Wednesday, 24 June 2020

Puppy Mail for You


Hello everyone, thanks for joining me today. I wanted to make a happy mail card using the new “Puppy Mail” stamp set from Gerda Steiner Designs.  I love to get happy mail (especially when it’s crafting supplies!), but a fun or loving note from someone is equally as good to receive and this stamp set is perfect for those cards.

Inside the card

I coloured my images with copic markers and added a few extra envelopes. I drew my envelopes but you could easily stamp the mailbox stamp again and use a few from the mail pile already on the stamp.

I then made a stencil from a “Bright Hearts” Memory Box die I had just received - in some happy mail! - and ink blended the hearts in Distress Oxide Worn Lipstick in the center of my card. Then I applied some Moonstone glimmer paste over this and let it all dry. Once it was dry I glued my puppy mail box image over the stencilled area and added a few extra envelopes to fill in the gaps. I stamped the sentiment just below my scene and the card front was done! 

I love it when there’s a little something extra on a card, so on the inside, I added the two puppy images. I stamped the “I woof you” sentiment on some white cardstock, and die cut it with a speech bubble die I had in my stash (I had to do a little partial die cutting to make it fit around the words).  I ran a black marker around the edges to highlight the speech bubble, and then glued it onto the inside of my card. This was a quick and simple card to make, and it’s just so nice to have some stamps in your supplies that can make a great “thinking of you” type of card. I hope you’ll give this card a try! 

Wednesday, 17 June 2020

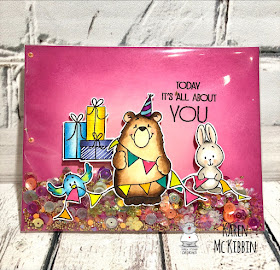
Birthday Bear Shaker card

Hello everyone, I’ve got a full size shaker card today made with a new stamp set from Gerda Steiner Designs called Birthday Bear. This is an easy card to make and it even uses a surprise material!


If you would like to see a video of how I made this card on YouTube,  please CLICK HERE


I coloured in my images with Copic markers and then applied some Glossy Accents to the banner flags, the bear’s hat and the balloon. Once that was dry, I fussy cut out my images.

On an A2 size piece of pink cardstock, I ink blended some Distress Oxide inks around the edges in Picked Raspberry and Seedless Preserves. Once the ink was dry, I used an anti-static powder over the whole card front. I find that helps the shaker material move better, and I wanted to heat emboss my sentiment on the card front. After deciding where my images would go, I stamped my sentiment and heat embossed it with clear embossing powder.

Now for that surprise material!  I save the cellophane envelopes that all our stamps and dies come in and use this for full size shaker cards. I cut out a rectangle from a cellophane wrapper that was approximately an inch wider than my card front all around. I centered this wrapper on my card front and then flipped them over. I used my tape runner to run a piece of tape along the bottom edge of my card front and then folded the wrapper up onto the tape and pressed it down. I repeated this with the 2 sides as well and trimmed down the excess wrapper in the corners. Now you have a pouch that is open at the top and can be filled.

The images on the front of the card can either be glued inside the pouch (in which case, adhere them before assembling the pouch), or they can be glued to the front of the pouch. I chose to glue mine to the front on the cellophane wrapper. I find it easier to do this before I fill the pouch because everything is flat at that point. Once they were glued down, I filled my pouch with shaker bits. Then, the top was adhered on the back with tape runner again and the corners trimmed. I don’t pull the last wrapper edge quite as tightly as the other edges, as this allows a bit of room for the shaker bits to move around freely.


I adhered the shaker pouch to my card base with my tape runner and then stamped my inside sentiment. I finally added the adorable bear arm with the balloon to the inside along the edge of the card, and trimmed off the excess. How much fun is that bear arm?!

This is a very quick and simple card, but it is so much fun to shake up and see all the inside bits move around. I hope you’ll give it a try!


Monday, 15 June 2020

Moody Unicorns Meet the Reveal Wheel

Hello again everyone! I’ve got another fun, interactive card today featuring the Moody Unicorns from Gerda Steiner Designs.  I’ve paired them up with the Reveal Wheel from Lawn Fawn to create rainbow coloured unicorns.


I’ve got a YouTube video of how I made this card if you CLICK HERE.  The video is probably the easiest way to figure out how to make this card, because it’s really not that hard but writing out an explanation makes it seem so much harder!

I started by watercolouring a circle of watercolour paper in a rainbow pattern. I made sure the paper I used was slightly bigger than the reveal wheel circle die, and had lightly pencilled the center and six segments. You could also colour this with markers or pencil crayons of course.  I think it might be fun to even emboss some stars or hearts on this to show through. Once the paint was dry, I die cut the larger reveal wheel circle from this paper.

I had also die cut the small inner circle and the add on square pocket pieces out of white cardstock. You won’t need to use the “jigsaw” piece that goes with the reveal wheel, as the horns and manes will become the “reveal” part of this pocket. I used a small brad to attach the small inner circle to my rainbow circle.
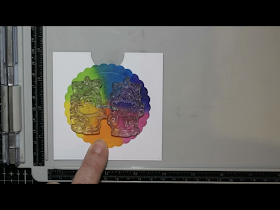
Position the stamps with the reveal wheel in place on the front pocket piece.
(Remove the wheel before stamping)

On one of the square pocket fronts, I stamped two of the unicorns in copic friendly ink. You need to be sure that these unicorns fit onto the rainbow circle, so I find it easiest to place them on the circle in my stamp positioner and then align them on the pocket front with the wheel showing just above the notch on the pocket. Then I remove the rainbow wheel and stamp them onto my pocket front. I left the unicorns where they were in my stamp positioner, and placed some scrap acetate over the pocket front. Then I stamped the unicorns again, but this time with Stazon black ink. I had to stamp them 2 - 3 times to get a good impression. I trimmed the acetate around the images next.

Carefully cut out the horns and manes. 

After colouring in the unicorns on the pocket front ( don’t colour the horns or manes), I used a sharp craft knife to carefully cut away the horns and manes on both unicorns. Try to turn the cardstock as you cut, to get a cleaner line. Then I placed glue around the cut edges and adhered the pocket front to the acetate piece, carefully aligning the images.


Next I applied foam tape to the back of the small inner wheel and removed the backing. Then I lined up the rainbow wheel behind the unicorns on the pocket front, making sure that it covered the manes and horns and was still slightly above the notch. Holding the wheel in place, I lined up the notches on the front pocket piece to the back pocket square and adhered them down.


 I like to place foam tape under the notched wheel to keep it flat - I just don’t remove the backing from these tape pieces. The next step is to place foam tape around the edges of the back pocket and I like to add some glue to the tape to make it easier to align. Then carefully adhere the front square pocket to the back, making sure the notches and edges are lined up. Now you have the fun part of the card assembled!  Make sure you spin the wheel to make sure it moves freely, and well, just for the fun factor!

For the card front, I die cut some cloud borders and a few clouds. I did some rainbow ink blending and glued down the cloud borders. I actually cut the borders in half and used them just at the edges of the card where they would show around the reveal wheel pocket. I added foam tape to the back of the reveal wheel pocket and adhered it to the card front. I then stamped my sentiments onto a couple of die cut clouds and added this to the pocket front, along with a few other clouds. And that’s it! A fun card that was actually not that hard to make. I think it would be fun to make it so the bodies of the unicorns changed colour instead of the manes.


I hope you’re having a great day, and that you’ll give this card a try. I think there are just so many possibilities for this card with so many stamp sets!

Tuesday, 9 June 2020

Flip Sider Puppy Mail

Hello everyone, I’ve got an interactive card today featuring the “Puppy Mail” stamp set from Gerda Steiner designs. I’ve used all the puppy images in this set and have made a flip slider card with them. I love how this set can be used for a happy mail card but also a thank you card for someone looking after a dog.


If you would like to see a YouTube video of how I made this card, please CLICK HERE.


I started by stamping out the images with Copic friendly ink and colouring them in with Copic markers. I made sure to space my images out when I stamped them, because I used the “Selfie Square” die from MFT to cut them out into flip cards. I also die cut the “Polaroid Shaker Frame” from MFT out of Neenah 80# cardstock, to create a 2.5” frame for the cards. If you have a set of square dies, you could just use these to cut the squares and frames. I coloured in the background of the flip cards with Copic markers and then the frames with coordinating markers. Next, I cut four 2.5” squares of cardstock to adhere the flip card to and glued the frame around it. This makes the flip card sturdier and hides the copic bleeding on the back.


To create the mechanism for the flip cards, I cut out a rectangle from Neenah 80# cardstock that measured 2 1/4” wide by 8 1/2” long. I also cut a smaller rectangle that was 1/2” x 4” long.


I creased the larger rectangle starting from the left edge at the 2.5” mark and each 1/2” after that up to, and including, the 4” mark. Then I used a bone folder to really crease these folds. They all fold in the same direction, but need to be well folded. I corner rounded the ends on the long side of this rectangle piece.

Then I glued the smaller rectangle in its center 2.5”, and adhered that to the top of the very end of the larger rectangle, centering it over the first 2.5” square.  This becomes the tab that holds the flip slider in place, and should be folded and creased down over the long rectangle piece.


Next, I used double sided tape to adhere my flip cards. The first one was applied to the 2.5” square, and each card after that was adhered to one strip of tape applied along each fold line. The remainder of this long rectangular piece folds underneath the flip cards and through the small tabs.


I die cut the word “Pull” and glued it to the corner rounded end of the slider mechanism. I also stamped some paw prints onto this end so it would add interest when pulled out.

I die cut a cover die for the front of my card and glued it to some blue cardstock. Then I applied double sided tape to the 2 small tabs and also some glue over the tape. I would recommend having these tabs already folded over the long pullout end before glueing them as it gets messy. Then I adhered the flip mechanism to the front of my card - the 2 small tabs are the only thing adhering the mechanism to the card front. Scary, I know, but it works! I let this dry under some acrylic blocks, and then attached my sentiment.


This sounds like a  complicated card, but it’s really not that hard to make and it’s super fun to play with. I really hope you’ll give it a try!