Hello again, there’s a new release at Craft Consortium called Belle Fleur. This is a beautiful collection of very elegant floral cardstock in neutral tones, stamps, ribbon, and other ephemera that all coordinate together. It’s perfect for those wedding, anniversary, engagement and feminine birthday cards. I’ve created a card today that has a see-through acetate window.
Friday, 28 January 2022
Belle Fleur Window Card
Wednesday, 26 January 2022
Rockin’ Birthday Card
Hello again and welcome! There’s a new release at Gerda Steiner Designs and I’ve chosen the You Rock stamp set to use on my card today. This is such a fun set to use for those younger people in our lives … oh, who am I kidding? It’s good for those older people too! So here’s the card I came up with.
It’s almost a one layer card too! I popped the snail in the front up on foam tape, so I think that means it doesn’t qualify as a true one layer card. I created the background by stencilling on my card front. I used the MFT Grassy Edges stencil and some Mowed Lawn Distress Oxide ink for the grassy section. I created a little hill for the main rock to sit on as well. For the sky, I used the Cloud Edger stencil from A Colorful Life Designs and some Cosmic Shimmer Colour Cloud ink in the Clear Day shade.
I used my Copic markers to colour in the images, and have listed them below if you’re interested. After fussy cutting everything out, I added some Glossy Accents to the sunglasses. I positioned all the characters on the front to determine my layout and where I wanted the music symbols to go. I then stamped on and clear heat embossed, the music symbols ( I did add some more music symbols from the Carol Kittens stamp set). Finally, I glued the characters down and popped the front snail up on foam tape before adhering him down. On the inside, I stamped the sentiment “Hope Your Birthday Rocks”. So another quick and easy card! Thank you so much for stopping by and I hope you are having a great day!
Copic Markers used:
Rocks - W2, W3, W4, W5
Snails - BV23, BV34, V20
Mouse - C3, C2, C1, C0, R00
Guitar - R39, R29, R35
Wednesday, 12 January 2022
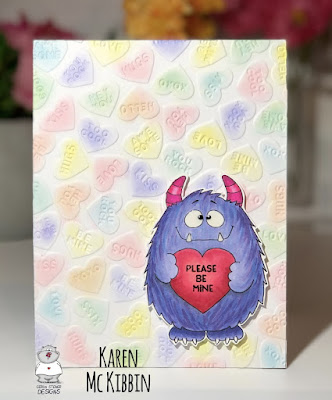
Monster Love Valentines Card
Hello and welcome! There’s a new release at Gerda Steiner Designs and I couldn’t decide which stamp set to play with for this post. In the end, I decided that since it was coming up to Valentines Day, I would go with the “Be Mine Monster” stamp set because who could say no to this cute little guy?
For the background, I used the “Conversation Hearts” embossing folder from Taylored Expressions to emboss the card front. Using a small circular brush, I added in some Distress Oxide ink to the hearts in Spun Sugar, Tumbled Glass, Shaded Lilac, and Squeezed Lemonade. Finally, I popped the monster up on foam tape and placed him on the card front in the lower right corner. Just a super quick and easy card to make. Thank you for stopping by and I hope you’re having a great day!
Copic markers used:
BV02, 04, 13, 23
RV17, 06, 04, 02
V15, B02
Heart - RV29, 25, 23


