Monday, 27 June 2022

Lovely Blossoms Hello Card


Paper Rose Studio Products:
Lovely Florals - Blossoms 18183, Hello Layered Die 18252

Other Supplies:
Copic Markers, Watercolours, vellum, clear embossing powder, Simon Says Stamp Fog ink, Neenah Solar Crest 80# cardstock

Hello everyone, welcome back!  I started this card by stamping the floral images onto Neenah Solar Crest 80# cardstock using the Fog ink.  I used Copic markers to colour in the images and then fussy cut them out.

For the background, I used some watercolour paints to create a corner of pinks and tried to let it fade out to white.  I wasn’t happy with how this turned out as the watercolour was darker than I wanted it to be.  To soften it, I attached a layer of vellum over the watercolour layer and wrapped it around to the back before attaching it with double sided tape at the back. This gave a much softer card front for the blossoms. I attached the blossoms as if it was a continuous branch across the page and popped a few of them up on foam tape for dimension.  

The Hello sentiment was cut three times from white cardstock and glued together.  I inked the top layer with Distress Oxide in Kitsch Flamingo before embossing it three times with VersaMark ink and clear embossing powders.  I love the glossy finish this gives it. The secondary sentiment is from the same stamp set, and I also stamped this onto white cardstock with the Kitsch Flamingo ink and heat set it with clear embossing powder before trimming it out.  Finally, I glued both sentiments in place at the bottom of the card.

Thanks for stopping by and I hope you’re having a happy, creative day.

Wednesday, 15 June 2022

Paper Rose Studio Etched Flowers Thank You Card


Paper Rose Studio Products:
Etched Flowers Die 25663, Little Swirls 6x6” Stencil 19724, Little Foliage 1 Die 21099, All Occasions Sentiment Sheets 22339, Hand Lettered Thanks Die 25606

Other Supplies - Acetate, Cosmic Shimmer Jamie Rodgers Glossy Glaze in Inspired Lilac, Cosmic Shimmer Pixie Sparkles in Flirty Sky, Gilded Plum and Fuchsia Rose, Cosmic Shimmer Sparkle Texture Paste in Chic Aubergine, Creative Expressions Sue Wilson Decorative Squares die CED4399, pearls, DecoFoil in Rainbow Shattered Glass

Hello and welcome!  For this card, I had a few elements that I knew would need to dry overnight, so I started with those first.  


For the acetate layer, I taped the Little Swirls stencil in place over my 6x6” piece of acetate.  I spread the Cosmic Shimmer Glossy Glaze over the entire stencil and used a palette knife to smooth out the application.  With the stencil still in place, I sprinkled on the Flirty Sky Pixie Sparkle powder quite liberally, and then spritzed it all with a few pumps of a water mister bottle.  I let that sit for a couple of minutes to be sure the water was activating the powder.  Then I removed the stencil and cleaned it up with water.  I left the acetate to dry overnight and once it’s dry, flip it over to see how beautiful and sparkly the bottom or “wrong” side is!

I also prepared the paper for the flowers the night before.  I used copy or computer paper for these, and placed about 4” wide strips onto an old metal cookie sheet.  I spritzed both sides of the paper with water, and then liberally sprinkled on the Pixie Sparkle powders in Gilded Plum and Fuchsia Rose.  I misted these quite liberally with a water mister to really get the powders activated, and then left them to dry overnight.  

For the leaves, on a scrap piece of white cardstock, I spread a thin layer of the Sparkle Texture paste and allowed that to dry overnight as well.  

The following day, I created a 6 x 6” card base.  I sprayed the front with a spray glue and attached the acetate, putting the stencilled side down against the front of the card.  I placed this under a heavy weight to allow it to dry.  I die cut the frame from white cardstock and glued this in place over the acetate.

Next, I die cut the flowers from the prepared computer paper, and the leaves from white cardstock, vellum and the cardstock covered with the Sparkle Texture paste.  I shaped the flowers slightly by pinching the tips and I used a round ball stylus on an old computer mouse pad to help shape the centres.  I glued the layers of the flowers together before attaching them to the front of the card with glue dots.  I used glue to add a small pearl to the centers of each flower.  Once the flowers were in place, I added in the leaves.  

The sentiment was die cut three times and glued together.  I foiled the secondary sentiment with my laminator, trimmed it down and added 2 or 3 strips of scrap cardstock to the back for dimension.  The sentiments were then glued to the front of the card,  There is really a lot of shine on this card with all the acetate, Pixie Sparkle powders and foiling, but it was hard to capture in a photo.

Thanks for stopping by and I hope you’re having a happy, creative day!

Happy Mail

Hello and welcome back!  Today I've got a quick and easy happy mail card that is perfect for sending off to family or friends as a little Hello, thinking of you type of card.  


I used the Puppy Mail stamp set from Gerda Steiner Designs and used Copic markers to colour in the two images that I used. I used a semicircular die to cut out the front cutout.  I don't have the details on the die I used as I didn't keep the packaging (it may have been from Craftin Desert Divas but they are no longer around), but any circular or semicircular die would work.  I then embossed the front with the Dappled Dots (EFPP-015) embossing folder from Creative Expressions.  I coloured the opened background on the card base with some Distress Oxide in Mowed Lawn and the sky with Cosmic Shimmer Colour Cloud ink in Clear Day.  I mounted the embossed card front on a layer of foam and attached it in place with glue. I then glued the images into the opening.  Finally, I stamped and heat embossed the sentiment onto white cardstock and cut it out.  I edged it with a little of the Clear Day ink before gluing it in place.

Thank you for stopping by and I hope you're having a great day!


Saturday, 4 June 2022

Pansy Thank You Card


Paper Rose Studio Products:
Etched Pansy Die 25666, Hand Lettered Thanks Die 25606, Sketchy 6 x 6” Paper Collection 25252

Other Supplies - Strathmore Bristol cardstock, Karin Brushmarkers, Prismacolour pencil crayons, Tombow Dual brush markers, Pinkfresh Studio Classic Edgers Border Dies, Clear embossing powder

Hello everyone, and welcome.  I love how realistic these Paper Rose Studio pansy die cuts are!  To create them, I die cut the pansies from the Bristol cardstock.  I scribbled the Brushmarker pens onto my glass mat and then used a damp brush to pick up the colour and apply it to the pansies.  I tried to follow some pictures on Google to get the colouring right.  Once the ink was dry, I went in with some pencil crayons  and the Tombow markers to deepen some of the colours around the centres where the extra purple coloured areas are.  To assemble the pansies, I creased along the fold lines on the main portion, pinching and folding the pleats as best I could.  I used glue to attach the centres and the extra petals, and then used a round ball stylus on an old computer mouse pad to shape the middle of the assembled pansy.

For the background, I used the Pinkfresh Studio border dies to cut the Sketchy paper, as well as white cardstock and a coordinating purple cardstock.  I attached the leftover bottom piece of the Sketchy paper to my card front along the bottom edge.  Then I layered the white and purple cardstocks so the scallops were aligned, and attached these over the top edge of the Sketchy paper.  For the top layer of the Sketchy paper, I attached some craft foam to the back of it for dimension, and then glued this down over the white and purple layers of cardstock.

The sentiment was cut three times and glued together. I then covered it with VersaMark embossing ink and sprinkled on some clear embossing powder before heat setting it.  I repeated this three times to get a really glossy shine on the Thanks. I attached the sentiment to the bottom of the card with glue.  Finally, I used glue dots to attach the pansies and leaves.

Thanks for stopping by and I hope you’re having a happy, creative day!

Wednesday, 1 June 2022

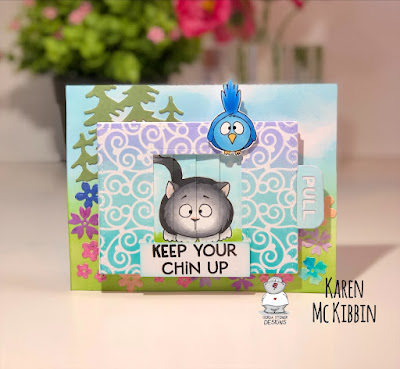
Chin Up Picture Changer Card

Hello again, I've got a picture changer card for you today.  Do you remember those? I've used a new stamp set from Gerda Steiner Designs called "What's Up" and had it change with one of the images in the All Cats stamp set.  Here's my card ...


The little bird perched on the front of the card is also from the What's Up stamp set.  I coloured all the images with Copic markers, before using the Lawn Fawn Magic Picture Die to cut them out.  After assembling the picture changer according to the instructions, I created the front coverplate by stencilling onto white cardstock using the Little Swirls stencil from Paper Rose Studio, and using Distress Oxide inks in Peacock Feathers, Salvaged Patina and Shaded Violet. 

For the background, I ink blended with Distress Oxide Mowed Lawn, and Cosmic Shimmer Colour Cloud ink in Clear Day.  I added in some trees that were diecut from green cardstock using the Alpine Trees die from Memory Box.  The flowers were leftovers from another card and are cut from the Spellbinders Petitie Floral Potpourri die set. Once the background was done, I mounted the picture changer on a double layer of foam and attached it to the background.  It's lots of fun changing the picture!

Thank you for stopping by and I hope you're having a great day!