Saturday, 27 August 2022

Paper Pieced Christmas Card


Supplies Used:  Paper Piece Rectangle Metal Cutting Die 21441, Christmas Stocking Metal Die Set 19508, Crisp Christmas A5 12pc Sentiment Sheets 19772, Stampendous Jewelled Gold Embossing Powder, Cosmic Shimmer Ultra Sparkle Paste in Frosty Sparkle, Nuvo Shimmer Pen, Copic Markers

Hello again everyone, I'm bringing you a little Christmas today!  I die cut the Paper Piece Rectangle die from white cardstock and carefully placed a piece of Glad Press 'N Seal on the backs of the diecut pieces to hold them in place while I coloured them.  I used Copic markers, all from the reds series, to colour them in.  Then I randomly applied the Ultra Sparkle Paste or Shimmer pen to a few of the sections and let them dry. 

I saved the white outline frame piece that was diecut with all the inset pieces, and positioned that on the card front with removable tape, making sure it was centered. Then I inset and glued all the coloured pieces into the frame, which was quite simple since the Press 'N Seal had held them all in place. Once they were in place, I removed the outline piece that had been temporarily positioned.  You could of course, glue it in place too, but I wanted the no frame look for this card.

I used an oval shape to trace around the sentiment and then fussy cut it out.  I went around the edges with a VersaMark ink pad, just lightly leaving a little ink.  I sprinkled on the Jewelled Gold embossing powder and heat set it.  I used a VersaMark pen to put some ink on the stocking die cut and sprinkled on the same embossing powder, which I also heat set. I used a gold brad to attach the stocking to the sentiment. I cut two more layers of cardstock to place behind the sentiment to add some dimension.  Then I glued it in place on the card.  Finally, I added a few gold pearls to the stocking.

Thanks for stopping by and I hope you're having a happy, creative day!

Monday, 15 August 2022

Rainbow Poppies Hello Card

Supplies Used: Little Etched Butterflies Metal Cutting Die 25609Little Foliage 1 Metal Cutting Die 21099, Banner Trio Metal Cutting Die 25921Rainbow Poppies 6x6 Paper Collection 25600Hello Layered Metal Cutting Die 18252, Cosmic Shimmer Pixie Sparkle Powders in Flirty Sky, Heavenly Hues, Blue Wish Teal Marine, Gilded Plum, Fuchsia Rose and Sandstorm.

Hello and welcome back! I started this card by colouring some watercolour cardstock with the Pixie Sparkle powders.  These powders react with water and you can get different looks depending on how much water you add.  I tended to use quite a bit of water to make the colours blend.  I used the three tags that are in the die set, and tried to co-ordinate them with the colours on the patterned paper.  On the first tag, I used the Flirty Sky and Heavenly Hues powders.  The second tag has Blue Wish and Teal Marine powders, and the third has Gilded Plum and Fuchsia Rose.  I also saved some extra coloured cardstock for the butterflies.  I coloured the cardstock first and let it dry before diecutting out the tag shapes.

I also diecut two each of the butterflies from the same cardstock, so they could have some dimension.  The yellow butterfly was done on the watercolour cardstock using the Sandstorm powder.  To help give the wings more dimension, I used Jennifer McGuire's idea of cutting a piece of acetate (approximately 1/2" wide by 3" long), and creasing it down the middle on the long edge. I then put a strip of 1/8" double sided tape along each long edge.  Then I cut crosswise pieces that fit on the wings on each side of the body. I attached these strips to the bottom butterfly so that the creased edge ran along the side of the body.  Then I applied a thin bead of glue along the body and antennae, removed the backing paper from the acetate and attached the second butterfly on top.  The acetate ensures that while the butterflies lie flat in the envelope, they pop up for that extra dimension when out of the envelope.  It's hard to explain but please see the somewhat out of focus pictures ( my camera didn't want to take close-ups!).

1/2" wide strip of acetate folded in half with double sided tape along the edges.

Two thin acetate strips applied along the body with creased edge against the body.

Second butterfly glued along the body and attached to the acetate.


For the Hello sentiment, I die cut it three times from white cardstock, and layered these together with glue to create a chipboard-like sentiment.  I used Distress Oxide inks (Salvaged Patina, Shaded Lilac, Kitsch Flamingo, and Mustard Seed) to colour in the top layer.  Once the ink was dry, I clear heat embossed it about three times to get a very glossy look. 

To assemble my card, I cut a piece of the Rainbow Poppies paper to fit on my card front.  I staggered the three tags along the top edge and trimmed them down with scissors once I had them arranged in place. I die cut from white cardstock, one each of the three foliage dies and glued these onto the tags along with the butterflies.  Finally, I glued the sentiment in place just above the poppies.

Thank you so much for stopping by and I hope you’re having a wonderful day! 


Wednesday, 10 August 2022

You Got This!

Hi everyone, I've got an encouragement card for you today.  I've used the Happy Fall stamp set from Gerda Steiner Designs for this one and it has a very summery feel to it.


The images are all from the Happy Fall stamp set, and I've coloured them with Copic markers before fussy cutting them out.  

I used the "So Many Squares Panel" die from Your Next Stamp for the overlay.  It actually cuts a grid of twelve squares, but I cut a few of them out with scissors to allow my pictures and sentiment to fit. 

I ink blended the background using my now favourite summer colour combination of Distress Oxide Mowed Lawn and Cosmic Shimmer Colour Cloud ink in Clear Day.  I masked off the outside area of the card before ink blending.

I stamped and clear heat embossed the sentiment so it would fit in one of the openings of the overlay diecut.  Then I attached the kite with the string to the back of the overlay before gluing it into place on the card front.  Finally, I popped the little squirrels up on double sided foam tape before attaching them in place.  I love how happy those squirrels are!

Thanks for stopping by and I hope you're having a happy, creative day!

Thursday, 4 August 2022

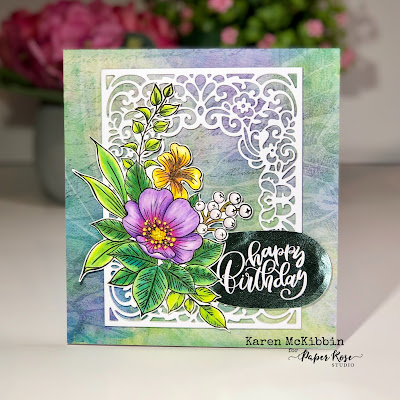
Floral Happy Birthday Card


Supplies Used:  Hayley's Bouquet Clear Stamp 25240Spring Floral Frame Metal Cutting Die 21054Sketchy 6x6 Paper Collection 25252Big Sentiments 1.0 A5 12pc Sentiment Sheets 22336, copic markers, yellow Prills (flower center), Minc Reactive Foil in Mint.

Hello everyone and welcome back!  For today's card, I started by stamping the floral image onto some Neenah 80# Classic Crest cardstock in Solar White, using a Copic marker friendly black ink (I used Gina K Amalgam ink).  I coloured the image in and then added some yellow Prills to the centre of the purple flower.  The Prills just add a great 3D effect, but you could also use Copic markers and some Glossy Accents to get a similar effect.  Once it was dry, I fussy cut the image out.

I cut the Spring Floral Frame three times from white cardstock and glued them together for dimension.  My card is 5.5" x 6" because I didn't want to cut too much off that beautiful Sketchy paper.  But that allows the floral image and the sentiment to hang off the side of the background diecut. So after adhering the trimmed down piece of Sketchy paper to my card front, I glued the layered background die over the center.  

I lightly traced an oval shape around the black version of the sentiment and fussy cut it out.  I foiled the sentiment with the Mint foil in my laminator, running it through two or three times before peeling off the foil.  I'm not really sure if that helps to run it through so many times, but it makes me feel better! :-)

Finally, I glued the sentiment to the background diecut on the card front, and popped the edges up on foam tape.  I then glued the floral image over the background diecut, and also put some foam tape under the edges that extended past the diecut.

I hope I've given you a little inspiration today, and thank you for stopping by!