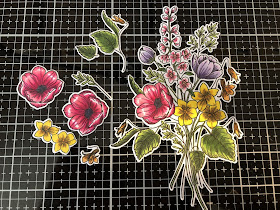
I received my Mother’s Day mail order this week and the first thing I wanted to try out was this amazing Bouquet Builder stamp and die set from Waffle Flower. This is a BIG bouquet of flowers and there are several additional flowers and leaves that can be added into the bouquet. The die that comes with the set is amazingly intricate and actually cuts out the little bits between the stems and leaves.
I decided to stamp and colour this bouquet using 5 different methods but to try to keep the colours as similar as possible. I also made all the cards into thank you cards.
This first card was made using the Zig Clean Colour brushes. I applied a little of the markers to the darkest areas of the flowers and then used a wet paintbrush moving from the lightest areas into the areas where I had applied the markers. Since these markers are filled with watercolour, the water helps to move the colour into the unpainted portion of the flower. I embossed the background panel with a Kaisercraft Striped embossing folder, and mounted my bouquet on foam tape and applied it to the panel. I used a Nuvo shimmer pen to add some shine to all the flowers.
Card 1 - Zig Clean Colour
The second card was done with Copic markers. This card has the most vibrant colour of all the cards. I die cut the background frame and ink blended it with Distress Oxide Picked Raspberry. I tied a little bow around the stems and added a small tag stamped with Thank You. I added in extra flowers from the set so it’s quite a busy bouquet!
Card 2 - Copic MarkersCard 3 - Prismacolour Pencil crayon
The fourth card was done in watercolour and I will apologize right away to all the true watercolour artists out there! This is my weakest medium for colouring but I was determined to give it a try. I did a no-line technique for this one and used my Migellin Mission watercolours. The background panel is a soft minty green cardstock I had in my stash. I stencilled on some Nuvo Moonstone glimmer paste and this panel has a beautiful sparkle to it. I love this Nuvo glimmer paste for stencils! I then die cut the bouquet and adhered it to the background on foam tape and added a little ribbon and sentiment.
Card 4 - Migellin Mission watercolour
The final card is actually just a Thank You notecard and I just embossed the bouquet on white cardstock using Stampendous Pearlustre Moonstone embossing powder I really like this gold powder as it is not a brassy gold.
Card 5 - Stampendous Pearlustre Moonstone
So there you have it, my first post! If you have any suggestions for me, please pass them on. I'm so totally new to all this and would appreciate feedback.


WOW! Not only are your cards gorgeous, but you've shared fabulous details on your techniques! Engaging, enlightening and inspiring. I have one tip: CARRY ON BLOGGING! You're a talented designer, passionate about creating, with a real flair for writing!
ReplyDeletehugs~carol
I realized I should have replied to you in the blog rather than email - steep learning curve here! But still, I really do appreciate your kindness and all your encouraging words! Thank you so much!
DeleteWow.. now that's an amazing post Karen! Such details and amazing photos. Love the way you coloured with different markers and show us how pretty that stamp would look in each way. Love the heat embossing too. I need to follow you now.
ReplyDeleteThank you so much! I really appreciate your kind comments and encouraging words! Especially coming from a seasoned pro such as yourself!!
Delete