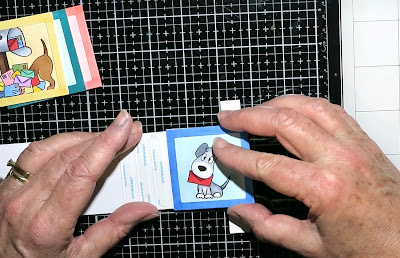
If you would like to see a YouTube video of how I made this card, please CLICK HERE.
I started by stamping out the images with Copic friendly ink and colouring them in with Copic markers. I made sure to space my images out when I stamped them, because I used the “Selfie Square” die from MFT to cut them out into flip cards. I also die cut the “Polaroid Shaker Frame” from MFT out of Neenah 80# cardstock, to create a 2.5” frame for the cards. If you have a set of square dies, you could just use these to cut the squares and frames. I coloured in the background of the flip cards with Copic markers and then the frames with coordinating markers. Next, I cut four 2.5” squares of cardstock to adhere the flip card to and glued the frame around it. This makes the flip card sturdier and hides the copic bleeding on the back.
To create the mechanism for the flip cards, I cut out a rectangle from Neenah 80# cardstock that measured 2 1/4” wide by 8 1/2” long. I also cut a smaller rectangle that was 1/2” x 4” long.
I creased the larger rectangle starting from the left edge at the 2.5” mark and each 1/2” after that up to, and including, the 4” mark. Then I used a bone folder to really crease these folds. They all fold in the same direction, but need to be well folded. I corner rounded the ends on the long side of this rectangle piece.
Then I glued the smaller rectangle in its center 2.5”, and adhered that to the top of the very end of the larger rectangle, centering it over the first 2.5” square. This becomes the tab that holds the flip slider in place, and should be folded and creased down over the long rectangle piece.
Next, I used double sided tape to adhere my flip cards. The first one was applied to the 2.5” square, and each card after that was adhered to one strip of tape applied along each fold line. The remainder of this long rectangular piece folds underneath the flip cards and through the small tabs.
I die cut the word “Pull” and glued it to the corner rounded end of the slider mechanism. I also stamped some paw prints onto this end so it would add interest when pulled out.
I die cut a cover die for the front of my card and glued it to some blue cardstock. Then I applied double sided tape to the 2 small tabs and also some glue over the tape. I would recommend having these tabs already folded over the long pullout end before glueing them as it gets messy. Then I adhered the flip mechanism to the front of my card - the 2 small tabs are the only thing adhering the mechanism to the card front. Scary, I know, but it works! I let this dry under some acrylic blocks, and then attached my sentiment.
This sounds like a complicated card, but it’s really not that hard to make and it’s super fun to play with. I really hope you’ll give it a try!


No comments:
Post a Comment