Wednesday, 22 May 2024

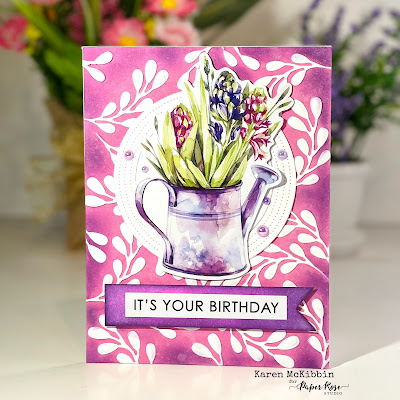
Hyacinth Birthday Card

Hi everybody, today I've got a floral birthday card for you.


 Supplies used: Violet Garden Die Cuts 28387, Little Foliage 1 Metal Cutting Die 21099, All Occasions Sentiments A5 12pc Sentiment Sheets 22339, Austin Circle Frame Metal Cutting Die 30225.


This was one of those quick and easy cards. It's an A2 sized card that I created using an A2 sized card front.  I ink blended all over the card front first in pink, and then with some purple around the outside edges.  

I die cut the leaves from the Little Foliage die set multiple times from white cardstock and adhered them randomly over the card front.  Then I cut the outer ring of the Austin Circle from white cardstock and glued that down to the upper portion of the card front.  I added in the center circle and then placed the Violet Garden die cut over the center of the circle.

For the sentiment, I used the same pink and purple inks to create the banner tag, and mounted the sentiment sheet on top of it. I trimmed the banner tag down to fit around the sentiment and cut out the fish tail ends. I mounted the banner on foam tape and adhered it below the center circle.  Next, I added a few pearls around the central image. 

At this point, I felt I didn't have quite enough purple tones on my card, so I went back around the edges with a small brush and added a bit more.  This was quite tricky because of the white die cut leaves, so I would highly recommend getting it right before adding the leaves! 😄

Thank you for stopping by today!

Sunday, 12 May 2024

Window Flowers Birthday Card

Hello and welcome back!  My card today has loads of texture - it actually feels like a stucco wall.  Here's a look at it.


 Supplies used: Window With Bricks Metal Cutting Die 22501, Rainbow Garden Florals Embossed Die Cuts 31563, Rainbow Garden Butterflies Embossed Die Cuts 31476, Birthday Layered Metal Cutting Die 18297. Liquitex Modeling Paste, Catherine Pooler inks in Ginger and Terracotta.

This is an A2 sized card so 4.25" x 5.5".  I used a card front that measured the same as the card base, and started by applying the inks randomly across the paper, trying to get a good blend of the inks.  Once I was happy with the ink blending, I die cut the window out of the upper part of the card, and saved the little brick pieces and the arched interior frame.

Next, I mixed in the same inks into a little of the modelling paste and applied that over the card front.  I wanted a stucco looking finish, so I used a spatula and after spreading the paste all over, used a lifting kind of motion to get the paste to lift up in a stucco type appearance.  It was really quite easy to get that look, and it didn't take long for the paste to dry.  It was a little light in colour after it dried, so I did some more ink blending over it with foam applicators to get the right colour. 

For the window, I used a scrap of thick acetate, and glued the ink blended frame onto it.  I also die cut the window portion of the die from white cardstock, and glued this inside the coloured frame on the acetate.  Then I fussy cut the window out of the acetate, but left a border on the left straight edge of the window.  This was only about 1/4" to 1/2" wide, just enough to allow me to glue the window to the back of the card front.  I folded the border to the back and pinched along the fold before attaching it to the back of the card front.  I then glued the whole card front with the attached window to my card base and used acrylic blocks to let it set up.

I added scrap strips of cardstock to the back of some of the bricks and to the long piece under the window, and then randomly glued these back in place.  I glued the beautiful Rainbow Garden Floral image into the window opening, and attached the Rainbow Garden butterfly.  The birthday sentiment was cut from gold mirror cardstock once and twice from white cardstock and layered together before gluing in place on the card front.  The "Happy" sentiment came from the Happy Birthday foiled sentiment sheets set.  I wish that you could feel the "stucco" on this card as it really is realistic!

Thank you for stopping by and I hope you're having a great day!


Friday, 3 May 2024

Gnomes, Gnomes and more Gnomes! *VIDEO*

Hello again and thanks for stopping by.  I've been playing with the Mother's Day Gnomes Embossed Die Cuts 31872 from Paper Rose Studio and have a trio of cards to share today. 

Pendulum swing card


Inside pop up


Honestly, I had so much fun with these gnomes and could have just kept playing with them.  Aren't they just adorable gnomes?!  The first card has a pendulum swing mechanism on it, so the gnome swings sideways on his swing.  The second card has an inside pop up, and the last card doesn't have any interactive component.  I've created a video for you, showing how I made all three cards, and I hope you will come join me there for more details. 

PLEASE CLICK HERE to watch the video.

Thank you for stopping by and I hope you're having a great day!