Wednesday, 17 November 2021

Namasleigh Christmas Circle Spinner Card with Center Shaker *Video*

Hello and welcome back! My card today is a circle spinner style card with a central shaker. I’ve used the fun, new Namasleigh stamp set from Gerda Steiner Designs for this one. 
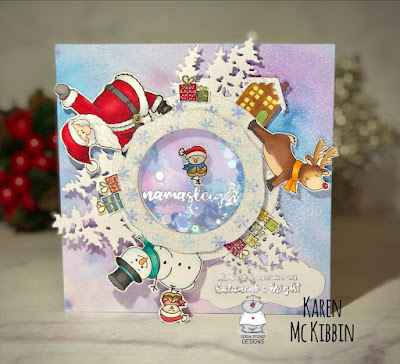


The outer ring on this 5 1/2” square card will spin around to add an interactive element and of course, the card can be shaken to move the shaker bits in the middle. There are no special dies required for this card other than a few circle dies in different sizes.  I’ve made a video for you to show you how I made this card, but I have to confess, I may have switched up some of the stamps and the Reindeer and a Tree stamp set from Gerda Steiner Designs may be involved! Here's a sneak peek at what the card in the video looks like.


If you would like to see how I made this card, PLEASE CLICK HERE.
 
Thank you so much for stopping by and I do hope you're having a great day!


Wednesday, 3 November 2021

A Nutcracker Christmas

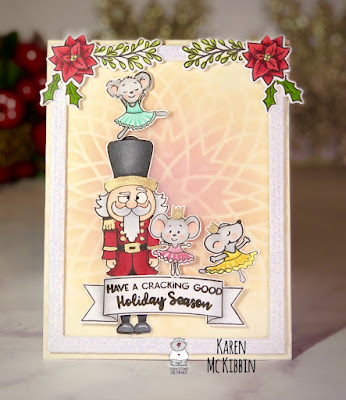
Hello and welcome back! I’ve got a Christmas card to share today that was made with a new stamp set from Gerda Steiner Designs called “The Nutcracker”. Those dancing mice are just so sweet and the look on the Nutcracker is priceless! 


I started by creating the background.  On yellow cardstock, I used the Captivating Mandala stencil from My Favourite Things and blended on some Distress Oxide ink in Worn Lipstick and Dried Marigold. I added a layer of vellum over top of this as I felt the stencilling was too distracting behind the images and the vellum softened it a little bit.  

I die cut a frame from white cardstock 4 times and glued 3 of these together to add some height. On the last diecut, I added some Tonic Moonstone Glimmer paste for a bit of shine, before gluing it to the other frames. 

I added in a few leaves and poinsettias that came from a Hero Arts “Stocking Bouquet” stamp set and placed these onto the frame. 

I used copic markers (listed below) to colour the little mice and Nutcracker images. I used a gold metallic marker to add in the gold elements on the Nutcracker and the crowns on the mice. I arranged the images onto the background and put the sentiment up on foam tape as well as the mice in pink and green. Those mice are just so cute! 

Thank you so much for stopping by and I hope you’re having a fun, creative day! 

Copic markers used: 

Nutcracker - R39, R29, R35, R20, R00, N8, N6, N4, E000, E00, C2, C1, C0
Mice - N2, N1, N0, R20, R00
Yellow dress - Y19, Y08, Y02
Green dress - G00, BG32, BG11
Pink dress - R85, R83, R81


Wednesday, 20 October 2021

Namasleigh Christmas Card with *Video*

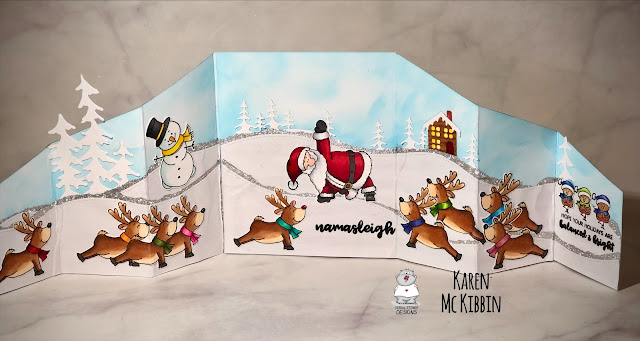
Hello and welcome back! I’ve got a fun Christmas card today that features a brand new Gerda Steiner Designs stamp set called Namasleigh.  I love the idea of the reindeer and Santa getting ready for their big day by doing some yoga together, and even the birds and snowman got in on it!  To fit all these images in (because I had to include all the reindeer), I’ve made a double zig zag card. When the card is folded down, it measures 5” x 4 1/4”. But when it’s opened up, it’s over 16” wide! So there’s lots of room to fit all those images. 

Front of the card when closed with an acetate belly band. 


The inside of the card when opened. 

I’ve made a video for you to see how this card was made.  If you are interested in seeing it, PLEASE CLICK HERE.  Thank you so much for stopping by and I hope you’re having a great day! 

Wednesday, 6 October 2021

Squirrels and Gourds Birthday Card

Hello again! I have another interactive card today that uses the Lawn Fawn Swish ‘N Pop pull tab die and I’ve paired it with the new “Gourds” and the “Happy Fall” stamp sets from Gerda Steiner Designs.  The gourds just make me smile and the squirrels are so cute, so I hope you don’t mind me doing a similar card again.  Here’s a look at the card before pulling the pull tab and after pulling it  


I really wanted the squirrel on the log to disappear as if he was scared by the talking gourds and then reappear hanging upside down in the tree, but I just couldn’t figure out how to make that happen.  So instead, the second squirrel appears from the tree. 

I coloured all the images in with copic markers and cut them out. The trunk of the tree is from an Elizabeth Craft die set just called “Tree”. The leaf canopy was made by adding some Pixie Sparkles (in Copper Splash and Red Oxide) from Cosmic Shimmer, to a piece of white cardstock, and lightly spritzing with water to activate the powder. After it was dry, I added a little Distress Oxide ink in Mustard Seed to get a deeper yellow colour. I freestyle cut out the leafy shape. 

The grass was made by ink blending with Distress Oxide inks in Mowed Lawn and Peeled Paint and then I die cut it with a grassy border that is in the same Tree die set used for the tree. For the sky background, I used the Cloud Edger stencil from A Colorful Life Designs and some Colour Cloud ink in Clear Day from Cosmic Shimmer. 

My card is actually a 5 x 7” card, so to use the Swish ‘N Pop die, I had to extend the pull tab by doing some partial die cutting on the pull tab. I also modified the assembly in order to make the hanging squirrel appear from the left. Here’s how that looks:


Basically, I’ve reversed which hole the pull tab is attached to, in order to make it swing up from the left. I’ve added double layers of foam tape along the bottom, and wherever else I could to anchor the grassy border without interfering with the mechanism. Once I had the mechanism in place and adjusted to allow the second squirrel to hang down, I attached the grassy border and then the tree and remaining images. 

I stamped and heat embossed the sentiment on a speech strip and adhered it above the gourds. I also stamped the inside sentiment which is from the Gourds stamp set. And then of course, I had to play with the card and watch the second squirrel come out! 

Thank you so much for stopping by and I hope you’re having a great day! 


Wednesday, 22 September 2021

Oh My Gourd Birthday Card

Hello again and thank you for stopping by. I’ve got a fun, interactive card today that features a new stamp set from Gerda Steiner Designs called Gourds.  I would like to point out that I made my card say “It’s Your Birthday” on the inside, but it could just as easily have said “It’s Halloween”, as that sentiment is also in the set. Here’s a look at the card:


I started by stamping and copic colouring the adorable gourds and some of the ghosts from the Ghosts stamp set. I love that with both of these sets, there are so many images with different expressions to choose from.  I meant to write down the copic markers that I used but I think I was too excited to colour the images and forgot, so I do apologize. 

I started by stamping the inside sentiment onto my card base, as I usually forget to do this while it’s easy to do.  On the front of the card, I used a piece of cardstock from the Happy Haunting collection from Craft Consortium for the background, but you could just as easily create an ink blended background.  I added a little Nuvo shimmer pen to the moon and stars. The next step was to use the Swish ‘n Pop Pull Tab die set from Lawn Fawn to add the interactive element on this card. I used the die as instructed by Lawn Fawn with the one exception that I modified it to allow me to have two ghosts swing up. To do that, I added a small strip of packaging acetate with double sided tape, to the long die cut arm. Here’s a picture of what that looked like to help make it clearer. 


I played around a little with the placement of this second ghost to be sure he would start by being hidden behind the tree and end up above the gourds. It really just meant I needed to add some bulk to the tree so it would hide the second ghost. The tree is from an Elizabeth Craft Tree die set and I used a cloud die I had to cut out some of the bushy leaves. I also stamped and cut out a few extra ghost faces to have them hiding in the tree. 

To cover the interactive mechanism, I used a border die to cut out a black foreground for the gourds to sit on.  I stamped the sentiment along the bottom and white heat embossed it. Next, I used a double layer of foam tape to pop up this layer onto the card front, and was careful to make sure I didn’t interfere with the movement of the mechanism. Finally, I attached the tree, again making sure the ghosts were hidden in the starting position. I was able to add some double layers of foam tape in the top right hand corner to help support the tree without disrupting the mechanism. Then I glued the gourds in place. Finally, I die cut the pull tab cover from a scrap of the background cardstock and adhered it with glue to the pull tab.  Then all that was left to do was to play with the pull tab and watch the ghosts come out! 

Thank you so much for stopping by and I hope you’re having a happy, creative day! 


Wednesday, 8 September 2021

Little Reindeer Christmas Card

Hello again and welcome! I have a Christmas card to share today, and I do hope it’s not too early for you. It features the sweet “Little Reindeer” from Gerda Steiner Designs and he seems to have got himself a little tangled up in the Christmas lights. 


I coloured the reindeer image with copic markers and then added glossy accents to all the lights and ornaments before setting it aside to dry.  While it was drying, I created the background by die cutting two borders of snowflakes from a Crafters Companion die set called Joyful Snowflakes. Although you can’t see it in the photo, I spritzed these with some Sheer Shimmer craft spray in Sparkle.  I rotated one panel to go across the top of my card front and placed the other along the bottom edge.  I die cut 5 layers of the circular Paper Rose Geo Mandala from red cardstock and glued these together.  I used the same red cardstock for the sentiment, which is from the “Reindeer and a Tree” stamp set, and white heat embossed the sentiment.  Finally, I glued the mandala circle to the front of the card and popped the reindeer up on foam tape inside the circle. The sentiment is also on foam tape.  So another quick and simple card today!  

Thank you for stopping by and I hope you’re having a great day!