Sunday 21 May 2023

Welcome to the Neighbourhood Card

Hello everyone, I've got a Welcome to the Neighbourhood card to share today, but it could just as easily have been a new home style card.

Paper Rose Studio Supplies used: Bird Houses Metal Cutting Die 21210, Tree of Love Metal Cutting Die 28825, All Occasions Sentiments A5 12pc Sentiment Sheets 22339, Watercolours - Sublime 12x12 Paper Collection 26440

I started my card by ink blending in a light blue on the card front, and just left some areas in white to look like clouds.  

Next, I die cut the bird houses from some of the watercolour papers and also from white.  I also cut several of the birds from white cardstock and used Copic markers to colour them in.  I coloured them all the same except for the one purplish bird so it would look like he was the newcomer to the area.  I feel I have to point that out as it doesn't seem terribly obvious to me!  :)

The tree trunk was also cut from white cardstock and I used Copic markers to colour it in.  I cut the leaves from the watercolour papers. The grassy border was also freestyle cut from the watercolour papers and I thought it had the perfect grassy look. 

To assemble the card, I started by gluing the tree in place and adding the leaves.  Next I added the grassy border, and then the birdhouses.  Finally, I added the birds and the sentiment which I popped up on foam tape. 

Thanks for joining me again today!


Friday 12 May 2023

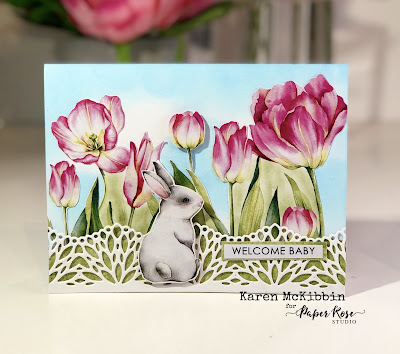
Welcome Baby Card

Hello and welcome!  Today I've got a baby card to share with you, as I thought the bunnies in the Garden of Hope collection were sweet enough to use in a baby card.


 Paper Rose Studio Supplies:  29458 Garden of Hope E 12x12 Paper, Layered Pinwheel Lace Border Metal Cutting Die 20973, All Occasions Sentiments A5 12pc Sentiment Sheets 22339 .


To create this card, I did some ink blending on the card front, using a light blue ink and just leaving little white areas for clouds. I fussy cut out the bunny and the flowers from the Garden of Hope papers.  Where there was white cardstock showing around the stems, I lightly ink blended some Catherine Pooler ink in Eucalyptus around the stems.  I glued the flowers down to the ink blended background, and popped the center flower bud on foam tape before adhering it.  

I die cut the Pinwheel border from white cardstock twice, and glued these together for dimension, using a spray glue.  I used the same Eucalyptus ink to colour a piece of white cardstock to put behind this border, as it helped disguise the fact that the flowers didn't quite reach the bottom. I glued all this in place at the bottom, and then popped the bunny up on foam tape and adhered him in place.  Finally, I used the same ink to make a mat for the sentiment and then glued it in place over the border.

Thank you for joining me today and I hope you're having a great day!


Tuesday 2 May 2023

Peek A Boo Shaker Cards *VIDEO*

Hello again,  I've got a couple of Peek A Boo shaker cards to share with you today.  These are fun shaker cards to make because you can have a little surprise inside the card for the recipient.  Here's a look at the first of my cards...


And here is the second card ...


Paper Rose Studio Supplies Used:  28477 Elodie Flower Building Die, 19499 Clear Crystal Mix, Bee Happy 12x12 Paper Collection 27706, Black & White A5 12pc Sentiment Sheets 19023, Cracked 6x6" Stencil 19298, Stitched Rectangles Metal Cutting Die 16575,  Birthday Layered Metal Cutting Die 18297, Hand Stitching Coverplate Metal Cutting Die 26020.  Other supplies: Heartfelt Art Foam Paper or Foamiran sheets, Shrink plastic, gold mirror card.


So you can see I've added some fun sentiments inside, but it could just as easily have been a bigger picture or other embellishments.  I've made a video for you showing how I made these cards, so if you want more details, please CLICK HERE.

Thank you for stopping by, and I hope I've given you a little inspiration today!