Friday 22 March 2024

Thankful for You Card

 Hello again!  Today I've got a sweet little card using a fairly new stamp set from Paper Rose Studio.


 Paper Rose Studio supplies used:  Friendship Mouse Clear Stamp 31341, Nesting Hearts Metal Cutting Die 28813, Splat Nesting Metal Cutting Die 19145, Forest Trip 12x12 Paper Collection 26629, All Occasions Sentiments A5 12pc Sentiment Sheets 22339.

I started this card by stamping and colouring in the little mouse image on some white cardstock.  I coloured it in with Copic markers and then added a little Nuvo Shimmer pen to the raindrops.  Once that was dry, I went over the raindrops with Nuvo Crystal Glaze to give them a wet look. 

I just happened to have the Forest Trip papers out on my desk from my last set of cards, and I had a scrap that was perfect for the card front.  It had a rather watery look to it.  I used the largest of the Splat dies to cut from the center of this paper.  I trimmed the paper down to be 5 1/4" x 4" as I wanted to have a white border around my card.  I glued the coloured mouse image to the front of the card and then adhered the blue card front on top of it.  

I cut three hearts from white cardstock, layered and glued them together, and then attached the sentiment to it in a rather haphazard way.  I used the Nuvo Shimmer pen to add some shimmer over the front of the heart. I went around the edges of the heart with a little blue ink to help define the edges.  Then I covered the heart with the Nuvo Crystal Glaze.  The heart is much whiter in real life and looks more like a puffy embellishment. Once the glaze was dry, I glued the heart in place to the front of my card.

Thank you for stopping by and I hope I have been able to give you a little inspiration today!

Tuesday 12 March 2024

Masculine Golf Cards

Hello again and welcome back! Today I've got a trio of masculine golf cards.  Where I live in Canada, we are right beside the Rocky Mountains and the Forest Trip paper collection by Paper Rose Studio looks just like the area around me.  My husband and four sons all like to go golfing in the mountains, so these cards were just meant to be! Here's a look at the cards I made ...


For the first and second cards, I chose sections of the 12 x 12" paper that I wanted to use, and trimmed them down to be 5 x 7" each.  I used a little Distress Oxide ink in Mowed Lawn to shade the bottom area in green.  I die cut from white cardstock, about nine of the golfer images.  I stacked three layers of the golfers for each card.  On the middle card, I used Copic markers to colour in the golfer image.
 
For the first card, I attached the mountain scenery paper to the front of a 5 x 7" card base.  Then I trimmed the right hand edge of the card front by 1/2".  I attached one of the decorative strips that come on all the Paper Rose Studio papers to the inside of the card along the right hand edge.  I had added a little Distress Oxide ink in Peacock Feathers to the strip before attaching it.  Then I glued the stacked layers of the golfer and his golf ball in place.  I apologize to any golfers out there if the golf ball is not in the right spot!   Finally, I mounted the sentiment strip on foam tape and adhered it above the golfer.

For the second card, after inking up the bottom in green, I trimmed my panel down to be just under 5 x 7" and mounted it to a 5 x 7" card base.  I adhered the golfer and his golf ball on the front, and then just added the sentiment underneath him, again on foam tape.

For the third card, I used more of the paper strips on the bottoms of the Forest Trip papers.  I laid them in a random pattern on a scrap piece of white cardstock and glued them in place.  Then I trimmed off the side edges and used these to go across the top and bottom of my collage.  This card measures 5 1/2 x 6", so its a bit of an unusual size.  I attached the Forest Trip paper to the top of my card front and then added my collage piece at the bottom.  I glued the golfer in place on the right.  The Celebrate die was cut three times from white cardstock and glued together.  Finally, I glued it in place to the left of the golfer.

So that was three fairly quick and easy masculine cards, and I'm thrilled to have them in my stash now. Thanks for stopping by and I hope you're having a happy, creative day!


Friday 8 March 2024

Card Makers Success Summit Supply List March 2024

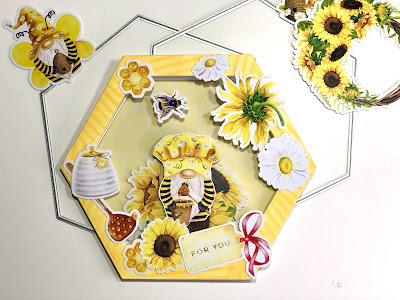
Here is a list of the supplies I have used in the two cards created in my video:
Hexagon Card

Hexagon Dies - Scrapbook.com.    sbc-shapes-10

Spellbinders Mini Everyday Sentiments GLP-260 

Simon Says Stamp Mod Stripe Stencil ssst121427

Paper Rose Studio Bee Happy Die Cuts - 27703

Paper Rose Studio Bee Happy 12 x 12" Paper Collection - 27706


Circle Card

Creative Expressions Noble Double Stitched Circle Dies - CED5528 

Cricut Cuttlebut Polka Dots Embossing Folder

Pink Ink Designs Golf Mouse Stamp PI131

High Hopes Rubber Stamps J026 Golf Bag with Clubs

High Hopes Rubber Stamps J025 Golf Cart

Beacon 3-In-1 Craft Glue

Saturday 2 March 2024

Rainbow Butterflies

Hello everyone, I've got a see-through window card to share today. I've been using the new Rainbow Garden die cuts and papers from Paper Rose Studio and they are beautiful!


Paper Rose Studio supplies used: Rainbow Garden Florals Cut Aparts Paper Pack 31560, Rainbow Twirl 2.0 12x12 Paper Collection 31046, Rainbow Garden Butterflies Embossed Die Cuts 31476 , Happy Birthday A5 10pc Sentiment Sheets 30720 - Foil , Arch Border Frames Metal Cutting Die 30420.

To create this card, I started by gluing the Rainbow Twirl yellow paper to my card front (this is an A2 sized card), but did not glue down where the arched window would go. I used the Arch Border Frames die to cut from white cardstock, two of the third largest arch.  Since this die is all one piece, I couldn't use it to cut out the window frame on my card front.  Instead, I placed one of the white arches on my card front where I wanted it to go and traced around the inside with a pencil.  Then I used my craft knife to cut out the window shape from the card front. I saved the white piece of cardstock to put on the inside of the card.

I trimmed a piece of acetate to fit behind the white arched piece and attached it with redline tape to the back of the arch. I then taped this to the back of the card front around the window opening. I attached the second arch to the inside of the card front to help tidy up the opening.

I fussy cut the flowers from the Rainbow Garden Florals Cut Aparts, and then used a scrap of white cardstock to make a rectangular window box. I trimmed down the sentiment to be the same width, then glued this to the bottom of the window box and attached the flowers above it.  I used foam tape behind the window box and mounted it to the front below the window arch.

On the scrap of white cardstock I had saved from cutting out the window, I used a little blue ink to colour in a sky.  I held this up to the window opening on the card front, and then added glue to the back of it before closing the card down on it to make it adhere directly behind the window. Then I attached the butterflies with a little glue so they were partially visible through the front window opening. Don't you just love those rainbow butterflies?!

Thank you for stopping by today, and I hope you're having a great day!