Friday 27 January 2023

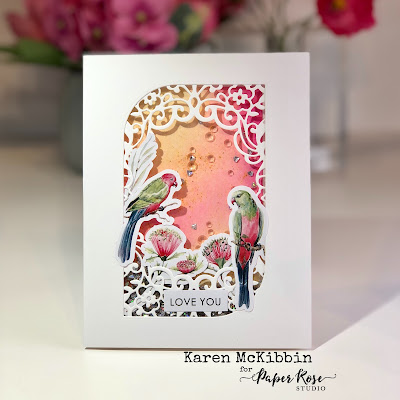
Valentine Shaker Card

Hello and welcome!  Today's card is an easy, non-traditional Valentine's Day card, or perhaps an anniversary card. 

Paper Rose supplies used:  Spring Floral Frame Metal Cutting Die 21054, Nesting Curved Rectangles Metal Cutting Die 25621, All Occasions Sentiments A5 12pc Sentiment Sheets 22339, Nature Stroll 3 Die Cuts 27898, 19499 Clear Crystal Mix and 18942 Gem Flakes Shaker Mix which I think is discontinued.  Other supplies: Cosmic Shimmer Colour Cloud inks in Baked Peach, Chic Magenta and Lemon Meringue, acetate. 

I started by doing some ink blending on the front of a white A2 sized card using the inks listed above.  Any inks that you have would work for this, or even patterned paper.

From an A2 sized card front, I die cut the Curved Rectangle, trying to be sure it was centered on my card.  I also die cut the Spring Floral Frame from another card front of the same A2 size.  I adhered the Spring Floral Frame behind the Curved Rectangle front piece, using glue, and just lining up the outside edges.  I placed double sided adhesive tape all around the curved rectangle opening, removed the backing and then adhered the acetate to the opening.  Next, I covered the back of this with two layers of foam tape, following the curved rectangle opening, and being sure to cover the entire back of the card front.  Before I removed the backing for the foam tape, I ran an anti-static powder tool around all the edges of the foam tape so the shaker mix wouldn't stick to it.

I added the shaker mix onto the front of the card, removed the backing on the foam tape and adhered it in place to the card front.  All that was left was to adhere the die cuts and sentiment in place and then give the card a good shake. : )  Those die cuts really make it easy!

Thank you so much for stopping by and I hope you're having a great day.


Sunday 15 January 2023

Banner Thank You Card

Hello and welcome back! I have a confession to make - I really don't know how this card came about, except I had been looking at my Triple Banner die and thinking I hadn't used it enough and how pretty the shape of the banners were.  And then one thing led to another ...


Paper Rose supplies used: Triple Banner Metal Cutting Die 25924, Hand Lettered Thanks Metal Cutting Die 25606, Lydia's Blooms Stamp Set 25852, Floral Borders 6x6" Stencil 19342, Sweet Foliage 6x6" Stencil 19739.  Other supplies used: Nuvo Glacier Paste in Winter White, Gel plate prints using I think - DecoArt Peacock Pearl metallic acrylic paint, DecoArt Turquoise Sparkle Glitter Paint, and Art Alchemy Sparks paint in Fairy Wings.

I had previously made the gel plate prints and I think the paints I used are the ones listed above.  I had used the Sweet Foliage stencil over the blue and turquoise paints, applying the greeny-gold Fairy Wings paint over it.  These prints were actually a failure, but I picked out the usable areas, and die cut them with the Triple Banner die.  I think patterned paper would work just as well, but it's surprising sometimes what small areas of a bad print can look like on their own.  I also cut the banners from white cardstock several times so I could stack two or three together to mount under the printed die cuts.

I used the Floral borders stencil on the card front along the top and bottom edges, applying a layer of the Nuvo Glacier Paste through it, and then set it aside to dry.  While it was drying, I coloured the little buds from the Lydia's Bloom stamp set, using Copic markers.  Then I placed it back in my stamp positioner and restamped it with Versamark ink, heat set it with a clear embossing powder, and then fussy cut the buds out.  I also die cut the Thanks die from white cardstock three times and stacked and glued these together.

To assemble the card, I ended up having to cut down the blue banner pieces just slightly from each end so they would all fit on this A2 size card. I started by glueing the turquoise pieces first on the left, and then worked across to the right side.  I tucked in the buds between the blue pieces, glueing them in place.  Finally, I glued the Thanks sentiment in the middle.  In the end, I'm really quite happy with how it turned out and it made me feel good to use my failed print pieces.  So the moral of the story is - don't throw away those failures! : )

Thank you for stopping by and I hope you're having a happy, creative day!

Wednesday 4 January 2023

Floral Thank You Card

Hello again and welcome!  We were having a horribly cold winter day here in Canada when I made this card, and I just felt like colouring and staying warm inside.  So I actually combined two floral stamp sets for this one, but I think either one of these two sets alone would have been good enough.

Paper Rose supplies used:  Spring Bloom Stamp Set 25282Hayley's Bouquet Stamp Set 25240,  Hand Lettered Thanks Metal Cutting Die 25606Little Swirls 6x6" Stencil 19724Little Foliage 1 Metal Cutting Die 21099. Other supplies: Nuvo Glacier Paste in Pineapple Delight, Cosmic Shimmer Pixie Sparkle Powder in Sandstorm, Copic markers.

I used Copic markers to colour in the images, but I only coloured the portions that I thought would be on the card. After colouring, I fussy cut them out, leaving  a wide margin around the bottom as I wasn't sure exactly how they would fit on the card.

For the card base (5 1/2" square), I cut from 110# white cardstock, a 5 1/2" x 11" piece, scored it in the middle at 5 1/2", and then folded and creased it to make my card base.  I also cut a piece of 5 1/2" square yellow cardstock for the front.  I placed the Little Swirls stencil over the yellow card and applied a layer of the Nuvo Glacier Paste.  While the stencil was still in place, I sprinkled the Cosmic Shimmer Pixie Sparkle Powder over top, and then lightly misted with about 2 or 3 mists of water.  Just enough water to activate the powder.  Then I removed the stencil and washed it, and allowed the card front to dry.

I die cut from white cardstock several of the leafy foliage and three of the Thanks die cuts.  I stacked and glued the Thanks die cuts together, and stacked and glued two each of the foliage die cuts.  

Once the card front was dry, I glued it onto the card base. I arranged the foliage in a wreath shape and then figured out the arrangement of the flowers.  I mounted the flowers on foam tape and adhered them to the bottom of the card.  I trimmed off the excess flowers from the back of the card.  Finally, I glued the thanks sentiment into place within the wreath.  I wish you could see how shiny this card really is, as that Glacier Paste really adds a lot of shine.

Thank you for stopping by and I hope you're having a great day!