Showing posts with label Thank you card. Show all posts

Wednesday, 21 June 2023

Tulip Trifold Card

Hello everyone, I've got a trifold card to share today, but it could easily be just a regular card and I'll show you how.  This card is a little smaller than typical, measuring 4" x 5".


Paper Rose Studio Supplies:  Tulip Border 1 Metal Cutting Die 29674, Summer Picnic Die Cuts 29952, Stitched Ovals Metal Cutting Die 16551, Black & White A5 12pc Sentiment Sheets 19023, 19499 Clear Crystal Mix

I started making this card by watercolouring two panels on Bristol cardstock.  I used reds, yellows and some orange on one of the panels, and more blue, green and purple on the other one.  I added some Spectrum Noir Sparkle Ink in Crystal Clear, but you could easily add any shimmer pen or embossing paste instead.  If you don't want to make this into a trifold card, just choose one colour combination.  Once the paint was dry, I die cut the oval shapes (I used the third largest oval die in the collection ~ 3"x4"). I also cut 2 - 1" x 4.75" panels from each colour.  I also cut three more ovals from white cardstock to use on the inside.

Next, I cut two 4" x 5" card bases from a 10" x 4" piece of white 100# cardstock. If you want to make the trifold card, I trimmed the tiniest ~1/8" from the right hand edge of each card base (this just allows the card to fit together better when joined).  On the right and left edges of the card front, I attached the two border panels, leaving a small white border around the edges.  If you are making the trifold card, the second card will fold out from the opposite side (left to right), so the front panel of this card will be on the far right when the card is open.  

On the front of one of these card bases, I cut out the Tulip Border 1 die, centering the tulips in the middle of the card front.  Since the tulips cut into the watercoloured portion of the card, there will not be a white border there.  To get around that, I cut another of the Tulip Border 1 die from white cardstock twice and then fussy cut out the tulips.  It was quite easy to do this, but you could easily pencil in a cutting line first and then cut that out.  I glued this tulip outline over the tulip on the card front, and also on the blue one if you're making the trifold card.

Next, I placed the oval behind the tulips on the first (orange, yellow, red card) and glued it in place by adding glue to the backs of the tulips and along the outside edges of the oval where it met the right and left border of the card front.  If you are making the trifold card, just do this on the regular card front for now.  To determine the placement of the inside, center oval, I placed my card face down on my work surface, and placed one of the white ovals over the first oval with the good side facing down. I then added glue to the back of this oval, and making sure it was lined up with the already glued front oval, I carefully closed the card back and pressed the oval into place. Just check the front to be sure the ovals are definitely lined up correctly. 

At this point, you could choose to just leave this as a regular card, and then decorate the front and add a sentiment.  However, if you want to make the trifold, I attached the second card base to the front one by gluing the left hand side behind the first card base.  I still hadn't attached the oval behind these tulips, so I placed the watercoloured oval over the middle one in the first card base with the coloured side up.  I glued the back of the tulips on the second card base and just along the edges of the borders where the oval would attach.  Keeping the oval in place over the already glued center oval panel, I carefully closed the right hand card front and pressed it into place so the oval was now glued in place.  Just check again that you've got them lined up correctly.  Finally, I used the two extra white ovals I had cut to cover the inside of the watercoloured ovals as mine were quite messy from the ink.  Then I used the die cuts from the Summer Picnic set to decorate the left and right ovals. 

Finally, on the front, I attached the sentiment and added a few crystal drops from the shaker mix. Whew, if you've made it to this point, kudos to you for sticking it out! 😀  Thank you so much for joining me for this very lengthy explanation - I had intended to make a video as that would have been so much easier, but I just ran out of time. 


Sunday, 15 January 2023

Banner Thank You Card

Hello and welcome back! I have a confession to make - I really don't know how this card came about, except I had been looking at my Triple Banner die and thinking I hadn't used it enough and how pretty the shape of the banners were.  And then one thing led to another ...


Paper Rose supplies used: Triple Banner Metal Cutting Die 25924, Hand Lettered Thanks Metal Cutting Die 25606, Lydia's Blooms Stamp Set 25852, Floral Borders 6x6" Stencil 19342, Sweet Foliage 6x6" Stencil 19739.  Other supplies used: Nuvo Glacier Paste in Winter White, Gel plate prints using I think - DecoArt Peacock Pearl metallic acrylic paint, DecoArt Turquoise Sparkle Glitter Paint, and Art Alchemy Sparks paint in Fairy Wings.

I had previously made the gel plate prints and I think the paints I used are the ones listed above.  I had used the Sweet Foliage stencil over the blue and turquoise paints, applying the greeny-gold Fairy Wings paint over it.  These prints were actually a failure, but I picked out the usable areas, and die cut them with the Triple Banner die.  I think patterned paper would work just as well, but it's surprising sometimes what small areas of a bad print can look like on their own.  I also cut the banners from white cardstock several times so I could stack two or three together to mount under the printed die cuts.

I used the Floral borders stencil on the card front along the top and bottom edges, applying a layer of the Nuvo Glacier Paste through it, and then set it aside to dry.  While it was drying, I coloured the little buds from the Lydia's Bloom stamp set, using Copic markers.  Then I placed it back in my stamp positioner and restamped it with Versamark ink, heat set it with a clear embossing powder, and then fussy cut the buds out.  I also die cut the Thanks die from white cardstock three times and stacked and glued these together.

To assemble the card, I ended up having to cut down the blue banner pieces just slightly from each end so they would all fit on this A2 size card. I started by glueing the turquoise pieces first on the left, and then worked across to the right side.  I tucked in the buds between the blue pieces, glueing them in place.  Finally, I glued the Thanks sentiment in the middle.  In the end, I'm really quite happy with how it turned out and it made me feel good to use my failed print pieces.  So the moral of the story is - don't throw away those failures! : )

Thank you for stopping by and I hope you're having a happy, creative day!

Wednesday, 4 January 2023

Floral Thank You Card

Hello again and welcome!  We were having a horribly cold winter day here in Canada when I made this card, and I just felt like colouring and staying warm inside.  So I actually combined two floral stamp sets for this one, but I think either one of these two sets alone would have been good enough.

Paper Rose supplies used:  Spring Bloom Stamp Set 25282Hayley's Bouquet Stamp Set 25240,  Hand Lettered Thanks Metal Cutting Die 25606Little Swirls 6x6" Stencil 19724Little Foliage 1 Metal Cutting Die 21099. Other supplies: Nuvo Glacier Paste in Pineapple Delight, Cosmic Shimmer Pixie Sparkle Powder in Sandstorm, Copic markers.

I used Copic markers to colour in the images, but I only coloured the portions that I thought would be on the card. After colouring, I fussy cut them out, leaving  a wide margin around the bottom as I wasn't sure exactly how they would fit on the card.

For the card base (5 1/2" square), I cut from 110# white cardstock, a 5 1/2" x 11" piece, scored it in the middle at 5 1/2", and then folded and creased it to make my card base.  I also cut a piece of 5 1/2" square yellow cardstock for the front.  I placed the Little Swirls stencil over the yellow card and applied a layer of the Nuvo Glacier Paste.  While the stencil was still in place, I sprinkled the Cosmic Shimmer Pixie Sparkle Powder over top, and then lightly misted with about 2 or 3 mists of water.  Just enough water to activate the powder.  Then I removed the stencil and washed it, and allowed the card front to dry.

I die cut from white cardstock several of the leafy foliage and three of the Thanks die cuts.  I stacked and glued the Thanks die cuts together, and stacked and glued two each of the foliage die cuts.  

Once the card front was dry, I glued it onto the card base. I arranged the foliage in a wreath shape and then figured out the arrangement of the flowers.  I mounted the flowers on foam tape and adhered them to the bottom of the card.  I trimmed off the excess flowers from the back of the card.  Finally, I glued the thanks sentiment into place within the wreath.  I wish you could see how shiny this card really is, as that Glacier Paste really adds a lot of shine.

Thank you for stopping by and I hope you're having a great day!

Wednesday, 13 July 2022

Thanks A Melon

Hello again and welcome back!  Today I've got a summery thank you card which features the Melon Friends from Gerda Steiner Designs.

I started by stamping these two images from the set and and colouring them with Copic markers.  After fussy cutting them out, I mounted them on foam tape.  

I used a patterned paper for the card front that I've had in my stash for a loooong time. The square frame is from Poppy Stamps Double Stitch Square Frames die set, and I die cut it three times and glued these together.  

I did a little ink blending on the center of one of the die cut frames, using Cosmic Shimmer Colour Cloud ink in Clear Day.  That ink is perfect if you have trouble with getting smooth ink blends.  It may not look like it when you put it on, but as it dries, it smooths out so you don't see any splotchy areas.  

To assemble the card, I glued the white square frame into position, and then glued in the ink blended center. Then I popped the images into place.

For the sentiment, I stamped and clear heat embossed onto white cardstock, the "Thanks a" portion of the sentiment, while masking off the "melon". Then I masked off the "Thanks a" portion and used Distress Oxide inks in Mowed Lawn and Rustic Wilderness to stamp the 'melon' portion before clear heat embossing it also.  Finally, I mounted the sentiment on foam tape and adhered it just below the square frame.

Thank you for stopping by and I hope you're having a great day!


Monday, 11 July 2022

Spring Bloom Thank You Card


Products Used:


From Paper Rose Studio - Spring Bloom Clear Stamp 25282, Little Swirls 6 x 6” Stencil 19724, Hand Lettered Thanks Metal Die 25606. Copic markers, Cosmic Shimmer Luna Paste in Moonlight Rose, Poppy Stamps Double Stitch Square Frames, Cosmic Shimmer Aurora Crystal embossing powder, Prills flower centers


Hello and thanks for stopping by!  I’ve got a thank you card to share today.  I started this one by using Copic markers to colour the Spring Bloom stamped image, and then fussy cut it out.  I mounted it on the white square frame from Poppy Stamps that I had die cut three times and glued together.  I placed foam tape inside the frame, behind the flowers and added double sided tape around the frame itself.  Then I added a little glue to some of the flower centers and added the Prills.

For the background, I taped the Little Swirls stencil to an A2 piece of white cardstock and applied the Luna Paste over it, smoothing to get an even layer.  I removed and cleaned the stencil right away, and left the stencilled piece to dry.  The shine from the Luna Paste is amazing once its dry!

I die cut the sentiment twice and glued them together before heat embossing the top layer with the Aurora Crystal embossing powder.  It doesn’t show up in the photo, but there’s a lovely sparkle to the sentiment.  

Finally, once everything was dry, I attached the stencilled card front to the card base, and then mounted the floral image and square die over the centre.  Then I glued the sentiment over the lower portion of the flowers.  I wish you could really see the shine on this card!
 

Wednesday, 15 June 2022

Paper Rose Studio Etched Flowers Thank You Card


Paper Rose Studio Products:
Etched Flowers Die 25663, Little Swirls 6x6” Stencil 19724, Little Foliage 1 Die 21099, All Occasions Sentiment Sheets 22339, Hand Lettered Thanks Die 25606

Other Supplies - Acetate, Cosmic Shimmer Jamie Rodgers Glossy Glaze in Inspired Lilac, Cosmic Shimmer Pixie Sparkles in Flirty Sky, Gilded Plum and Fuchsia Rose, Cosmic Shimmer Sparkle Texture Paste in Chic Aubergine, Creative Expressions Sue Wilson Decorative Squares die CED4399, pearls, DecoFoil in Rainbow Shattered Glass

Hello and welcome!  For this card, I had a few elements that I knew would need to dry overnight, so I started with those first.  


For the acetate layer, I taped the Little Swirls stencil in place over my 6x6” piece of acetate.  I spread the Cosmic Shimmer Glossy Glaze over the entire stencil and used a palette knife to smooth out the application.  With the stencil still in place, I sprinkled on the Flirty Sky Pixie Sparkle powder quite liberally, and then spritzed it all with a few pumps of a water mister bottle.  I let that sit for a couple of minutes to be sure the water was activating the powder.  Then I removed the stencil and cleaned it up with water.  I left the acetate to dry overnight and once it’s dry, flip it over to see how beautiful and sparkly the bottom or “wrong” side is!

I also prepared the paper for the flowers the night before.  I used copy or computer paper for these, and placed about 4” wide strips onto an old metal cookie sheet.  I spritzed both sides of the paper with water, and then liberally sprinkled on the Pixie Sparkle powders in Gilded Plum and Fuchsia Rose.  I misted these quite liberally with a water mister to really get the powders activated, and then left them to dry overnight.  

For the leaves, on a scrap piece of white cardstock, I spread a thin layer of the Sparkle Texture paste and allowed that to dry overnight as well.  

The following day, I created a 6 x 6” card base.  I sprayed the front with a spray glue and attached the acetate, putting the stencilled side down against the front of the card.  I placed this under a heavy weight to allow it to dry.  I die cut the frame from white cardstock and glued this in place over the acetate.

Next, I die cut the flowers from the prepared computer paper, and the leaves from white cardstock, vellum and the cardstock covered with the Sparkle Texture paste.  I shaped the flowers slightly by pinching the tips and I used a round ball stylus on an old computer mouse pad to help shape the centres.  I glued the layers of the flowers together before attaching them to the front of the card with glue dots.  I used glue to add a small pearl to the centers of each flower.  Once the flowers were in place, I added in the leaves.  

The sentiment was die cut three times and glued together.  I foiled the secondary sentiment with my laminator, trimmed it down and added 2 or 3 strips of scrap cardstock to the back for dimension.  The sentiments were then glued to the front of the card,  There is really a lot of shine on this card with all the acetate, Pixie Sparkle powders and foiling, but it was hard to capture in a photo.

Thanks for stopping by and I hope you’re having a happy, creative day!

Saturday, 4 June 2022

Pansy Thank You Card


Paper Rose Studio Products:
Etched Pansy Die 25666, Hand Lettered Thanks Die 25606, Sketchy 6 x 6” Paper Collection 25252

Other Supplies - Strathmore Bristol cardstock, Karin Brushmarkers, Prismacolour pencil crayons, Tombow Dual brush markers, Pinkfresh Studio Classic Edgers Border Dies, Clear embossing powder

Hello everyone, and welcome.  I love how realistic these Paper Rose Studio pansy die cuts are!  To create them, I die cut the pansies from the Bristol cardstock.  I scribbled the Brushmarker pens onto my glass mat and then used a damp brush to pick up the colour and apply it to the pansies.  I tried to follow some pictures on Google to get the colouring right.  Once the ink was dry, I went in with some pencil crayons  and the Tombow markers to deepen some of the colours around the centres where the extra purple coloured areas are.  To assemble the pansies, I creased along the fold lines on the main portion, pinching and folding the pleats as best I could.  I used glue to attach the centres and the extra petals, and then used a round ball stylus on an old computer mouse pad to shape the middle of the assembled pansy.

For the background, I used the Pinkfresh Studio border dies to cut the Sketchy paper, as well as white cardstock and a coordinating purple cardstock.  I attached the leftover bottom piece of the Sketchy paper to my card front along the bottom edge.  Then I layered the white and purple cardstocks so the scallops were aligned, and attached these over the top edge of the Sketchy paper.  For the top layer of the Sketchy paper, I attached some craft foam to the back of it for dimension, and then glued this down over the white and purple layers of cardstock.

The sentiment was cut three times and glued together. I then covered it with VersaMark embossing ink and sprinkled on some clear embossing powder before heat setting it.  I repeated this three times to get a really glossy shine on the Thanks. I attached the sentiment to the bottom of the card with glue.  Finally, I used glue dots to attach the pansies and leaves.

Thanks for stopping by and I hope you’re having a happy, creative day!

Wednesday, 4 May 2022

Garden Critters Thank You Card

Hello and welcome back.  I’ve got a thank you card to share today that combines the Garden Critters and Happy Bee-day stamp sets from Gerda Steiner Designs.


I used Copic markers to colour in all the poppies and the caterpillar, and then fussy cut them out.  The extra leaves are from the HoneyBee Stamps "Lovely Layers Coneflower" die set and I cut them from green cardstock and added some Distress Oxide Rustic Wilderness and Mowed Lawn to them.  The white circular die is from PinkFresh Studio and is the "Stitched Scallop Circle" die set, and I chose to use both the inside and outside die cuts.  I stacked about four of these die cuts together to create some dimension. The sentiment is from the Garden Critters stamp set and I heat embossed it with clear embossing powder (please try not to notice that I didn't cut it quite straight! It drives me crazy 😬).

For the background, I used some Cosmic Shimmer Colour Cloud ink in Lemon Meringue, Baked Peach and Lush Pink and just ink blended them over the card front. Then I sprinkled on some Pixie Sparkles in Pumpkin Patch and misted with water.  There's a lot of sparkle in real life from these, but it doesn't show up in the picture. 

Finally, to put it all together, I glued down the leaves where I wanted them to go, but left the upper edges free to be curled up slightly.  Then I glued the white circle die cuts down in place, before adding in the poppies.  I mounted the caterpillar on foam tape and positioned him at the bottom of the circle.  I also mounted the sentiment on foam tape and adhered it below the image.

Thank you for stopping by, and I do hope you're having a happy, creative day!

Wednesday, 23 February 2022

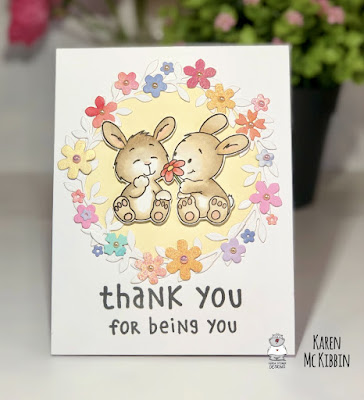
Bunny Friends Thank You Card

Hello again and welcome. We’re having a little stretch of very cold weather here at the moment, so I decided to make a springlike card to warm me up! These little bunny friends were perfect for the occasion. 


I stamped the adorable image from the “Bunny Friends” stamp set from Gerda Steiner Designs onto Neenah Solar Crest 80# cardstock, and coloured it in with Copic markers before fussy cutting it out.  I masked off my card front with some contact paper that I had die cut a circle from.  I ink blended this circle in yellow ( I used some Cosmic Shimmer Colour Cloud ink in Lemon Meringue, but any ink would work). I used a grey ink to stamp and clear heat emboss the sentiment, which is from the same stamp set.  

Next, I die cut a variety of flowers from scraps of inked up cardstock I had in my “To Be Used One Day” box (that’s the box where all those bits and pieces go when you’re just not sure what to do with them!).  I used the Spellbinders Petite Floral Potpourri die set for this, as the flowers are quite small and delicate.  Once I had everything cut out, I started with the leaves to build a wreath, and glued them in place around my inked circle.  Then I added in the little flowers around the wreath.  I mounted the bunnies on foam tape and popped them up in the middle.  Finally, I added a few pearls to the flower centres to give them that little sparkle.  Those little bunnies just steal the show with their cuteness! 

Thank you so much for joining me today and I hope you’re having a great day! 

Copic markers used: E40, E41, E42, E43, E31 and R00


Wednesday, 25 August 2021

Penguin Thank You Card

Hello again, and welcome. I’ve had a busy few weeks here with visitors and an illness in the family, so I needed a quick and simple card.  And today’s card is exactly that. 


I’ve used the very sweet “Penguin with Heart” stamp set for this one and coloured it in with copic markers.  I then die cut a circle (that was the diameter of the inside of the large Paper Rose Geo Mandala die) from an A2 card front.  I embossed this card front with a 3D embossing folder from Creative Expressions called “Hearts on a String”.  I used some Cosmic Shimmer Opal Polish in Pink Thistle to lightly shade the raised areas of the embossing.  This Opal Polish gives the look of pearlescent paper and changes colour depending on whether you use white or black cardstock - lots of fun!

I also die cut the largest of the Geo Mandala dies from Paper Rose, out of white cardstock, and applied the same Opal Polish to it.  I saved the inner circle from the die cut mandala, and added a very light layer of Distress Oxide ink in Shaded Lilac to it.  

I then glued the embossed card front to the card base, and glued the inked circle inside the opening.  I added a few die cut clouds to the circle.  The penguin was popped up on foam tape and trimmed to fit inside the circle opening.  I used a spray adhesive to adhere the outer mandala ring around the circle opening.  Finally, I already had the Taylored Expressions sentiment (from their Simple Strips Background set) stamped and clear heat embossed so just popped it up on foam tape and adhered it to the bottom of the circle.  

That’s it from me, and I hope you’re having a great day! 


Wednesday, 14 July 2021

Thanks a Melon Slimline Card

Hello again!  I’ve got a watermelon filled card today which just felt right on this hot summer day.  I’ve used the Melon Friends stamp set from Gerda Steiner Designs which has to be one of the cutest sets out there.


I stamped the images onto some Neenah Solar White cardstock and then used copic markers to colour them in.   I’ve listed the markers I used down below.  I ended up stamping about three of the dinosaurs and two of the bears.  I used circle dies in different sizes to cut areas out of the images, and just tried to offset where the images were in the circles.  To create the white frames, I used low tack tape to tape together the same circle die used to cut out the image, and a die that was a size smaller.  I cut two of each of these frames, and glued them together before gluing them to the circle image.  I saved the centers of the frames to colour in with copic markers and then added some of these between the circle images.  I diecut the frame from red cardstock using the Trinity Stamps Wonky Stitched Wilderness die set and made it three layers thick.  To assemble the card, I attached the red frame first, then spaced out the images and finally added in the coloured circles and the sentiment.  I popped up the two larger circles on foam tape to allow everything to fit on my card.  Finally, I glued the remaining images to the inside of the card along with the inside sentiment.  

Thank you so much for joining me and I hope you are having a great day!

Copic markers used:

Dinosaur - YG17, YG03, YG01, YG21, YG0000

Bear - R20, E34, E53, E51

Watermelon - R29, R35, YG67, YG01, YG0000


Wednesday, 30 December 2020

Hedgehog Thank You Card

Hello and thanks for stopping by. I hope everyone had a very happy Christmas, however it was celebrated this year. I’m finding myself very much in need of some thank you cards at the moment, and luckily the Hedgehog with Gifts stamp set from Gerda Steiner Designs has come to my rescue. There are so many great sentiments in this set, and I just couldn’t decide which ones to use, so I used them all! *Big grin*


I started my card by making two rows of sentiments in my stamp positioner and then stamped with Versamark ink onto my card front that I had used an anti-static powder bag on. I started at the top of my card, and then just shifted my card front up in my stamp positioner to stamp the next two lines. Once the whole card front was stamped, I added white embossing powder and heat set it. Then I ink blended the background with Distress Oxide inks in Rustic Wilderness, Evergreen Bough, Twisted Citron, and a little Speckled Egg. From white cardstock, I die cut a semi-circle and a strip of cardstock for my sentiment. I ink blended these with Speckled Egg and a little Rustic Wilderness around the edges.  I again, stamped and white heat embossed the sentiment on the strip of cardstock. 

I chose two of the three hedgehogs in this adorable stamp set and one of the gifts. When I googled hedgehogs, they have slightly darker markings around their noses, so I tried to be brave and added in some darker lines.  I have to confess, I’m a little undecided whether I like it better or not, but I wanted to give it a try.  I’ve listed the copic markers I used down below if you’re interested. I cut around the paw on the hedgehog holding the gift and then mounted the hedgehogs and sentiment on foam tape. Finally, I centered the semi-circle on the card front and attached the sentiment and hedgehogs. This was a quick and simple card to make, but those hedgehogs just steal the show!

Copic Markers used:

Hedgehogs: BODY - C1, E40, R00, N0.  BACK - W7, W5, W2, N4, E53.  FACE - W1, W3, N2

Gift - Y08, Y38, YR27 and a gold DecoColor pen for the ribbon.


Monday, 2 November 2020

Paper Roses Poinsettia Flowers

 Hello, I’ve got three cards today made with this beautiful Poinsettia Flowers die set from Paper Roses and one of them isn’t even a Christmas card! Shocking, right?!  Honestly, the last one started off in my mind as a Christmas card, but I wanted to make them pink poinsettias.  However, once I coloured them up, they didn’t look too Christmassy so they’re a thank you card now.  Just the way things go ...

Anyway, here’s the first card and it is a Christmas card. 


This is the front of the card but it’s a trifold card, so when you open up the card the poinsettias are actually on the middle layer and look like this ...


The sentiment on the front of the card is from Poppy Stamps and is called Christmas Quotes. The holly on the inside is also from Poppy Stamps and is from their Mistletoe and Holly die set. I die cut the poinsettias from white cardstock and then copic coloured them with R39, R29 and R35. 

Here is my second card ...


This one is a shaker card and has a lot of shiny stuff on it! It was very hard to photograph as a result.  The background is a Gina K foiled toner card and the “peace” sentiment is from Crafter’s Companion.  It’s meant to be cut out of an opening so I did some partial die cutting to get the arched circle and then die cut the “peace” again from foiled cardstock to place over top.  I used a “Mini Poinsettia” embossing folder from Couture Creations on the front.  I copic coloured these poinsettias in the same way as the first card.

And for the third card ...


I die cut the flowers from Bristol cardstock and coloured them with Zig Clean Color watercolour brushes, which I’m really not as comfortable using.  They were just so bright and pink when I was done that I just didn’t see them as Christmas flowers at all. The background is made from a Paper Roses stencil called Flowy Leaves and I used some Decofoil Metallix gel in Champagne. The sentiment is from MFT’s More Essential Sentiments set. 

Thank you so much for joining me today and I hope I’ve given you a little inspiration!  Have a great day! 


Wednesday, 26 August 2020

Slimline Safari Card


Hello again! I’ve got a slimline card today that could be used as either a thank you card or an encouragement card for a friend, or even a birthday card. I’ve used stamps from the Go Wild set from Gerda Steiner Designs, as well as the lion from the Party Animals set. 


 I started by stamping The Leafy Bold Print stamp from Hero Arts onto my card front with Versamark ink.  Once the ink was dry, I ink blended over it with original Distress Inks in Pine Needles, Lucky Clover and Peacock Feathers. I have to admit that I loved this card base so much that I made another card with the same background and added some flowers for a quick thank you card. 


Next, I stamped out my images by masking as needed and allowing room between my images to cut them out with a square die (I used the Selfie Square die from My Favourite Things). I used copic markers to colour them in, and also for the backgrounds.  I die cut 3 Polaroid frames from white cardstock using the Polaroid Shaker Frame die from My Favourite Things.  I wanted my images to look glossy like a photograph, so on the back of these frames, I placed double sided adhesive around the opening, and then adhered some scrap acetate (from a stamp set packaging), trimming it down to fit the opening.  Then I used a little glue to attach my coloured images to the acetate on the back of the Polaroid frames.  Just for fun, I fussy cut around the elephant’s trunk and made that come out over the front of the Polaroid frame (I had to cut a small slit in the acetate to allow it to come out). Finally, I hand wrote the hashtags messages on the front since I didn’t have any stamps for this, so you can get creative with what you write or personalize it for a special person.


I die cut the  sentiment from an older Neat and Tangled stamp and die set called “Awesome”.  The die set comes with a border die so I cut that from white cardstock, and the word from black cardstock.  I stamped the “You are so”  in black Versfine ink and clear embossed the sentiment at the top of the card, and then glued the die cut “Awesome” in place.  I placed the sentiment going down the side of the card as it allowed me to more easily fit my images without obscuring them too much.  This was a fairly quick and easy card to do and the slimline size gives you so much more room to play with.  Thanks so much for stopping by and I hope you’re having a great day!


Wednesday, 29 July 2020

Thank You for Watching the Dog

Hello and welcome back!  Life has been so busy here with our new puppy, so this card today is going to come in handy for sure! I’ve used the new stamp set from Gerda Steiner Designs for this one, called  “Puppy Mail”.


I first stamped and coloured in my images with copic markers. I also used the image from the “I Just Miss You”  set. This is also available as a digital set, so it’s easy to resize to your card front. I love how all these images so clearly show different moments in a puppy’s day. 

On my card front, I used the larger circle die in the Panel Shapes die set from Your Next Stamp because I liked that it cut the stitched line around it. I cut out four circles, leaving room for my sentiment. I found a dog paw stamp in my stash and stamped it randomly over the card front in black Versafine ink. 

I placed the card front over my card base and lightly pencilled in the circles. I used a larger circle die to cut out my images, and then adhered them with glue over the pencilled areas. I decided not to pop my card front up with foam tape, but I do think that would look very nice. 

I used the sentiment from the Puppy Mail set and stamped it on some white cardstock. I used a fishtail die to cut it out and then mounted it with tape to a piece of blue cardstock. I fussy cut the blue cardstock to leave a small border along the top and bottom, and then adhered this to my card front and trimmed the excess from the right hand side. 

This was a really quick and simple card to make but such a handy one to have in your stash if you’re a dog owner.  I know I’ll be using it! 


Tuesday, 9 June 2020

Flip Sider Puppy Mail

Hello everyone, I’ve got an interactive card today featuring the “Puppy Mail” stamp set from Gerda Steiner designs. I’ve used all the puppy images in this set and have made a flip slider card with them. I love how this set can be used for a happy mail card but also a thank you card for someone looking after a dog.


If you would like to see a YouTube video of how I made this card, please CLICK HERE.


I started by stamping out the images with Copic friendly ink and colouring them in with Copic markers. I made sure to space my images out when I stamped them, because I used the “Selfie Square” die from MFT to cut them out into flip cards. I also die cut the “Polaroid Shaker Frame” from MFT out of Neenah 80# cardstock, to create a 2.5” frame for the cards. If you have a set of square dies, you could just use these to cut the squares and frames. I coloured in the background of the flip cards with Copic markers and then the frames with coordinating markers. Next, I cut four 2.5” squares of cardstock to adhere the flip card to and glued the frame around it. This makes the flip card sturdier and hides the copic bleeding on the back.


To create the mechanism for the flip cards, I cut out a rectangle from Neenah 80# cardstock that measured 2 1/4” wide by 8 1/2” long. I also cut a smaller rectangle that was 1/2” x 4” long.


I creased the larger rectangle starting from the left edge at the 2.5” mark and each 1/2” after that up to, and including, the 4” mark. Then I used a bone folder to really crease these folds. They all fold in the same direction, but need to be well folded. I corner rounded the ends on the long side of this rectangle piece.

Then I glued the smaller rectangle in its center 2.5”, and adhered that to the top of the very end of the larger rectangle, centering it over the first 2.5” square.  This becomes the tab that holds the flip slider in place, and should be folded and creased down over the long rectangle piece.


Next, I used double sided tape to adhere my flip cards. The first one was applied to the 2.5” square, and each card after that was adhered to one strip of tape applied along each fold line. The remainder of this long rectangular piece folds underneath the flip cards and through the small tabs.


I die cut the word “Pull” and glued it to the corner rounded end of the slider mechanism. I also stamped some paw prints onto this end so it would add interest when pulled out.

I die cut a cover die for the front of my card and glued it to some blue cardstock. Then I applied double sided tape to the 2 small tabs and also some glue over the tape. I would recommend having these tabs already folded over the long pullout end before glueing them as it gets messy. Then I adhered the flip mechanism to the front of my card - the 2 small tabs are the only thing adhering the mechanism to the card front. Scary, I know, but it works! I let this dry under some acrylic blocks, and then attached my sentiment.


This sounds like a  complicated card, but it’s really not that hard to make and it’s super fun to play with. I really hope you’ll give it a try!