Showing posts with label trifold card. Show all posts

Tuesday, 21 October 2025

Bojo Baby Cards

Hello again, I've got 3 baby cards that I have created with the Paper Rose Studio Bojo Baby collection.


 I started all of these cards by die cutting 3 each of the largest arch in the Nesting Arches set from white cardstock.  I cut scraps of white cardstock to be 3" long by 1" wide, and scored these down the middle along the 1" edge at 1/2".  I folded these and burnished them, and then glued them to the back of one of the arches along one half of the scrap strip and then glued a second arch on the other half of the strip.   I then glued a second scrap strip to the other side of one of the arches making sure it was folded in the opposite direction, and then glued the third arch to the other half of the strip.  This gave me a trifold card.  
 
I then die cut patterned paper using the second largest arch die 3 times for the front, and three times from white cardstock for the back.  I glued all of these in place.  
 
For the small step, I used scraps of white cardstock, and scored them at 1/2", 1", 3", 3 1/2" and cut the strip at the 5 1/2" mark.  The height of this step can vary, depending on what image you are attaching to it.  For the baby carriage, my step was 1", but for the bear and train it was 3/4".  Once you've scored these, fold them all into mountain folds to make the rectangle and glue the small 1/2" tab to the other longer end. Next, apply glue to one of the longer rectangles and the small tab to the left of it.  This will attach to the bottom of the middle arched section and the arch to the left of it.  Be sure to butt the rectangle right into the fold line and make sure it is along the bottom edge of the card.
 
Finally, I decorated the cards adding the die cuts and sentiments.  When these cards are folded down, they measure 4 3/4" tall by 3" wide.  But opened up, they are 4 3/4" tall by 9" so there's lots of room for decorating!
 
Thanks for stopping by today and I hope you're having a great day! 


Sunday, 21 January 2024

Floral TriFold Acetate Card

Hello everyone! Today, I've got a trifold card to share and the front page is an acetate floral covered layer. I've decorated all the pages on this card, so here's a look at it.


Paper Rose Studio Supplies Used: Alana Flower Metal Cutting Die 21078, Celebrate Layered Metal Cutting Die 17454, Lovely Florals Blossom Flowers 4x6" Clear Stamp Set 18183.  

Other Supplies:  Cosmic Shimmer Pixie Sparkles Powder in Coral Crush and Pumpkin Patch, and Cosmic Shimmer Pixie Powder in Mango Blaze.

I started this card by creating the flowers first.  I sprinkled the Pixie Sparkles and Pixie Powders over a sheet of white cardstock and then spritzed it liberally with water.  These are "explosion" powders, so they react with the water by spreading out with colour and you never know what you'll get.  I just made sure I had enough cardstock coloured up for all my flowers, and tried to have a slight range of colour variation.  After the cardstock was dry, I used the Alana Flower dies to cut out all the flowers.  I created 3 layered  flowers to go on the front of the card, and shaped them slightly by using a ball stylus in the centres.  I glued these layers together.  For the second page of flowers, I heat embossed in white, the secondary sentiments which came from the Lovely Florals stamp set.

To assemble the card, I cut a piece of acetate that was 4 3/4" wide by 5 1/2" tall and scored this at 1/2" along one long (5 1/2") side.  I placed some double sided adhesive on both sides of the flap created by the score line, and used my bone folder to fold and burnish the fold.  I attached the acetate layer to my A2 card base, by aligning the folded edge of acetate to the left side of the card base, removed the release paper on the bottom side of the flap, and folded the acetate flap onto the card base.  Then I placed another piece of cardstock that measured 4 1/4" x 5 1/2" over top of the acetate flap section (which is now the middle section of the card), and secured it by removing the release paper on the acetate, and adding glue to the rest of the section.

I wanted the flowers on the second page to be hidden by the front cover flowers, so I attached the front 3 layered flowers to the acetate using glue and making sure that they were slightly spread apart. To get the middle layer of flowers lined up, I placed the flowers face down on the inside of the acetate layer, added some glue to the centre of the flowers, and then carefully closed the back of the card down so that it would pick up the glued flowers in the right spot.  Because I used glue, I had a little bit of time to check that the second layer of flowers were hidden from the front. I made sure that the florals with the secondary sentiments were on top on the second page.  Finally, I added the remaining flowers to the front of the card and on the inside layer.  I then added some pearls on the card front to the centre of the flowers.  

I die cut the sentiment three times and stacked them together with glue.  I cut the shadow layer from pink vellum and adhered the white sentiment to this with glue.  Finally, I attached the sentiment to the card front with glue. 

Thank you for stopping by today and I hope I've given you a little inspiration for your card making!


Wednesday, 9 February 2022

Fun Fold Meerkat Birthday Card

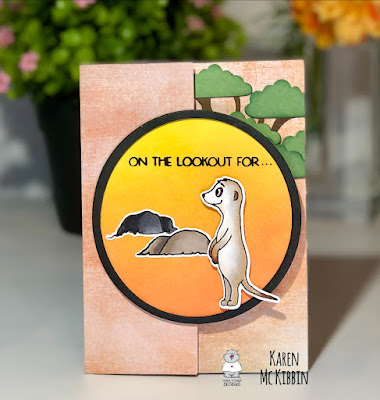
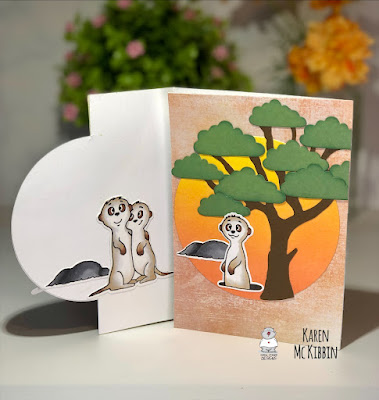
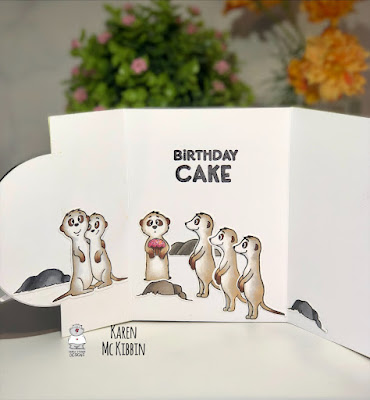
Hello everyone! Today I thought I would share an easy fun fold card with you. It’s really just a trifold card with a bit of die cutting on the front flap. But it means there is extra room inside to add some more images so you can have a fun surprise for the recipient. I chose to use the “Meerkats on the Lookout” stamp set from Gerda Steiner Designs, because they are just so fun and there are quite a few images in the collection. Here’s a look at my card. 


Aren’t those meerkats just the cutest?!  The final size of this card is 5” x 3 5/8” so it’s similar to a mini slimline card. This really is a simple card fold and I’ve made a video for you showing you how I’ve made this one. If you would like to see how to make it, PLEASE CLICK HERE.

The tree die I used is from Elizabeth Craft and is just called “Tree”.   Here’s a list of the Copic markers I used for my colouring. 

Meerkats - W2, E53, E40, C2, C0, E27
Rocks - N6, N4 and W7, W5, W4

Thank you so much for stopping by and I hope you’re having a great day! 


Monday, 2 November 2020

Paper Roses Poinsettia Flowers

 Hello, I’ve got three cards today made with this beautiful Poinsettia Flowers die set from Paper Roses and one of them isn’t even a Christmas card! Shocking, right?!  Honestly, the last one started off in my mind as a Christmas card, but I wanted to make them pink poinsettias.  However, once I coloured them up, they didn’t look too Christmassy so they’re a thank you card now.  Just the way things go ...

Anyway, here’s the first card and it is a Christmas card. 


This is the front of the card but it’s a trifold card, so when you open up the card the poinsettias are actually on the middle layer and look like this ...


The sentiment on the front of the card is from Poppy Stamps and is called Christmas Quotes. The holly on the inside is also from Poppy Stamps and is from their Mistletoe and Holly die set. I die cut the poinsettias from white cardstock and then copic coloured them with R39, R29 and R35. 

Here is my second card ...


This one is a shaker card and has a lot of shiny stuff on it! It was very hard to photograph as a result.  The background is a Gina K foiled toner card and the “peace” sentiment is from Crafter’s Companion.  It’s meant to be cut out of an opening so I did some partial die cutting to get the arched circle and then die cut the “peace” again from foiled cardstock to place over top.  I used a “Mini Poinsettia” embossing folder from Couture Creations on the front.  I copic coloured these poinsettias in the same way as the first card.

And for the third card ...


I die cut the flowers from Bristol cardstock and coloured them with Zig Clean Color watercolour brushes, which I’m really not as comfortable using.  They were just so bright and pink when I was done that I just didn’t see them as Christmas flowers at all. The background is made from a Paper Roses stencil called Flowy Leaves and I used some Decofoil Metallix gel in Champagne. The sentiment is from MFT’s More Essential Sentiments set. 

Thank you so much for joining me today and I hope I’ve given you a little inspiration!  Have a great day!