Showing posts with label Christmas card. Show all posts

Sunday, 22 September 2024

Joyful Christms Card

 Hello again, I've got a simple Christmas card to share today.


Paper Rose Supplies Used: Floral Christmas Coverplate Metal Cutting Die 32466, Floral Holly Christmas Wreath Metal Cutting Die 32469, Fancy Script Layered Joy Metal Cutting Die 32454

This is an A2 sized card and I started by die cutting the floral coverplate die from white cardstock.  I used this as a stencil to then add a little ink onto my card front.  I used a lighter blue-green ink and then went back in with a darker shade closer to the center of the stems.  Finally, I added some Distress Grit Paste in Snowfall which gives it a nice frosty look.  

While the card front was drying, I die cut the wreath from vellum and once from white cardstock.  I added some ink to the cardstock wreath and then covered it with VersaMark ink before adding some clear sparkle embossing powder and heat setting this. I added a thin strip of foam tape to the back circle of the wreath and attached it to the vellum wreath, offsetting them slightly.  

Before assembling my card, I trimmed the front cover down and cut a piece of gold glitter cardstock behind it.  I used glue to attach the wreath and set it under an acrylic block to dry.  I cut the Joy from the same gold glitter cardstock once and twice more from white cardstock and layered these up with glue.  I used the shadow die to cut an outline from vellum and then glued the Joy word in place.  I put some foam tape under the center of the Joy word where it fit inside the wreath, and used glue on the outer edges to attach the sentiment in place. Finally, I added a few gold pearls sporadically around the card.

Thanks for stopping by everyone, and I hope you're having a great day!


Tuesday, 12 December 2023

Snowglobe Card *VIDEO*

Hello again everyone, thank you for stopping by.  I have another dimensional card today for Paper Rose Studio, as one of the themes this month was to create a card using a fun fold. And this is a fun fold!


Supplies used:  Enchanting Christmas Embossed Die Cuts 30989, Pinecone Border Metal Cutting Die 26083, Crisp Christmas A5 12pc Sentiment Sheets 19772.  Other supplies: Ranger Alcohol inks in Villainous, Celestial, Patina and Cool Peri, laminating sheet, acetate, white acrylic paint, 110# or 120# cardstock.

This card design is another one that was designed by Sarah Trebilcock, and I have again modified her design to be a little simpler and smaller so that it will fit into an A7 (5 1/4" x 7 1/4") envelope.  Surprisingly, this card will fold down almost completely flat to fit into an envelope too.  I have created a video for you if you would like to see how it's made.  To watch the video, PLEASE CLICK HERE.


Thursday, 2 November 2023

Dimensional Snowman Christmas Card *VIDEO*

Hello everyone, I've got a fun, somewhat interactive card to share with you today.  It has lots of dimension, but folds flat for mailing.  Here's a look at it ... 

 Supplies Used: Enchanting Christmas Embossed Die Cuts 30989, Layering Ornate Bauble 1 Metal Cutting Die 30240, Merry Duo Layered Metal Cutting Die 30189, Snowflake Border Metal Die 18153, Snowflakes 6x6" Stencil 18198.  Other supplies: Distress Grit paste in Snowfall, Distress Mica Flakes, Cosmic Shimmer Diamond Frost glitter in Sparkle Star.

The snowman will move inside the ornament, and the card has a centre bend in it that can be accentuated to help curve the border and ornament forward. Although it's a fairly simple card to make, it's difficult to explain so I've created a video for you which I hope you will check out.  Here's the link to my VIDEO.

Thanks for stopping by and I hope you're having a great day!

Saturday, 12 August 2023

Christmas Poinsettias Card

 Hello again! I've got a Christmas card today created from some new products from Paper Rose Studio. 

Supplies Used: Poinsettia Bouquet Clear Stamp Set 30306, Christmas Poinsettia Border Metal Cutting Die 30159, Merry Christmas Chunky Metal Die Set 19511, silver mirror cardstock.


I started this card by stamping the poinsettia image onto Neenah Solar Crest 80# cardstock with Gina K amalgam black ink.  I coloured it in with Copic markers (R39, R29, R35, YG01 for the main poinsettias, R46 for the berries, and BG72, BG70 for the leaves).  I then applied some Glossy Accents to the berries and set it aside to dry before fussy cutting it out.

Next, on a white A2 (4.25" x 5.5") sized card front, I die cut the Christmas Poinsettia Border die twice, trying to get it evenly spaced across the card as well as up and down.  I glued this onto an A2 sized piece of silver mirror cardstock, and then adhered this to my card base.  This is a really beautiful border die!

On a scrap of white cardstock, I applied a red ink ( I think it was Rouge by Catherine Pooler), and then die cut the Merry Christmas from this.  I also cut two more from white cardstock and stacked these together with glue.  I die cut the shadow layer from the same white cardstock and then glued the sentiment to the shadow layer.  I applied Glossy Accents to the sentiment and let it dry.

Finally, to assemble the card I glued the poinsettia image just above the center and the sentiment just below this.  The silver mirror cardstock really gives this card a lot of shine and the die cut borders look so delicate! 

Thank you for stopping by and I hope you're having a great day!

Wednesday, 12 July 2023

Christmas in July!

Hello again!   Now, I know this may be early for some of you, but one of the themes this month at Paper Rose Studio is Christmas in July.  And since I've been making Christmas cards already on my other design teams, I thought it was only fair to make one for Paper Rose Studio. 😀

Paper Rose Studio Supplies Used: Crisp Christmas A5 12pc Sentiment Sheets 19772, Three Candle Circle Metal Cutting Die 26026, Aussie Christmas - Gum Leaves & Holly Circle Metal Cutting Die 27397 , Holly 6x6" Stencil 19721

Other Supplies: Liquitex Gloss Heavy Gel, Distress Ink in Festive Berries and Aged Mahogony, Distress Ink reinker in Festive Berries, Distress Glitter Dust, Cosmic Shimmer Luna Paste in Moonlight Pearl, Ranger Glossy Accents, microbeads.

I started this card by doing some ink blending with the Festive Berries Distress Ink on an A2 card front, and I tried to get a darker application out towards the edges.  Then I die cut the Three Candle Circle from the center of the card.  I also cut this from white card and just cut out the candle and leaves portion.  I coloured the candles with Copic markers, and applied the Luna Paste over the leaves.  Then I covered the candles with Glossy Accents and while it was still wet, I sprinkled on a little of the glitter.

I wanted some more interest on the background, so I created a paste from the Liquitex gel, Festive Berries, and a little of the Glitter Dust. 


I spread this paste over the Holly stencil and set it aside to dry.  Once it had dried, I applied the Aged Mahogony ink around the edges.  I hadn't thought about adding the Aged Mahogony prior to applying the paste, but that would have been better.  The Liquitex gel is very glossy so it gives a very pretty finish and the glitter dust just helped to add a little sparkle that matched the one on the candles.

On a piece of white card, I applied a light layer of the Luna Paste and let that dry.  I cut the Gum Leaves & Holly die from this, and again from white card two more times. I layered these die cuts up with the Luna Paste one on top.  I paper pieced the leaves back into the die cut by applying a small piece of cellophane tape to the back of the die cut and then inserting the die cut leaves.  Next, I glued this stacked die cut over the Three Candle circle on the card front.

I struggled with what to put in behind the candles, as gold mirror card was too shiny and white too boring.  Finally, I applied a layer of double sided adhesive over some gold mirror card, and covered this with microbeads, and pressed them in using the release paper.  This doesn't show up well in the picture, but in real life, there's a really fun texture behind the candles.

I glued the card front down to an A2 sized card base.  I used my laminator to foil the sentiment, using a satin gold foil. I trimmed this down and lastly, glued it to the circle just below the candles.

Thank you so much for joining me today, and I hope you are ok with a very early Christmas card!


Sunday, 27 November 2022

Christmas Wreath Card

Hello and welcome back!  I've got another Christmas card today, and it's probably my last for the year.


Supplies Used:  Little Foliage 1 Metal Cutting Die 21099, Berry Border Metal Cutting Die 23473, Poinsettia Flowers Metal Die Set 18351, Hand Stitching Coverplate Metal Cutting Die 26020, Merry Christmas Script Clear Stamp 27301. Other supplies - Cosmic Shimmer Ultra Sparkle Paste in Golden Sand and Frosty Sparkle, Cosmic Shimmer Gilded Touch in Warm Gold, gold mirror cardstock, gold beads,  white acrylic paint, Kuretake Starry Colors Paint, Glossy Accents.

I made this card a little bigger to accommodate the wreath, so it ended up being 5" x 6".  I used the Hand Stitching coverplate die on the card front, and extended the die cutting over the entire surface which was easy to do.  I mounted the gold mirror cardstock behind this and attached the background to my card base.  

I die cut the foliage dies from both green and white cardstock and spattered them with gold paint and some white acrylic paint. I also applied some of the Ultra Sparkle paste over the white leaves and set everything aside to dry.  Once they were dry, I added some more of the Gilded Touch wax to the green leaves. 

I die cut the berry border die twice and coloured in the berries with Copic markers.  I added Glossy Accents to the berries and then let this dry.  Then I fussy cut out individual branches of berries to tuck into the wreath. 

I cut the poinsettia from red cardstock several times, and once with the small outline die from gold mirror cardstock. I layered these together, shaping the petals for dimension and using some foam tape between layers.  Then I added some of the Gilded Touch wax to the tips.  I used glue to add the gold beads to the center of the poinsettia. 

I stamped and white heat embossed the sentiment onto some red cardstock, and then fussy cut it out.

Finally, I assembled the wreath onto the card front, tucking in berries where I could. The poinsettia was added at the bottom, and the sentiment to the inside of the wreath.  Finally, I added a little of the Ultra Sparkle Frosty Sparkle paste to the tips of the leaves and berries, and just a little on the poinsettia. 

Thank you for joining me today and I hope I've given you some inspiration!


Tuesday, 15 November 2022

Santa's Sleigh Card

Hello again and welcome!  I think I'm on a roll with making my Christmas cards, so I hope you're not too tired of seeing them!  Here's a look at today's card.


Products used:  Nature Stroll 3 Die Cuts 27898, Crisp Christmas A5 12pc Sentiment Sheets 19772, Sleigh Metal Cutting Die 20610, Holly 6x6" Stencil 19721, Nature Stroll Festive 12x12 Paper Collection 27433 (Note - I only used the red and white strip from the bottom of one of the 12 x 12" papers from this collection, so if you have something similar, it would probably work).  Other supplies - Cosmic Shimner Luna Paste in Moonlight Pearl, silver cardstock, foil for the sentiment.

I started by creating the background first.  I used the Luna Paste through the Holly stencil, spreading as even a layer as I could, and then set it aside to dry.  

I die cut the sleigh twice from white cardstock, and once from green (this green was actually a scrap piece from the Nature Stroll Festive 12 x 12" papers). I glued one of the white die cut sleighs to the back of the green one for extra support.  I cut the runners and snowflakes from the silver mirror cardstock, and I also cut the runners again from white cardstock and glued it to the silver one.  I used glue to adhere the snowflakes to the sleigh, and then glued the sleigh runners in place.

The diecuts were easily removed from the card backing and I trimmed the tags where needed.  What a quick and simple way to make a great card! I just collected an assortment of flowers that filled the sleigh and arranged them in the sleigh.  I used a little glue to hold them in place and then glued the extra sleigh to the back of all the flowers. The red and white strip border was cut from one of the 12 x 12" paper borders.

I foiled the sentiment in my laminator with some DecoFoil in silver, and trimmed it down.

To assemble the card, I glued the now dry stencilled card front to my card base.  The red and white strip was adhered with glue on the left hand edge. I attached the sleigh and then finally, placed the sentiment underneath it, on foam tape.  

Thank you for stopping by and I hope you're having a happy, creative day!

Monday, 14 November 2022

Feline Christmas Card

Hello everyone!  I've got a Christmas card to share today using the new "Furry and Bright" stamp set from Gerda Steiner Designs.


I stamped the Furry and Bright cat image first onto Neenah Solar Crest 80# cardstock and then masked the two lights that are on the right side. Then I positioned and stamped the cat from the "All Cats" stamp set (also from Gerda Steiner Designs) just to the right of the first cat.  I used Copic markers to colour them in and then fussy cut them out, and mounted them on double sided foam tape.  The sentiment was stamped and clear heat embossed onto white cardstock, and after trimming the sentiment down, I cut the tail ends at an angle.  I also mounted the sentiment onto foam tape. 

The background was created with the Detail Bohemian Plate die from Simon Says Stamp. After die cutting it out, I adhered it with glue to the card base.  I then positioned the cats and sentiment on the card, and finally, added a few sequin stars (from a dollar store mix), and also some Glossy Accents on the lights.  I'm pretty sure those cats look like my husband and I every year when we go to put up the lights!

Thanks for stopping by and I hope you're having a great day!

Thursday, 27 October 2022

Dancing Reindeer Card


Hello again, I've got an interactive card today inspired by the amazing Jennifer McGuire.  Hopefully, you can see it it action in the short video above. 

Paper Rose supplies used:  Starry Night 6x6" Stencil 19802, Jumping Reindeer Metal Cutting Die 17817, Merry Christmas Chunky Metal Die Set 19511. Other supplies:  Acetate, alcohol inks, beads, gold mirror cardstock, DecoFoil Metallix gel in Champagne, holographic glitter.

This card actually started from my stash of backgrounds that I keep in a box.  I had created the alcohol inked background, but wasn't sure what to do with it.  I added the Metallix gel over the Starry Night stencil to the inked background, and before I removed the stencil, I sprinkled on some of the holographic glitter. Then I removed the stencil and washed it.  Once the background had dried, I trimmed it down to be a 4 1/2" square. The glitter added a slight grainy texture to the card front, and since I wanted to try making the reindeer swing following Jennifer McGuire's instructions (here's a link to her video for pendulum cards), I decided to add an acetate cover.  I cut a piece of acetate that was 5 x 5" and scored it on all four edges 1/4" in from the outside edge.  Using a bone folder, I creased each of the fold lines, folding the edges under.  I attached the acetate to the back of the alcohol inked card with double sided adhesive tape.

Next, I cut the reindeer die twice from white cardstock and once from the gold mirror cardstock, and glued them together.  I also cut the outline reindeer die from a navy cardstock.  I glued the gold reindeer onto the outline die cut. 

To create the pendulum mechanism, I cut a piece of acetate that was approximately 2" long and 1/2" wide, and used a piece of double sided tape to attach a penny to the bottom end.  The penny gives the acetate weight and allows it to swing.  I decided where I wanted the reindeer to be positioned on the card front and marked where the center of his head would be on the acetate square.  I used my smallest circle die, about 3/4", and die cut over this mark.  I placed a small circle of doubled up foam tape at the top of the acetate pendulum and aligned the square front over this so the foam tape came through the die cut opening.  On the front, I removed the backing from the circle of foam tape and placed the head of the reindeer over the foam tape, securing it in place.  Then I added doubled up foam tape all around the back edges, making sure the pendulum could swing freely. 

Back of the pendulum piece

Next,  I created a card base that measured 6 1/4" x 4 3/4".  I attached a piece of gold mirror cardstock to the front.  The sentiment was cut from white cardstock twice and once more from the gold cardstock and adhered together.  I cut the outline from the same navy cardstock and glued the sentiment onto this.  I positioned the sentiment at the bottom of the card front and glued it in place.  Next I removed the backing from the double sided foam on my reindeer piece, and positioned this on the card front.  To stop the pendulum from swinging as I positioned it, I had temporarily taped the reindeer in place on the front with low tack tape.  Finally, I added some beads to the reindeer and had a play with it.  It really is fun to watch him swing back and forth!

Thank you for stopping by and I hope you're having a great day!


Saturday, 15 October 2022

Satin Ribbon Embossed Background


Hello again, and welcome!  Have you ever tried using ribbon for your card background?  I've used some satin ribbon today for this card and it gives the card a soft, satiny finish in real life.  The photograph doesn't really do it justice.  

Paper Rose supplies used: Spring Floral Frame Metal Cutting Die 21054, Christmas Fir Tree Large Metal Cutting Die 20589, Stitched Rectangles Metal Cutting Die 16575, Crisp Christmas A5 12pc Sentiment Sheets 19772.  Other supplies, Distress Oxide ink in Worn Lipstick, acetate strip, pearl beads, satin ribbon, double sided adhesive (I used Die Cut'N Bond). 

To create the background, I placed the double sided adhesive over an A2 (4 1/4" x 5 1/2 ") sized card front, covering it completely.  After removing the backing paper,  I placed a strip of ribbon down the center of this card front, and then placed strips down the sides of the center ribbon until the entire card front was covered.  I used a bone folder to gently press the ribbon down so it adhered well to the card front.  I applied a little of the Worn Lipstick with a brush to just around the edges to darken them slightly and then rubbed the excess off with a soft cloth.  Next, I positioned this card front inside the Spring Floral Frame die and ran it through my die cutting machine with the rubber mat and embossing plate to emboss it.  You don't want to die cut this!

Using the largest and third largest dies in the Stitched Rectangles die set, I created a frame by taping the two dies evenly inside each other.  I cut this frame from white cardstock twice. 

I cut a card base from white cardstock that was the size of the frame.  I glued the satin ribbon card front to the card base, trimming it to fit.  I glued one of the white frames over this.  Next, I die cut from white cardstock, three of the Christmas Fir Trees and glued them together.  I chose to leave them white, but you could add a glitter paste or cut them from glitter cardstock.  I glued the tree to the center of the satin card front and added some pearls to it.  

Then I used double sided tape to adhere a 3/8" wide x 3 3/4" piece of acetate to the back of the remaining frame, placing it near the bottom, where the base of the tree would be.  This strip allowed me to place the sentiment off the tree and to add a few more pearls. Once the strip was in place,  I added two layers of narrow foam tape to the back of the frame, and then positioned it over the frame that was already in place.  Once the second frame was in position, I added the sentiment to the acetate strip and a few more pearls.  The ribbon really does give this card a very different look.

Thank you for stopping by, and I hope you're having a great day!


Tuesday, 27 September 2022

See-Through Christmas Tree Card

Hello everyone, I'm so glad you stopped by.  I've got a Christmas card again to share with you today, and I must say I can never get these done early enough!


Supplies Used:  Christmas Fir Tree Large Metal Cutting Die 20589Poinsettia - Silver Foil 6x6 Paper Collection 27277, Crisp Christmas A5 12pc Sentiment Sheets 19772, holographic silver cardstock, gemstones, acetate (4.25" x 5.5").

I started this card by die cutting the tree out of white cardstock three times, and once from holographic silver cardstock.  I was very careful with the silver one and one of the white ones, to not loose the inset pieces, so I placed Glad Press 'N Seal onto the back of the diecut to keep all those little bits in place. The triple layers of the tree helps to give support to the acetate and keeps the card front from bending.  

I glued two of the white trees together, and then glued this onto a scrap piece of acetate.  The acetate gave me something to inlay the diecut pieces onto, but won't show up in the final card.  I trimmed this acetate so it didn't extend past the outside edges of the tree.  Then I used a fine tipped glue to inlay the white diecut pieces.  I only inlaid the non-circle pieces, as I knew I was going to put the gemstones in where the circles were.  The purpose of inlaying these white pieces was to make sure the holographic ones would show up better and not be lost in the depths of the tree.  I know that seems like an extra step, but I do think it was worth it and it really didn't take too long to do.  So the next step was to inlay the holographic pieces over the white inlaid ones. Then I glued the gemstones in place.  I also have a holographic tree now to use on another card. 

I used a top folding A2 sized card base (4.25 x 5.5"), and trimmed the front down to be 1.5" (or 4mm).  I also cut two strips from the Poinsettia silver foil cardstock, to be 4.25" x 1.5" ( 11 mm x 4 mm).  I also cut one of these strips from white cardstock.

On the card front, I used my tape gun to adhere the 4.25 x 5.5" piece of acetate over the remaining top front.  I found this easiest to do by lining up the bottom edge of the acetate with the bottom edge of the card base and then easing the acetate down onto the upper edge of the card.  

Next, I adhered the white strip of cardstock to the inside bottom edge of the acetate. I used my tape gun to apply adhesive over the white cardstock, then I lined it up flush with the bottom edge of the card base, and carefully lowered the acetate over it so it was all flush with the edges of the card base.  Finally, I adhered the silver foiled paper over the acetate, again using my tape runner.  Finally, I cut little strips of the metallic silver cardstock and glued them in place along the edges of the silver foiled cardstock.  I mounted the sentiment onto some more metallic silver cardstock.  To finish the card, I glued the tree onto the card front and added the sentiment above.  On the inside of the card front, I glued the third white cardstock tree shape over top of the front tree to give a clean finish.

Thank you so much for stopping by, and I hope you're having a very creative day!


Saturday, 27 August 2022

Paper Pieced Christmas Card


Supplies Used:  Paper Piece Rectangle Metal Cutting Die 21441, Christmas Stocking Metal Die Set 19508, Crisp Christmas A5 12pc Sentiment Sheets 19772, Stampendous Jewelled Gold Embossing Powder, Cosmic Shimmer Ultra Sparkle Paste in Frosty Sparkle, Nuvo Shimmer Pen, Copic Markers

Hello again everyone, I'm bringing you a little Christmas today!  I die cut the Paper Piece Rectangle die from white cardstock and carefully placed a piece of Glad Press 'N Seal on the backs of the diecut pieces to hold them in place while I coloured them.  I used Copic markers, all from the reds series, to colour them in.  Then I randomly applied the Ultra Sparkle Paste or Shimmer pen to a few of the sections and let them dry. 

I saved the white outline frame piece that was diecut with all the inset pieces, and positioned that on the card front with removable tape, making sure it was centered. Then I inset and glued all the coloured pieces into the frame, which was quite simple since the Press 'N Seal had held them all in place. Once they were in place, I removed the outline piece that had been temporarily positioned.  You could of course, glue it in place too, but I wanted the no frame look for this card.

I used an oval shape to trace around the sentiment and then fussy cut it out.  I went around the edges with a VersaMark ink pad, just lightly leaving a little ink.  I sprinkled on the Jewelled Gold embossing powder and heat set it.  I used a VersaMark pen to put some ink on the stocking die cut and sprinkled on the same embossing powder, which I also heat set. I used a gold brad to attach the stocking to the sentiment. I cut two more layers of cardstock to place behind the sentiment to add some dimension.  Then I glued it in place on the card.  Finally, I added a few gold pearls to the stocking.

Thanks for stopping by and I hope you're having a happy, creative day!

Wednesday, 17 November 2021

Namasleigh Christmas Circle Spinner Card with Center Shaker *Video*

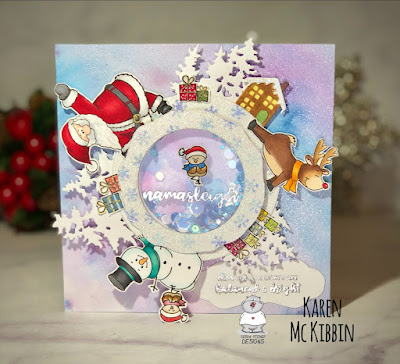
Hello and welcome back! My card today is a circle spinner style card with a central shaker. I’ve used the fun, new Namasleigh stamp set from Gerda Steiner Designs for this one. 


The outer ring on this 5 1/2” square card will spin around to add an interactive element and of course, the card can be shaken to move the shaker bits in the middle. There are no special dies required for this card other than a few circle dies in different sizes.  I’ve made a video for you to show you how I made this card, but I have to confess, I may have switched up some of the stamps and the Reindeer and a Tree stamp set from Gerda Steiner Designs may be involved! Here's a sneak peek at what the card in the video looks like.


If you would like to see how I made this card, PLEASE CLICK HERE.
 
Thank you so much for stopping by and I do hope you're having a great day!


Wednesday, 3 November 2021

A Nutcracker Christmas

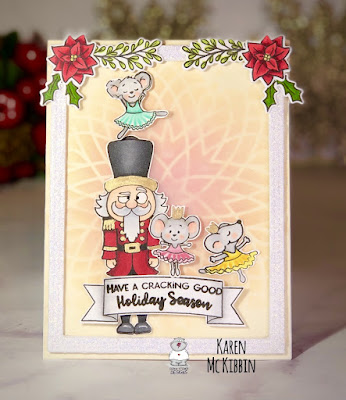
Hello and welcome back! I’ve got a Christmas card to share today that was made with a new stamp set from Gerda Steiner Designs called “The Nutcracker”. Those dancing mice are just so sweet and the look on the Nutcracker is priceless! 


I started by creating the background.  On yellow cardstock, I used the Captivating Mandala stencil from My Favourite Things and blended on some Distress Oxide ink in Worn Lipstick and Dried Marigold. I added a layer of vellum over top of this as I felt the stencilling was too distracting behind the images and the vellum softened it a little bit.  

I die cut a frame from white cardstock 4 times and glued 3 of these together to add some height. On the last diecut, I added some Tonic Moonstone Glimmer paste for a bit of shine, before gluing it to the other frames. 

I added in a few leaves and poinsettias that came from a Hero Arts “Stocking Bouquet” stamp set and placed these onto the frame. 

I used copic markers (listed below) to colour the little mice and Nutcracker images. I used a gold metallic marker to add in the gold elements on the Nutcracker and the crowns on the mice. I arranged the images onto the background and put the sentiment up on foam tape as well as the mice in pink and green. Those mice are just so cute! 

Thank you so much for stopping by and I hope you’re having a fun, creative day! 

Copic markers used: 

Nutcracker - R39, R29, R35, R20, R00, N8, N6, N4, E000, E00, C2, C1, C0
Mice - N2, N1, N0, R20, R00
Yellow dress - Y19, Y08, Y02
Green dress - G00, BG32, BG11
Pink dress - R85, R83, R81


Wednesday, 20 October 2021

Namasleigh Christmas Card with *Video*

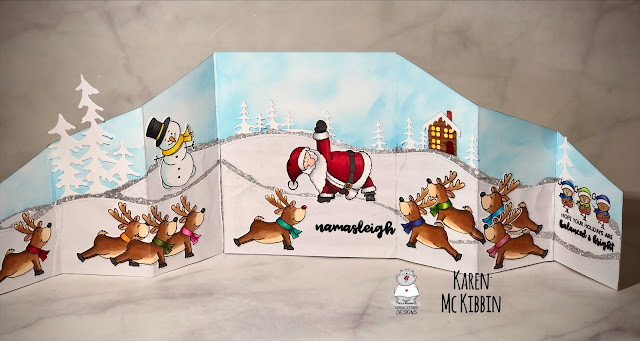
Hello and welcome back! I’ve got a fun Christmas card today that features a brand new Gerda Steiner Designs stamp set called Namasleigh.  I love the idea of the reindeer and Santa getting ready for their big day by doing some yoga together, and even the birds and snowman got in on it!  To fit all these images in (because I had to include all the reindeer), I’ve made a double zig zag card. When the card is folded down, it measures 5” x 4 1/4”. But when it’s opened up, it’s over 16” wide! So there’s lots of room to fit all those images. 

Front of the card when closed with an acetate belly band. 


The inside of the card when opened. 

I’ve made a video for you to see how this card was made.  If you are interested in seeing it, PLEASE CLICK HERE.  Thank you so much for stopping by and I hope you’re having a great day! 

Wednesday, 8 September 2021

Little Reindeer Christmas Card

Hello again and welcome! I have a Christmas card to share today, and I do hope it’s not too early for you. It features the sweet “Little Reindeer” from Gerda Steiner Designs and he seems to have got himself a little tangled up in the Christmas lights. 


I coloured the reindeer image with copic markers and then added glossy accents to all the lights and ornaments before setting it aside to dry.  While it was drying, I created the background by die cutting two borders of snowflakes from a Crafters Companion die set called Joyful Snowflakes. Although you can’t see it in the photo, I spritzed these with some Sheer Shimmer craft spray in Sparkle.  I rotated one panel to go across the top of my card front and placed the other along the bottom edge.  I die cut 5 layers of the circular Paper Rose Geo Mandala from red cardstock and glued these together.  I used the same red cardstock for the sentiment, which is from the “Reindeer and a Tree” stamp set, and white heat embossed the sentiment.  Finally, I glued the mandala circle to the front of the card and popped the reindeer up on foam tape inside the circle. The sentiment is also on foam tape.  So another quick and simple card today!  

Thank you for stopping by and I hope you’re having a great day! 


Friday, 4 December 2020

A Dog and a Bone Christmas

Hello again, I hope you’re having a great day.  I love these images from Anita Jerem of the Colorado Craft Company (Christmas Presents stamp set) and couldn’t wait to start playing with them. 


I copic coloured the image and fussy cut it out.  I also diecut the Merry from MFTStamps about 4 times and stacked them up.  I really like the look of tone on tone white, but I felt that something was still missing. So I used a CZ Designs stencil from Simon Says Stamp and added some Distress crackle paste in white. When it dries, it gives so much texture and interest to the background. The frame is from Poppy Stamps Double Stitched Rectangle Frames, and I die cut 3 of them.  I also cut an inner frame from foiled cardstock.  The ornaments are from a Gerda Steiner Designs stamp set called Reindeer and a Tree. 

This was such a fun, quick card to make and I absolutely love that image! I know there is no way at our house, that the bone shaped gift would remain under the tree to be admired!! *grin*

Tuesday, 10 November 2020

Another Paper Roses Poinsettia card

 Hello again and thanks for stopping by!  I have really been trying to use my supplies repeatedly lately, so I have another card today featuring Paper Rose Studio’s Poinsettia Flower  die set. If you haven’t seen this die set yet, you should check it out - it’s beautiful! 


I die cut from gold cardstock, two of the outline flowers.  The red flower was cut from red cardstock and I used some copic markers to add some shading (R39 and R29).  I glued some gold seed beads to the center of the red flower.

The bottom border is from a Paper Rose Studio stencil called Holly.  I applied some Heidi Swapp clear texture paste to green cardstock.  When it was dry, I ran it through my laminator with some champagne foil.  I used my R39 copic marker on the berries and then added glossy accents on top. I cut a border from the gold foil cardstock using a MFT Ric Rac die.  

The top, see-through part of the card is made with a laminating pouch that I sprinkled some embossing powder in as well as some silver stars, before running it through my laminator.  Jennifer McGuire has a video on how to do this and here is the link if you want to check it out.  It’s a fantastic idea!  I scored and folded this see-through panel, and then sandwiched it between pieces of white cardstock on the front and back of my card.  Finally, I cut my sentiment from red foil cardstock and glued it to the inside of my card. 

Thanks so much for joining me today and I hope you’re having a great day! 


Monday, 2 November 2020

Paper Roses Poinsettia Flowers

 Hello, I’ve got three cards today made with this beautiful Poinsettia Flowers die set from Paper Roses and one of them isn’t even a Christmas card! Shocking, right?!  Honestly, the last one started off in my mind as a Christmas card, but I wanted to make them pink poinsettias.  However, once I coloured them up, they didn’t look too Christmassy so they’re a thank you card now.  Just the way things go ...

Anyway, here’s the first card and it is a Christmas card. 


This is the front of the card but it’s a trifold card, so when you open up the card the poinsettias are actually on the middle layer and look like this ...


The sentiment on the front of the card is from Poppy Stamps and is called Christmas Quotes. The holly on the inside is also from Poppy Stamps and is from their Mistletoe and Holly die set. I die cut the poinsettias from white cardstock and then copic coloured them with R39, R29 and R35. 

Here is my second card ...


This one is a shaker card and has a lot of shiny stuff on it! It was very hard to photograph as a result.  The background is a Gina K foiled toner card and the “peace” sentiment is from Crafter’s Companion.  It’s meant to be cut out of an opening so I did some partial die cutting to get the arched circle and then die cut the “peace” again from foiled cardstock to place over top.  I used a “Mini Poinsettia” embossing folder from Couture Creations on the front.  I copic coloured these poinsettias in the same way as the first card.

And for the third card ...


I die cut the flowers from Bristol cardstock and coloured them with Zig Clean Color watercolour brushes, which I’m really not as comfortable using.  They were just so bright and pink when I was done that I just didn’t see them as Christmas flowers at all. The background is made from a Paper Roses stencil called Flowy Leaves and I used some Decofoil Metallix gel in Champagne. The sentiment is from MFT’s More Essential Sentiments set. 

Thank you so much for joining me today and I hope I’ve given you a little inspiration!  Have a great day! 


Monday, 26 October 2020

How to Make a Hillside Trifold Card *Video*

 Hello and thanks for stopping by!  I’ve got a couple of cards for you today that use a similar technique but they have very different looks. They are both hillside trifold cards and are both Christmas cards. 


This is the first card and it features the beautiful Hero Arts Tri-fold Edge Village die set.  I’ve kept the colours very simple - just white and gold, which gives the card a classic, elegant look.  


The second card features The Reindeer and a Tree stamp set from Gerda Steiner Designs, as well as Sunny Studios Woodland Border die set.  This is a fun, whimsical card and has the added surprise that from the front of the card, you don’t see all the reindeer decorating inside. You only see them when the card is opened.  


I’ve got a video if you would like to see how I made these cards.  To see the video PLEASE CLICK HERE.

I hope these cards will give you a little inspiration or help jumpstart your creativity.   Thank you so much for stopping by and I hope you’re having a great day!