Saturday 28 May 2022

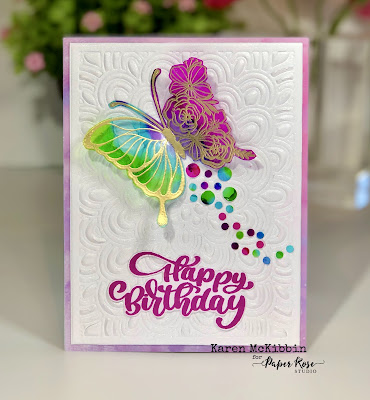
Cleo Floral Butterfly Birthday Card

Hello again and welcome! I've got another butterfly birthday card to share with you today, and this one features the Cleo Floral Butterfly stamp from Paper Rose Studio.


Paper Rose Studio products - Cleo Floral Butterfly Stamp 24643, Happy Birthday Chunky Script Stamp 24640, Doodle Flower Coverplate 1 Die 20553, Butterfly Bliss 6x6 Paper Collection

Other products - Ranger Alcohol inks in Boysenberry, Fiesta, Botanical, and Pool; acetate; Yupo paper; Perfect Pearls in Pearl; Altenew ink in Razzleberry; VersaMark ink; Ranger Super Fine Gold embossing powder; circle paper punches.


I added the alcohol inks to the acetate and tried to keep them separated slightly by colour as I wanted the floral side of the butterfly to have the more pink and purple tones, and the blues and greens to be on the other side.  I also added the same inks to the Yupo paper to be used for the trail, but this could also be made out of acetate (I just didn’t have enough left for this).  Once the inks were dry, I turned the acetate over and used an anti-static powder bag liberally over this side, before using some VersaMark ink to stamp the butterfly and heat set it with gold embossing powder.  I then fussy cut out the butterfly. For the sentiment, I stamped onto white cardstock about three times with the Razzleberry ink to get a deep colour. I also fussy cut this out.  I embossed the Doodle Flower Coverplate die onto white cardstock using a rubber mat and embossing plate, and then misted it with the Perfect pearls (just a little Perfect Pearls mixed with water in a spray bottle).  I used one piece of the Butterfly Bliss paper pad for the background ( but made sure to cut out the centre to be used in another project), and adhered this to the card front. I used glue to attach the embossed front background piece.  Then I glued the sentiment in place along the bottom third.  I carefully folded the butterfly wings back along the edges of the body, and attached it in place using glue on the body and the antenna.  Finally, I used two sizes of paper punches to cut circles from the Yupo coloured paper, and glued these in place behind the butterfly.

Thank you for stopping by, and I do hope you're having a fun, creative day!

Wednesday 18 May 2022

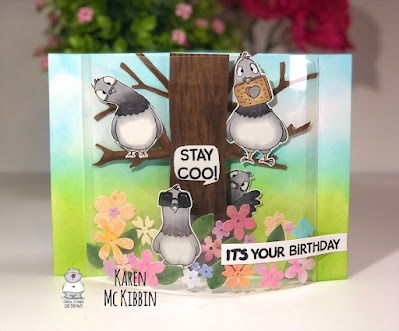
Pigeons Acetate Bendy Card with *Video*

Hello everyone! I’ve got a fun new card fold idea for you today, using the adorable “Pigeons” stamp set from Gerda Steiner Designs. This is a 5” x 7” card that folds flat, but pops out to create a 3D card when it comes out of the envelope. There’s room on the back of the card to write a message and to decorate if you want. I have to give a shoutout to Sam Calcott of Mixed Up Craft who I first saw make this style of card.  I've got a link in the video description to her video which is well worth seeing.  Here’s a look at my card.


Back of the card

Bottom view of the card showing dimension


I’ve made a video for you to show how this card was made. There are no special dies required, and it’s really not a difficult card to make. But it does have lots of dimension and a little bit of movement of the pigeons. So if you would like to see the video, please CLICK HERE. 

Thank you so much for stopping by and I hope you’re having a fun, creative day! 


Monday 16 May 2022

Happy Everything Poppy Card

Hello again and welcome! Today, I've got a card that features some slightly older Paper Rose Studio products that I love.  I left the sentiment on this one as a very general Happy Everything as I really like to have some of these in my stash for different occasions that might arise. Here's a look at the card.


Paper Rose Studio products - Poppy Field Border Die 18640, Spotty Line Border Die 18548, Crisp Christmas Sentiment Sheets

Other supplies - Copic Markers; Cosmic Shimmer Pixie Sparkles Powder in Beyond Blue; DecoFoil in Gold

For the background, I sprinkled the Pixie Sparkles powder quite liberally over the card front and misted with 3-4 good mists of water, before setting it aside to dry. Next, I die cut the Poppy Field die from white cardstock, and used Copic Markers to colour in the flowers and leaves.  I also used one of the red markers to colour a scrap of white cardstock to use behind the sentiment.  Then I die cut the Spotty Line Border die from white cardstock, having it cut just below the centre of the card. I wove the poppies through the lines so some of them were in front and others behind the lines, and then glued them together on the bottom edge of the poppy die cut. I glued the now dry background behind the poppies, only using glue on the poppies in the back row behind the lines.  On the front, I used little pieces of double sided foam tape to attach the poppies that were in front of the lines.  I foiled the sentiment using a laminator, trimmed it down, and attached it to the red coloured scrap of cardstock I had prepared earlier. This was then trimmed down and attached just below the poppies.

Thank you so much for stopping by and I hope you're having a great day!

Wednesday 4 May 2022

Butterfly Birthday card

Hello again, I've got another birthday card to share with you today featuring products from Paper Rose Studio.  I wish you could see how bright those alcohol inked wings really are, but my camera just would not cooperate.


Paper Rose Studio products - Butterfly Card Creator Die 25117, All Occasions Sentiment Sheets 22339, Gum Leaf Stencil 18132

Other supplies: Ranger Alcohol inks in Boysenberry, and Fiesta; acetate sheet; Cosmic Shimmer Colour Cloud ink in Chic Magenta and Lilac Whisper; Distress Crackle Texture Paste; Distress Oxide ink in Peacock Feathers; DecoFoil in Rainbow Shattered Glass; white pearls

I die cut the larger of the Butterfly dies in the Butterfly Card Creator die set three times from white cardstock. I extended the die cutting slightly to allow the butterfly to be more towards the centre.  I stacked and glued the three layers together.  On the acetate, I used the alcohol inks to create a pattern for the wings of the butterfly.  Once this was dry, I placed it behind the butterfly where I wanted it to go, and cut around it, using the butterfly wings as a guide. I glued this in place by only gluing on the back of the stacked butterly wings. I then cut and glued in place, a piece of white cardstock to go on the back of the acetate as I didn’t want the background to interfere with the alcohol ink. I used the DecoFoil and a laminator to foil the sentiment, and also added a small strip of the foil along the edge of the butterfly die. For the background, I ink blended the bottom edge of the card front with the Colour Cloud inks. I then stencilled over this with the Crackle paste and the Gum Leaf stencil on which I had covered the flower portion of the stencil with some tape. Once the paste was dry, I stencilled over it with the Peacock Feathers Distress Oxide ink.  I added some splatters using the Peacock Feathers ink, Chic Magenta and a little white acrylic paint.  Once the background was dry, I added the butterfly die cut and a few white pearls.

Thank you for stopping by and I hope you're having a happy, creative day!

Garden Critters Thank You Card

Hello and welcome back.  I’ve got a thank you card to share today that combines the Garden Critters and Happy Bee-day stamp sets from Gerda Steiner Designs.


I used Copic markers to colour in all the poppies and the caterpillar, and then fussy cut them out.  The extra leaves are from the HoneyBee Stamps "Lovely Layers Coneflower" die set and I cut them from green cardstock and added some Distress Oxide Rustic Wilderness and Mowed Lawn to them.  The white circular die is from PinkFresh Studio and is the "Stitched Scallop Circle" die set, and I chose to use both the inside and outside die cuts.  I stacked about four of these die cuts together to create some dimension. The sentiment is from the Garden Critters stamp set and I heat embossed it with clear embossing powder (please try not to notice that I didn't cut it quite straight! It drives me crazy 😬).

For the background, I used some Cosmic Shimmer Colour Cloud ink in Lemon Meringue, Baked Peach and Lush Pink and just ink blended them over the card front. Then I sprinkled on some Pixie Sparkles in Pumpkin Patch and misted with water.  There's a lot of sparkle in real life from these, but it doesn't show up in the picture. 

Finally, to put it all together, I glued down the leaves where I wanted them to go, but left the upper edges free to be curled up slightly.  Then I glued the white circle die cuts down in place, before adding in the poppies.  I mounted the caterpillar on foam tape and positioned him at the bottom of the circle.  I also mounted the sentiment on foam tape and adhered it below the image.

Thank you for stopping by, and I do hope you're having a happy, creative day!