Showing posts with label Birthday card. Show all posts

Friday, 12 July 2024

Oceans of Birthday Wishes

Hello again, and welcome.  I've got two birthday cards today that are the result of using the positive and negative images from some die cuts.  I love getting a 2 for 1!  Here's a look at the two cards:


 CARD 1

The first card is a shaker card.  I started by adding some Catherine Pooler inks to my card front in Aquatini, Stone Blue and Seafoam.  I added in some water drops and then reinked over those once they were dry.  I repeated this several times until there was some depth and interest to the cardstock.  Then I used the Cracked stencil over top and spread some Nuvo Jewel Drops in Sea Breeze over the card front. 

When this was dry, I used the Dolphin Dance dies to cut out the center.  I also cut the dolphins from white cardstock and set them aside.  I had originally thought I was going to create more layers for this card (which is why the second card has so many layers), but changed my mind and only cut one lighter green-blue piece of cardstock, using the Splat Nesting die for this.  I used one of the pieces of Inky Colour papers to place at the back of the opening. 

I covered the back of the card front with a piece of acetate.  I put a second piece of acetate behind the lighter green-blue layer as well.  I placed double side foam tape around the back of the opening on the card front to create a well for my shaker. 

I had to get a little creative with the coral and seaweed as I did not have any dies for this.  So the "coral" is acutally one of the branches from the Little Foliage 2 set that I coloured, cut apart and then glued back together to look a little like coral. The "seaweed" is made from the wavy border die in the Wave borders die set.  I cut it from some inked up green card, and then cut it out to make seaweed by following the die cut lines.  I glued these element onto the back of the card front before adding the shaker bits and attaching the second die cut layer.   

I positioned the Inky Colour paper onto the card base and added the one dolphin so he could be seen through the opening.  I then attached the shaker layers to the card front.  Finally, I added the second dolphin and the sentiment. 

CARD 2

I started this card by cutting through the card base with the bubbly border die from the Wave borders die set.  I cut through both the front and back and had to run it through my die cutting machine several times. I then added a lighter blending of the same inks used in the first card.   Then I used the Cracked stencil over top and applied some Liquitex Gloss Heavy Gel that was mixed with some of the Aquatini ink. 

Once the card front was dry, I started layering up my die cut pieces.  I had used the Splat Nesting dies to cut all of them except for the top layer.  The very top layer was applied with foam tape to give some added dimension. I added in my seaweed and coral in a few places.  

I die cut the fish from white cardstock and then backed them with some scraps of the Inky Colour papers.  I added these to the card front and then added the sentiment.  I created the sentiment on my computer as I didn't have anything fishy enough in my stash! 

Thank you for stopping by today and I hope I may have given you some inspiration.


Wednesday, 12 June 2024

Botanical Blooms Birthday Cards

Welcome back and I'm glad you've stopped by.  I have two cards to share today, both made from the beautiful Botanical Blooms 6 x 6" patterned paper from Paper Rose Studio.  These papers are so beautiful that I really didn't think they needed much more added to them.  Here's a look at my cards ... 


Paper Rose Studio Supplies Used:  Botanical Blooms 6x6 Paper Collection 32052, Happy Birthday A5 10pc Sentiment Sheets 30720 - Foil, Little Foliage 2 Metal Cutting Die 21102, Happy Peek-a-Boo Metal Cutting Die 16832.

For the first card which I'm going to call the blue card, I started by cutting a 5 1/2" x 5 1/2" square of the patterned paper.  I used the Peek-A-Boo Happy die to cut out the bottom third or so from the paper.  This die leaves the letters attached at the top and bottom, so the patterned paper stayed intact.  On another piece of white scrap cardstock, I did a little ink blending with different shades of blue using some Catherine Pooler inks (I'm sorry but I forgot to write down which inks I used).  I then die cut the Peek-A-Boo Happy from this now coloured cardstock.  I applied some VersaMark ink to the letters and then covered them with Ultra Thick Embossing powder and heat set them.  I repeated this two more times until the letters were smooth and glossy.  Then I trimmed the top and bottom off the letters so that they were now individual letters. I glued the botanical paper down to a 5 1/2" square card base, and then glued the embossed letters on top of the botanical paper layer.  I used some blueish ink again on some scrap cardstock and then die cut the Little Foliage 2 leaves out and tucked them in beside the Happy part of the sentiment. I had a little butterfly that was from the Rainbow Butterflies and Insects cut aparts that I glued to one of the leaves. And finally, I cut the birthday from one of the silver foiled sentiment strips, mounted it onto double sided foam tape and adhered it below the Happy sentiment. 

For the second card, I started with an A2 card base that is side folding.  I trimmed a piece of the botanical paper to cover the front and glued it in place.  Then I positioned the Peek-A-Boo Happy die at the top of my card and die cut out the letters from both the front and back of the card base.  There was a very thin strip of card left at the top of the letters, and I trimmed that off with my paper trimmer.  On a separate piece of scrap white cardstock, I did some ink blending to get a mix of pinks  and peachy tones.  I die cut the Peek-A-Boo Happy die from this also, and again, used my VersaMark ink and Ultra Thick Embossing powder to get a thick, glossy effect. I then trimmed the top and bottom off this to just get the letters separately.  I glued the letters onto the front of the card and added the gold foiled birthday sentiment just below.  Since the letters were die cut out of both the front and back of the card, when you open the card, there is a separate happy at the top of the inside of the card which is quite fun. 

Thank you for stopping by and I hope I've given you a little inspiration today!


Wednesday, 22 May 2024

Hyacinth Birthday Card

Hi everybody, today I've got a floral birthday card for you.


 Supplies used: Violet Garden Die Cuts 28387, Little Foliage 1 Metal Cutting Die 21099, All Occasions Sentiments A5 12pc Sentiment Sheets 22339, Austin Circle Frame Metal Cutting Die 30225.


This was one of those quick and easy cards. It's an A2 sized card that I created using an A2 sized card front.  I ink blended all over the card front first in pink, and then with some purple around the outside edges.  

I die cut the leaves from the Little Foliage die set multiple times from white cardstock and adhered them randomly over the card front.  Then I cut the outer ring of the Austin Circle from white cardstock and glued that down to the upper portion of the card front.  I added in the center circle and then placed the Violet Garden die cut over the center of the circle.

For the sentiment, I used the same pink and purple inks to create the banner tag, and mounted the sentiment sheet on top of it. I trimmed the banner tag down to fit around the sentiment and cut out the fish tail ends. I mounted the banner on foam tape and adhered it below the center circle.  Next, I added a few pearls around the central image. 

At this point, I felt I didn't have quite enough purple tones on my card, so I went back around the edges with a small brush and added a bit more.  This was quite tricky because of the white die cut leaves, so I would highly recommend getting it right before adding the leaves! 😄

Thank you for stopping by today!

Sunday, 12 May 2024

Window Flowers Birthday Card

Hello and welcome back!  My card today has loads of texture - it actually feels like a stucco wall.  Here's a look at it.


 Supplies used: Window With Bricks Metal Cutting Die 22501, Rainbow Garden Florals Embossed Die Cuts 31563, Rainbow Garden Butterflies Embossed Die Cuts 31476, Birthday Layered Metal Cutting Die 18297. Liquitex Modeling Paste, Catherine Pooler inks in Ginger and Terracotta.

This is an A2 sized card so 4.25" x 5.5".  I used a card front that measured the same as the card base, and started by applying the inks randomly across the paper, trying to get a good blend of the inks.  Once I was happy with the ink blending, I die cut the window out of the upper part of the card, and saved the little brick pieces and the arched interior frame.

Next, I mixed in the same inks into a little of the modelling paste and applied that over the card front.  I wanted a stucco looking finish, so I used a spatula and after spreading the paste all over, used a lifting kind of motion to get the paste to lift up in a stucco type appearance.  It was really quite easy to get that look, and it didn't take long for the paste to dry.  It was a little light in colour after it dried, so I did some more ink blending over it with foam applicators to get the right colour. 

For the window, I used a scrap of thick acetate, and glued the ink blended frame onto it.  I also die cut the window portion of the die from white cardstock, and glued this inside the coloured frame on the acetate.  Then I fussy cut the window out of the acetate, but left a border on the left straight edge of the window.  This was only about 1/4" to 1/2" wide, just enough to allow me to glue the window to the back of the card front.  I folded the border to the back and pinched along the fold before attaching it to the back of the card front.  I then glued the whole card front with the attached window to my card base and used acrylic blocks to let it set up.

I added scrap strips of cardstock to the back of some of the bricks and to the long piece under the window, and then randomly glued these back in place.  I glued the beautiful Rainbow Garden Floral image into the window opening, and attached the Rainbow Garden butterfly.  The birthday sentiment was cut from gold mirror cardstock once and twice from white cardstock and layered together before gluing in place on the card front.  The "Happy" sentiment came from the Happy Birthday foiled sentiment sheets set.  I wish that you could feel the "stucco" on this card as it really is realistic!

Thank you for stopping by and I hope you're having a great day!


Monday, 22 April 2024

Rainbow Butterfly Birthday Card

 Hi everyone,  I've got a fairly simple card to share today.  


Paper Rose Studio Supplies: Eucalyptus Gum Leaf 6x6" Stencil 22585, Rainbow Garden Florals Embossed Die Cuts 31563, Rainbow Garden Butterflies Embossed Die Cuts 31476, Happy Birthday A5 10pc Sentiment Sheets 30720 - Foil, Austin Circle Frame Metal Cutting Die 30225.

You can see I've still been enjoying those Rainbow Garden embellishments!  

I started this card by placing the Eucalyptus Gum Leaf stencil onto my card front.  I used Catherine Pooler inks in Hot Tub through the stencil over the leaves and Cranberry Fizz for the berries ( I think I used a little artistic licence on the colour of those berries - my apologies to all the Aussies!).  Once the ink was dry, I applied a layer of Distress Grit Paste in Snowfall and set the card front aside to dry.

I cut the Austin Circle from white cardstock, and just used the outer ring.  I place a piece of vellum in behind the center of the circle, and adhered it to the outer ring. 

Once the card front was dry, I attached it to my 5 1/2" square card base.  Then I adhered the vellum circle in the center.  I attached the little bouquet of flowers and the butterfly with glue.  I trimmed the sentiment down and cut the right hand end in a banner style, before attaching it to the circle.  Finally, I rounded the right hand corners of my card to soften it a little. 

Thank you for stopping by and I hope I've given you a little inspiration today!


Monday, 25 December 2023

Gnome Birthday Card

Hi again everyone!  Today I've got a quick and simple birthday card for you.  I need a few birthday cards in February, and I thought this one could be used for one of my recipients.


Supplies Used:  Hey Gnomie Embossed Die Cuts 30921, Ornate Swirl Rectangle Frame Metal Cutting Die 20129 .  Other supplies:  Catherine Pooler Inks in Tiara, Apricot, and Orange Peel.

I started this card by ink blending over the card front using the inks as they are listed above to get an ombre effect.  Next, I cut two of the background die and glued them together, before gluing them down over the card front.  Isn't that a pretty background die?! Finally, I chose some of the die cuts from the Hey Gnomie set and glued them in place on my card front.  What a simple card to make, but those gnomies just make it so celebratory! 

Thank you for taking the time to stop by and I hope you're having a great day!

Tuesday, 12 September 2023

Balloon Birthday Card

Hi again everyone, I've got a balloon birthday card to share today that was created with some stencils from Paper Rose Studio.


Supplies Used:  Balloon 6x6" Stencil & Mask 20982, Floral Borders 6x6" Stencil 19342, Happy Birthday Chunky Script Stamp Set 24640, Betty's Garden 6x6 Paper Collection 28576. Liquitex Gloss Heavy Gel, Distress Oxide inks, gold thread, Gelly Roll Sparkle gel pen.

I started this card by using the Ballloon stencil to create the background on an A2 size piece of white cardstock which I later trimmed down to be 4 x 5 1/4". I just used a couple of the smaller sized balloons to stencil the cloud of balloons and tried to leave a slightly lighter area on each balloon, and made sure I overlapped the balloons. Once I was happy with the balloons, I used the gel pen to draw some squiggly lines down for the strings.

On a separate piece of white cardstock, I used the second largest balloon stencil to create the two larger balloons.  To add the Floral Borders stencil over top, I kept the original balloon stencil in place with low tack tape, and then applied the stencil over top of the balloon with a darker ink.  Next, I applied a thin layer of the Liquitex gel over these two balloons to give them a shiny look.  Glossy Accents would also work for this.  Once that was dry, I fussy cut the balloons out, right up to the edge of the stencilling.  I then added the gold thread to the tails of these balloons, using some double sided tape on the back.

Next, I stamped the sentiment with black ink onto the balloon card front, and adhered this to a piece of confetti patterned paper from the Betty's Garden collection and attached this to my card base.  Finally, I used scrap card to add some dimension to the back of the bigger balloons and then glued them onto the card front. 

Thank you for joining me today and I hope I've given you a little inspiration!

Wednesday, 12 April 2023

Fun, Feminine Interactive Cards *VIDEO*

Hi again!  I've got two cards for you today and a video.  I was still having fun with the Garden of Hope paper pack from Paper Rose Studio and came up with these two cards which are both very feminine, interactive cards.

 Supplies Used: Garden of Hope 12x12 Paper Collection 29443, Cake Metal Die 28612, Super Day Sentiments Stamp Set 25933, Birthday Layered Metal Cutting Die 18297, Stitched Square Frames Metal Cutting Die 16685. Nuvo Glacier paste in Mambo Melon, and Nuvo Glimmer paste in Moonstone.

Front of this trifold card


Middle of the card

Inside of the card


I love how each fold of this card reveals just a little more of the inside.  Here's a look at the second card which is a full size double slider card.


Supplies Used: Garden of Hope 12x12 Paper Collection 29443, Cake Time Die Cuts 29590, Big Sentiments 1.0 A5 12pc Sentiment Sheets 22336, Floral Borders 6x6" Stencil 19342, Black & White A5 12pc Sentiment Sheets 19023. Also Nuvo Glimmer Paste in Moonstone.

So with this card, when you pull the two slider elements out, all the cakes, chocolates and flowers are revealed. The card is around 13" when fully extended, so there's lots of room to add some fun surprises on there!

I hope you'll come join me for the video which shows how each of these two cards are created.  Please CLICK HERE to watch that video.  If you are interested in making the full size double slider card, I have just previously created a video tutorial of it with my template in the video.  You can watch that video HERE.

Thank you so much for stopping by and I hope you're having a fun, creative day!


Thursday, 29 December 2022

Penguin Birthday Shaker Card

Hello everyone, I hope you had a good Christmas holiday! I've got a shaker birthday card for you today with some happy, little penguins.

I've used the Penguin Cake - 4x6 Clear Stamp - GSD799, to create the cake and penguins.  I masked the two front penguins after stamping them on some Neenah Solar Crest card, and then stamped the cake and the middle penguin afterwards.  I used Copic markers to colour everything in, and then attached the image to the front of an A2 sized card.  I added some Distress Oxide Shaded Lilac ink around the outside of the penguins in a circular shape.

The paper for the card front is from the Grunge Light collection by Craft Consortium, and I cut out a circle that was big enough to allow the penguins to show through.  The sentiment is from the same stamp set, and I just used Versamark ink and white embossing powder and heat set it.  On the back of the card front,  I placed double sided adhesive tape around the opening, removed the backing paper, and then attached a piece of acetate that was big enough to cover the opening.  Next, I placed two layers of foam tape all around the opening and over the rest of the back of the card front.  I added some shaker bits over the penguins, before removing the backing of the foam tape and adhering the card front to the base. 

I used the Memory Box Bubble Circles die to cut the rings out from white cardstock - I cut two of these.  I actually cut the circles from scraps of inked up card I already had, but I think it would be even easier to just use markers or pencil crayons to colour in the circles.  I added Stickles Glitter Glue over top of the circles and let it dry before attaching the rings to the card front with glue.  And then all that's left, is to give the card a good shake!

Thank you so much for stopping by!


Monday, 24 October 2022

Penguins’ Birthday Cake

Hello and welcome back. I’ve got a birthday card today created from a brand new stamp set from Gerda Steiner Designs. It’s the new Penguin Cake stamp set and it’s absolutely adorable! 


Aren’t those penguins just the sweetest?! I wanted some of the penguins and the cake to extend off the top of my card, so I cut my card base down to be 5 1/2” wide by 3 3/4” tall. I then used some cloud dies to create layers of clouds. I ink blended the tops of these in rainbow colours using Distress Oxide inks (I used Picked Raspberry, Saltwater Taffy, Ripe Persimmon, Carved Pumpkin, Squeezed Lemonade, Twisted Citron, Prize Ribbon and Seedless Preserves).  I stamped and clear embossed the sentiment on the bottom layer of clouds. Next, I layered the clouds up on the card front and tucked the cake and penguins in between layers. It’s really hard to see in the picture, but I used a tacky glue on the hats, and when it had dried, I used a little laminating foil to “colour” in the hats. The foil I used is DecoFoil Rainbow Shattered Glass and it’s got lots of different colours in it. I die cut some candles from white cardstock and also put those between the clouds to add some interest. Finally, I added a few gemstones for even more interest. Thanks for stopping by and I hope you’re having a great day! 


Tuesday, 4 October 2022

Butterflies and Poppies Bay Window Fold Card

Hello everyone, I've got another fun fold card for you today.  This one is called a Bay Window Fold and I'm sure you can see why.  There are no specialty dies required for this one but it has a great 3D effect.


Back of the card

Paper Rose supplies used: Butterfly Bliss 6 x 6' Paper Collection25108, Rainbow Poppies 6 x 6" Paper Collection 25600, Little Etched Butterflies 25609, Poppy Field Border Metal Cutting Die 18640, Stitched Rectangles Metal Cutting Die 16575 (I used the third largest rectangle), Happy Birthday Chunky Script Stamp Set 24640.  
Other Supplies: Ranger Alcohol ink in Cranberry, Gumball, Lemonade, Limeade, and Denim.  Copic markers in BG93, YR15, R02, E97, Y15, Y11, RV17, RV25, RV21 for the poppy border. 

This is a really simple card fold to make and while I've used the butterflies and poppies, you could easily use whatever you have in your supplies to make it.  I think it would be fun with some acetate over the window to really make it look like a bay window.  It could also be a scenery card if you have stamps and dies for that. Or Christmas florals ... so many options!  :)

I've made a video for you to show how I created this card.  If you want more directions, please CLICK HERE.

Thank you for stopping by and I hope you're having a happy, creative day


Wednesday, 7 September 2022

Scary Birthday Card

Hello crafty friends, I've got a fun birthday card today for someone with an October or fall birthday. It's an interactive card as the ghosts are all on swing mechanisms and move when the card is shaken.


I've used the "Ghosts" stamp set from Gerda Steiner Designs for this one.  My card is 5 1/2 " x 5 1/2" square, so slightly bigger than normal.  I started by creating the background.  I used Cosmic Shimmer Pixie Sparkles Powder in Wild Plum, Pumpkin Patch and Cut Grass.  These are those fun shimmer powders that you sprinkle on, mist with water and wait to see what happens.  It's a lot like alcohol inks - no two pieces turn out the same.  Once I had the colour that I wanted, I set it aside to dry.

I used some Copic markers in BV23, CO and C1 to colour in the ghosts, and then fussy cut them out.  The cemetary is from a "Graveyard" die set from Creative Expressions and I cut it from black cardstock.  I also cut a few clouds from white cardstock as they were needed to hide the swing mechanisms.  Once the background was dry, I glued the cemetary in place, and white heat embossed the sentiment which is from the Ghost stamp set. 

The swing mechanisms are easy to make and no special dies are required.  I used a piece of packaging acetate from a die set.  Using a regular paper punch, I punched a hole near the top left corner of the acetate.  I then cut a strip of the acetate just slightly wider than the hole, and just rounded the outside top edges around the hole.  The picture may help explain this better.


I then doubled up some foam tape, and used the same hole punch to punch out a piece of the tape. This foam tape fits inside the circle on the acetate, so if it feels too tight, you can use the paper punch to slightly enlarge the hole.  The acetate needs to be able to swing freely.  Next, I decided where I wanted my ghosts to go on the card front, and placed the acetate strips there.  I removed the backing paper from the circle pieces of foam tape, and placed them inside the acetate circles.  Then I used double sided tape to adhere the ghosts where I wanted them to go on the acetate strips, and trimmed the long side of the strips so they didn't stick out from behind the ghost.  If you want your ghosts to have a lot of movement, you can attach a penny to the back of the ghost which gives it more weight (I used regular cellophane tape to attach mine).  To prevent the strips from falling off the card, I attached the clouds over the foam circles and added a little more doubled up foam tape above the swing mechanisms to help support the clouds.  You want to be careful where you put the foam tape as you don't want to impede the acetate from swinging.  That being said, if the ghosts swing too much, you may want to put a little piece of doubled foam tape under the cloud to block some of the movement. Just play around with it until you have them moving the way you want them to.  It's not hard, I promise you, but it is a lot of fun.  
 
Before attaching the card front, I stamped the inside sentiment and added the extra two ghosts.  Finally, I glued the card front to the base and then played with the swinging ghosts.  I hope you'll give this a try as it's a lot of fun!  Thank you so much for stopping by. 


Thursday, 4 August 2022

Floral Happy Birthday Card


Supplies Used:  Hayley's Bouquet Clear Stamp 25240, Spring Floral Frame Metal Cutting Die 21054, Sketchy 6x6 Paper Collection 25252, Big Sentiments 1.0 A5 12pc Sentiment Sheets 22336, copic markers, yellow Prills (flower center), Minc Reactive Foil in Mint.

Hello everyone and welcome back!  For today's card, I started by stamping the floral image onto some Neenah 80# Classic Crest cardstock in Solar White, using a Copic marker friendly black ink (I used Gina K Amalgam ink).  I coloured the image in and then added some yellow Prills to the centre of the purple flower.  The Prills just add a great 3D effect, but you could also use Copic markers and some Glossy Accents to get a similar effect.  Once it was dry, I fussy cut the image out.

I cut the Spring Floral Frame three times from white cardstock and glued them together for dimension.  My card is 5.5" x 6" because I didn't want to cut too much off that beautiful Sketchy paper.  But that allows the floral image and the sentiment to hang off the side of the background diecut. So after adhering the trimmed down piece of Sketchy paper to my card front, I glued the layered background die over the center.  

I lightly traced an oval shape around the black version of the sentiment and fussy cut it out.  I foiled the sentiment with the Mint foil in my laminator, running it through two or three times before peeling off the foil.  I'm not really sure if that helps to run it through so many times, but it makes me feel better! :-)

Finally, I glued the sentiment to the background diecut on the card front, and popped the edges up on foam tape.  I then glued the floral image over the background diecut, and also put some foam tape under the edges that extended past the diecut.

I hope I've given you a little inspiration today, and thank you for stopping by!


Saturday, 28 May 2022

Cleo Floral Butterfly Birthday Card

Hello again and welcome! I've got another butterfly birthday card to share with you today, and this one features the Cleo Floral Butterfly stamp from Paper Rose Studio.


Paper Rose Studio products - Cleo Floral Butterfly Stamp 24643, Happy Birthday Chunky Script Stamp 24640, Doodle Flower Coverplate 1 Die 20553, Butterfly Bliss 6x6 Paper Collection

Other products - Ranger Alcohol inks in Boysenberry, Fiesta, Botanical, and Pool; acetate; Yupo paper; Perfect Pearls in Pearl; Altenew ink in Razzleberry; VersaMark ink; Ranger Super Fine Gold embossing powder; circle paper punches.


I added the alcohol inks to the acetate and tried to keep them separated slightly by colour as I wanted the floral side of the butterfly to have the more pink and purple tones, and the blues and greens to be on the other side.  I also added the same inks to the Yupo paper to be used for the trail, but this could also be made out of acetate (I just didn’t have enough left for this).  Once the inks were dry, I turned the acetate over and used an anti-static powder bag liberally over this side, before using some VersaMark ink to stamp the butterfly and heat set it with gold embossing powder.  I then fussy cut out the butterfly. For the sentiment, I stamped onto white cardstock about three times with the Razzleberry ink to get a deep colour. I also fussy cut this out.  I embossed the Doodle Flower Coverplate die onto white cardstock using a rubber mat and embossing plate, and then misted it with the Perfect pearls (just a little Perfect Pearls mixed with water in a spray bottle).  I used one piece of the Butterfly Bliss paper pad for the background ( but made sure to cut out the centre to be used in another project), and adhered this to the card front. I used glue to attach the embossed front background piece.  Then I glued the sentiment in place along the bottom third.  I carefully folded the butterfly wings back along the edges of the body, and attached it in place using glue on the body and the antenna.  Finally, I used two sizes of paper punches to cut circles from the Yupo coloured paper, and glued these in place behind the butterfly.

Thank you for stopping by, and I do hope you're having a fun, creative day!

Wednesday, 18 May 2022

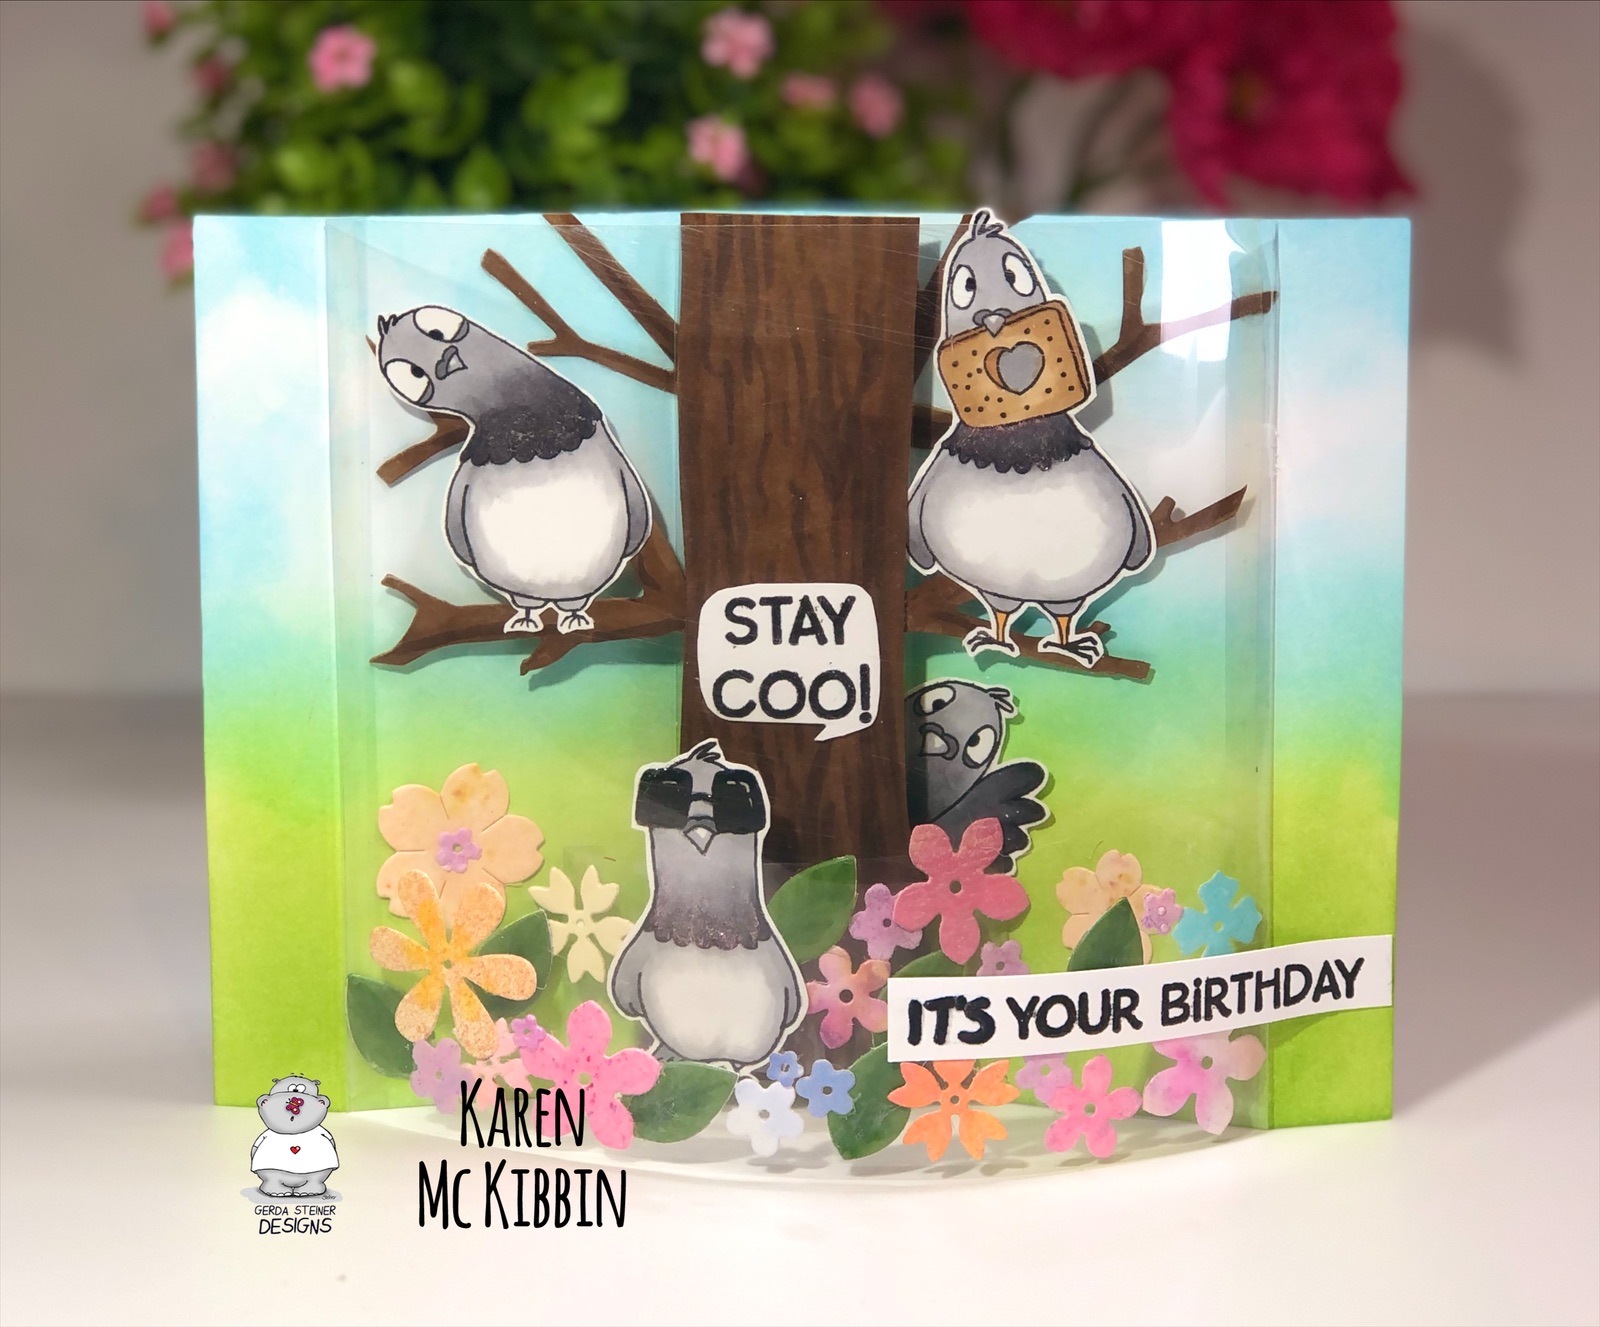
Pigeons Acetate Bendy Card with *Video*

Hello everyone! I’ve got a fun new card fold idea for you today, using the adorable “Pigeons” stamp set from Gerda Steiner Designs. This is a 5” x 7” card that folds flat, but pops out to create a 3D card when it comes out of the envelope. There’s room on the back of the card to write a message and to decorate if you want. I have to give a shoutout to Sam Calcott of Mixed Up Craft who I first saw make this style of card.  I've got a link in the video description to her video which is well worth seeing.  Here’s a look at my card.


Back of the card

Bottom view of the card showing dimension


I’ve made a video for you to show how this card was made. There are no special dies required, and it’s really not a difficult card to make. But it does have lots of dimension and a little bit of movement of the pigeons. So if you would like to see the video, please CLICK HERE. 

Thank you so much for stopping by and I hope you’re having a fun, creative day! 


Wednesday, 4 May 2022

Butterfly Birthday card

Hello again, I've got another birthday card to share with you today featuring products from Paper Rose Studio.  I wish you could see how bright those alcohol inked wings really are, but my camera just would not cooperate.


Paper Rose Studio products - Butterfly Card Creator Die 25117, All Occasions Sentiment Sheets 22339, Gum Leaf Stencil 18132

Other supplies: Ranger Alcohol inks in Boysenberry, and Fiesta; acetate sheet; Cosmic Shimmer Colour Cloud ink in Chic Magenta and Lilac Whisper; Distress Crackle Texture Paste; Distress Oxide ink in Peacock Feathers; DecoFoil in Rainbow Shattered Glass; white pearls

I die cut the larger of the Butterfly dies in the Butterfly Card Creator die set three times from white cardstock. I extended the die cutting slightly to allow the butterfly to be more towards the centre.  I stacked and glued the three layers together.  On the acetate, I used the alcohol inks to create a pattern for the wings of the butterfly.  Once this was dry, I placed it behind the butterfly where I wanted it to go, and cut around it, using the butterfly wings as a guide. I glued this in place by only gluing on the back of the stacked butterly wings. I then cut and glued in place, a piece of white cardstock to go on the back of the acetate as I didn’t want the background to interfere with the alcohol ink. I used the DecoFoil and a laminator to foil the sentiment, and also added a small strip of the foil along the edge of the butterfly die. For the background, I ink blended the bottom edge of the card front with the Colour Cloud inks. I then stencilled over this with the Crackle paste and the Gum Leaf stencil on which I had covered the flower portion of the stencil with some tape. Once the paste was dry, I stencilled over it with the Peacock Feathers Distress Oxide ink.  I added some splatters using the Peacock Feathers ink, Chic Magenta and a little white acrylic paint.  Once the background was dry, I added the butterfly die cut and a few white pearls.

Thank you for stopping by and I hope you're having a happy, creative day!

Wednesday, 20 April 2022

A Toast to You

Hello and welcome! I’ve got another pigeon card today featuring the new Pigeons stamp set from Gerda Steiner Designs. Here’s a look at my card and since it’s an interactive one, there’s a shot of before, and after, you pull the tab (this is a 5 1/2” square card).


To create the card, I started by colouring in the pigeons with Copic markers and fussy cutting them out. For the background, I used a stencil from TCW called Aspen Trees, and added some Distress Oxide shading in Evergreen Bough, Twisted Citron and Tumbled Glass. I then added a little shading to the trees with a C0 Copic marker as they looked a little stark. I cut the hilly foreground from some green cardstock, and added some Copic marker dots under the pigeons feet.  The sentiment is actually from another new stamp set by Gerda Steiner Designs called “Toast to You”, and I stamped it in black Versafine ink and then clear heat set it. The tree was made from a set of cloud dies for the leafy parts cut out of green cardstock scraps, and the trunk and branch were cut from brown cardstock using a Bigz die from Sizzix by Tim Holtz called “Branches”.  I used the “Swish ‘n Pop Pull Tab” die set from Lawn Fawn for the interactive mechanism, but I modified it to have the pigeon appear from the left hand side. I’ve done a previous video showing how to modify it, so if you’re interested, you can find it here.  The branch and pigeon with the toast are actually attached to the clear, acetate arm of the interactive mechanism, so are separate from the tree. I used foam tape in a double layer to pop up the hilly foreground and tree in order to hide the mechanism, and to allow the swing arm to move. 

Thank you so much for stopping by and I hope you’re having a great, crafty day!  


Wednesday, 9 February 2022

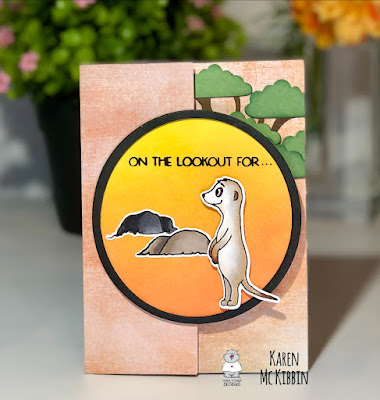
Fun Fold Meerkat Birthday Card

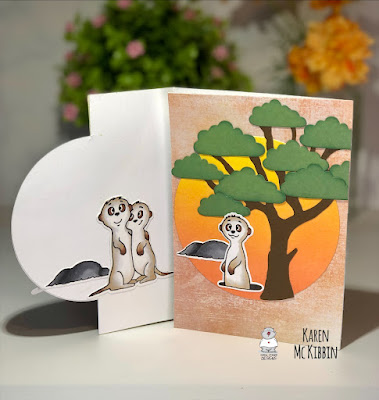
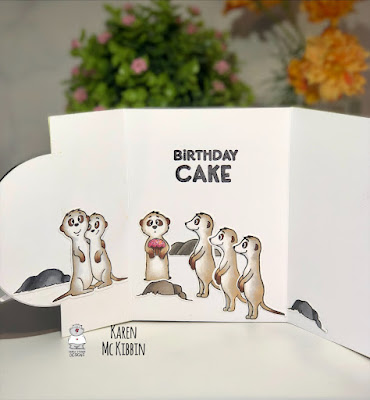
Hello everyone! Today I thought I would share an easy fun fold card with you. It’s really just a trifold card with a bit of die cutting on the front flap. But it means there is extra room inside to add some more images so you can have a fun surprise for the recipient. I chose to use the “Meerkats on the Lookout” stamp set from Gerda Steiner Designs, because they are just so fun and there are quite a few images in the collection. Here’s a look at my card. 


Aren’t those meerkats just the cutest?!  The final size of this card is 5” x 3 5/8” so it’s similar to a mini slimline card. This really is a simple card fold and I’ve made a video for you showing you how I’ve made this one. If you would like to see how to make it, PLEASE CLICK HERE.

The tree die I used is from Elizabeth Craft and is just called “Tree”.   Here’s a list of the Copic markers I used for my colouring. 

Meerkats - W2, E53, E40, C2, C0, E27
Rocks - N6, N4 and W7, W5, W4

Thank you so much for stopping by and I hope you’re having a great day! 


Wednesday, 26 January 2022

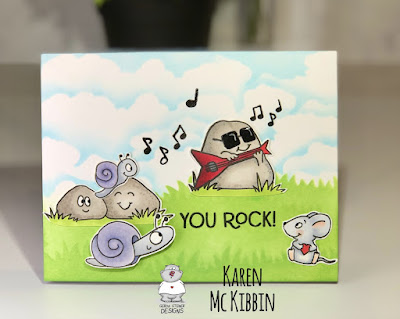
Rockin’ Birthday Card

Hello again and welcome! There’s a new release at Gerda Steiner Designs and I’ve chosen the You Rock stamp set to use on my card today. This is such a fun set to use for those younger people in our lives … oh, who am I kidding? It’s good for those older people too! So here’s the card I came up with. 


It’s almost a one layer card too!  I popped the snail in the front up on foam tape, so I think that means it doesn’t qualify as a true one layer card.  I created the background by stencilling on my card front. I used the  MFT Grassy Edges stencil and some Mowed Lawn Distress Oxide ink for the grassy section.  I created a little hill for the main rock to sit on as well.  For the sky, I used the Cloud Edger stencil from A Colorful Life Designs and some Cosmic Shimmer Colour Cloud ink in the Clear Day shade.  

I used my Copic markers to colour in the images, and have listed them below if you’re interested.  After fussy cutting everything out, I added some Glossy Accents to the sunglasses.  I positioned all the characters on the front to determine my layout and where I wanted the music symbols to go.  I then stamped on and clear heat embossed, the music symbols ( I did add some more music symbols from the Carol Kittens stamp set).  Finally, I glued the characters down and popped the front snail up on foam tape before adhering him down.  On the inside, I stamped the sentiment “Hope Your Birthday Rocks”.  So another quick and easy card! Thank you so much for stopping by and I hope you are having a great day! 


Copic Markers used:

Rocks - W2, W3, W4, W5

Snails - BV23, BV34, V20

Mouse - C3, C2, C1, C0, R00

Guitar - R39, R29, R35


Wednesday, 6 October 2021

Squirrels and Gourds Birthday Card

Hello again! I have another interactive card today that uses the Lawn Fawn Swish ‘N Pop pull tab die and I’ve paired it with the new “Gourds” and the “Happy Fall” stamp sets from Gerda Steiner Designs.  The gourds just make me smile and the squirrels are so cute, so I hope you don’t mind me doing a similar card again.  Here’s a look at the card before pulling the pull tab and after pulling it  


I really wanted the squirrel on the log to disappear as if he was scared by the talking gourds and then reappear hanging upside down in the tree, but I just couldn’t figure out how to make that happen.  So instead, the second squirrel appears from the tree. 

I coloured all the images in with copic markers and cut them out. The trunk of the tree is from an Elizabeth Craft die set just called “Tree”. The leaf canopy was made by adding some Pixie Sparkles (in Copper Splash and Red Oxide) from Cosmic Shimmer, to a piece of white cardstock, and lightly spritzing with water to activate the powder. After it was dry, I added a little Distress Oxide ink in Mustard Seed to get a deeper yellow colour. I freestyle cut out the leafy shape. 

The grass was made by ink blending with Distress Oxide inks in Mowed Lawn and Peeled Paint and then I die cut it with a grassy border that is in the same Tree die set used for the tree. For the sky background, I used the Cloud Edger stencil from A Colorful Life Designs and some Colour Cloud ink in Clear Day from Cosmic Shimmer. 

My card is actually a 5 x 7” card, so to use the Swish ‘N Pop die, I had to extend the pull tab by doing some partial die cutting on the pull tab. I also modified the assembly in order to make the hanging squirrel appear from the left. Here’s how that looks:


Basically, I’ve reversed which hole the pull tab is attached to, in order to make it swing up from the left. I’ve added double layers of foam tape along the bottom, and wherever else I could to anchor the grassy border without interfering with the mechanism. Once I had the mechanism in place and adjusted to allow the second squirrel to hang down, I attached the grassy border and then the tree and remaining images. 

I stamped and heat embossed the sentiment on a speech strip and adhered it above the gourds. I also stamped the inside sentiment which is from the Gourds stamp set. And then of course, I had to play with the card and watch the second squirrel come out! 

Thank you so much for stopping by and I hope you’re having a great day!