Sunday, 22 December 2024

Embossed and Foiled Cards

Hello everyone and Merry Christmas!  I've got a couple of embossed and foiled cards to share today.  


Supplies Used: Beautiful Bouquet 3D Embossing Folder 32949, Arch Border Frames Metal Cutting Die 30420, Big Sentiments 1.0 A5 12pc Sentiment Sheets 22336 , All Occasions Sentiments A5 12pc Sentiment Sheets 22339, alcohol inks, foiled cardstock, acetate

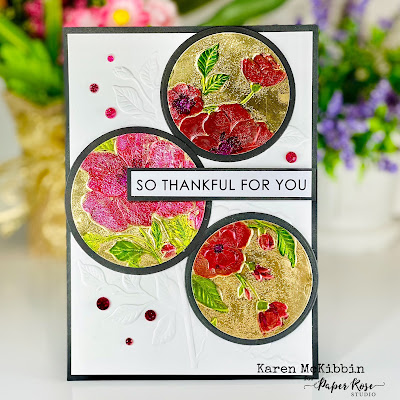
Circle Card

To create this card, I cut 3 circles of gold foiled cardstock and  embossed them in the Beautiful Bouquet embossing folder.  I also embossed the white cardstock in the same folder. I have a small paintbrush that I keep with my alcohol inks, and I used this to paint on some alcohol ink onto the flowers and leaves.  It's difficult to get these inks to blend well, so I had to just "let it be" after the inks went on.  Once the ink was dry, I swiped my VersaMark ink pad over the top of the painted pieces.  Then I added some clear embossing powder and heat set it.  The powder landed in various areas of the foiled circles, but I quite liked that and left it that way.  However, you could use a dry brush to remove the powder from the non-inked areas.  Next, I cut black circle mats to back the inked circles and attached them together.  To assemble the card, I matted the white embossed background with black cardstock, and adhered it to my card base.  I pieced the circles back onto the white background where they matched the embossing, and added the sentiment and glitter dots.

Arched Card

This card started off much like the first.  I embossed the gold foiled cardstock and then painted on the flowers and leaves with alcohol ink.  I then swiped my VersaMark inkpad over the front and added the clear embossing powder.  Once this was heat set, I repeated this process.  I had also embossed a piece of acetate, and I found that I liked the look of the acetate over the gold foil so I used a double sided adhesive to attach these together around the outside edges.  Next, I cut the arch out of the black card front, and matted this over the foiled acetate image.  Then I attached this to my card front and added the sentiment.

I hope I've been able to give you a little inspiration today as that is a beautiful embossing folder!  Thanks for stopping by!


Thursday, 12 December 2024

Gnome Tags

Hi everyone, I am always late at making tags for Christmas gifts and usually have to scramble to find something to use.  But this year, I was inspired by the new Build a Gnome die set from Paper Rose Studio, and am ahead of the game now!

Supplies Used: Build A Gnome Small Metal Cutting Die 32484 , Banner Trio Metal Cutting Die 25921, mini pompoms from the Dollar Store.

I started these by doing all my die cutting first.  I cut the tags from white cardstock and some from foiled cardstock.  After cutting out the noses, hands and beards, I laid them out on a sticky surface and coloured them all in with my Copic markers (C0, C1 for the beards, and E00, R00 and R20 for the hands and noses).  I went through my stash of used scraps and cut out the bodies, arms and hats.

Once everything was die cut, I started assembling all the gnomes, mixing and matching colours.  I punched a small hole on the upper middle of the tags and attached a ribbon or wire before attaching the gnomes to cover the holes.  Finally, I cut the pompoms in half and glued them in place.  I love how colourful and playful these tags are and they can be used for any time of the year.

Thanks for stopping by today, and I hope you're having a great day!


Monday, 2 December 2024

New Larger 5" x 7" Pop Up Box Card. *VIDEO*

Hi everyone, I'm back with another pop up box card, but I've recreated this one to fit a 5 x 7" envelope and to accommodate a lot of images.


Supplies Used: White Christmas Cut Aparts Paper Pack 32886, White Christmas Basics 6x6 Paper Collection 32934
 

So the finished size of this box card is 5" x 7" when its folded down flat.  There are 4 cross pieces where images can be attached, so any die cut images or stamped images would work well here.  It can be used for any occasion too, of course.  So check out your stash of supplies - I'm sure something in there will work!

I've made a video to show you how easy it is to make this card, so I hope you'll come watch it.  

PLEASE CLICK HERE to see the video and the PDF is located in the description box below the video. 

Thanks for stopping by today!