Wednesday, 23 February 2022

Bunny Friends Thank You Card

Hello again and welcome. We’re having a little stretch of very cold weather here at the moment, so I decided to make a springlike card to warm me up! These little bunny friends were perfect for the occasion. 


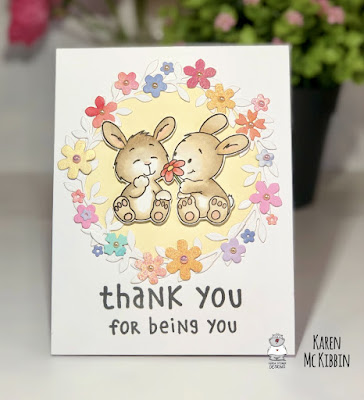
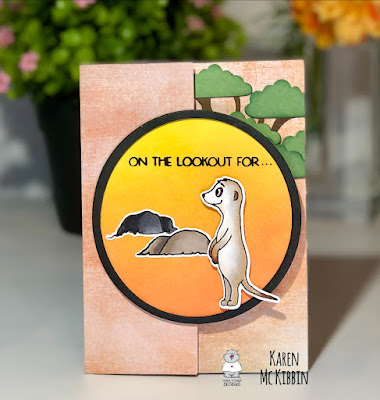
I stamped the adorable image from the “Bunny Friends” stamp set from Gerda Steiner Designs onto Neenah Solar Crest 80# cardstock, and coloured it in with Copic markers before fussy cutting it out.  I masked off my card front with some contact paper that I had die cut a circle from.  I ink blended this circle in yellow ( I used some Cosmic Shimmer Colour Cloud ink in Lemon Meringue, but any ink would work). I used a grey ink to stamp and clear heat emboss the sentiment, which is from the same stamp set.  

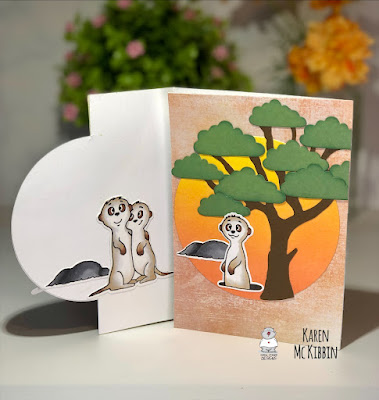
Next, I die cut a variety of flowers from scraps of inked up cardstock I had in my “To Be Used One Day” box (that’s the box where all those bits and pieces go when you’re just not sure what to do with them!).  I used the Spellbinders Petite Floral Potpourri die set for this, as the flowers are quite small and delicate.  Once I had everything cut out, I started with the leaves to build a wreath, and glued them in place around my inked circle.  Then I added in the little flowers around the wreath.  I mounted the bunnies on foam tape and popped them up in the middle.  Finally, I added a few pearls to the flower centres to give them that little sparkle.  Those little bunnies just steal the show with their cuteness! 

Thank you so much for joining me today and I hope you’re having a great day! 

Copic markers used: E40, E41, E42, E43, E31 and R00


Wednesday, 9 February 2022

Fun Fold Meerkat Birthday Card

Hello everyone! Today I thought I would share an easy fun fold card with you. It’s really just a trifold card with a bit of die cutting on the front flap. But it means there is extra room inside to add some more images so you can have a fun surprise for the recipient. I chose to use the “Meerkats on the Lookout” stamp set from Gerda Steiner Designs, because they are just so fun and there are quite a few images in the collection. Here’s a look at my card. 


Aren’t those meerkats just the cutest?!  The final size of this card is 5” x 3 5/8” so it’s similar to a mini slimline card. This really is a simple card fold and I’ve made a video for you showing you how I’ve made this one. If you would like to see how to make it, PLEASE CLICK HERE.

The tree die I used is from Elizabeth Craft and is just called “Tree”.   Here’s a list of the Copic markers I used for my colouring. 

Meerkats - W2, E53, E40, C2, C0, E27
Rocks - N6, N4 and W7, W5, W4

Thank you so much for stopping by and I hope you’re having a great day! 


Friday, 28 January 2022

Belle Fleur Window Card

 Hello again, there’s a new release at Craft Consortium called Belle Fleur. This is a beautiful collection of very elegant floral cardstock in neutral tones, stamps, ribbon,  and other ephemera that all coordinate together. It’s perfect for those wedding, anniversary, engagement and feminine birthday cards. I’ve created a card today that has a see-through acetate window. 


I started by temporarily taping a card front to the card base. Then I placed a circle die in position in the lower right hand side of the card. I ran this through my die cutting machine several times to cut through both layers.  Taping the layers together ensured that the openings were cut in the same spot on both the card front and the base.  I also cut a piece of the patterned paper the same size as my card front. I placed the patterned paper under the card front and notched the same circle die into position and ran that through my die cutting machine. 

Next, I cut a piece of acetate (I used some scrap packaging) that was just big enough to cover the circle opening and made sure it had a straight edge. I sandwiched this between the card front and the card base using double sided tape to keep it in position, and making sure the straight edge was aligned with where the edge of the card should be.  

I then cut a piece of the coordinating ribbon to fit along the left hand side of the card. I adhered this with some double sided tape to the patterned paper piece, and wrapped it around to the back of the paper. Then I used some glue to attach the patterned paper to the card front, making sure the circle openings lined up. 

I then die cut the flowers and leaves from the French Marigold set by Creative Expressions. I only used the two smallest flower dies and cut them from white cardstock that I had coloured with Cosmic Shimmer Matt Chalk Polish in Custard. Since that gave them quite a yellowish look, I went over them with Matt Chalk Polish in Simply White. That helped to tone down the yellow giving a more ivory colour. I used the Antique Rosewood Matt Chalk Polish lightly on the very edges of the flowers to give a hint of colour. For the leaves, I used Matt Chalk Polish in Opulent Olive which I applied to white cardstock before cutting them out. I think it would be really pretty too if the flowers were cut from a pearlescent cardstock. 

To shape the flowers, I placed them upside down on an old spongy mouse pad and used a round ball head tool to press and shape the the petals.  Then I turned them over and used a slightly larger round ball head to press and shape the centres. I then used glue dots to attach a smaller set of petals inside a larger one. Finally, I put some liquid glue inside the centres of the flowers and added some Prills (small, round Pearl like accents) in white for the flower center. Once the glue was dry, I used a little more glue to attach the flowers around the acetate window being careful not to put them on the acetate, as it would show through from the inside. 

Thank you so much for stopping by and I hope you are having a great day! 


Wednesday, 26 January 2022

Rockin’ Birthday Card

Hello again and welcome! There’s a new release at Gerda Steiner Designs and I’ve chosen the You Rock stamp set to use on my card today. This is such a fun set to use for those younger people in our lives … oh, who am I kidding? It’s good for those older people too! So here’s the card I came up with. 


It’s almost a one layer card too!  I popped the snail in the front up on foam tape, so I think that means it doesn’t qualify as a true one layer card.  I created the background by stencilling on my card front. I used the  MFT Grassy Edges stencil and some Mowed Lawn Distress Oxide ink for the grassy section.  I created a little hill for the main rock to sit on as well.  For the sky, I used the Cloud Edger stencil from A Colorful Life Designs and some Cosmic Shimmer Colour Cloud ink in the Clear Day shade.  

I used my Copic markers to colour in the images, and have listed them below if you’re interested.  After fussy cutting everything out, I added some Glossy Accents to the sunglasses.  I positioned all the characters on the front to determine my layout and where I wanted the music symbols to go.  I then stamped on and clear heat embossed, the music symbols ( I did add some more music symbols from the Carol Kittens stamp set).  Finally, I glued the characters down and popped the front snail up on foam tape before adhering him down.  On the inside, I stamped the sentiment “Hope Your Birthday Rocks”.  So another quick and easy card! Thank you so much for stopping by and I hope you are having a great day! 


Copic Markers used:

Rocks - W2, W3, W4, W5

Snails - BV23, BV34, V20

Mouse - C3, C2, C1, C0, R00

Guitar - R39, R29, R35


Wednesday, 12 January 2022

Monster Love Valentines Card

Hello and welcome! There’s a new release at Gerda Steiner Designs and I couldn’t decide which stamp set to play with for this post. In the end, I decided that since it was coming up to Valentines Day, I would go with the “Be Mine Monster” stamp set because who could say no to this cute little guy? 


I used copic markers to colour him in (listed below). I then stamped and heat embossed the sentiment in black, onto the heart. I added some Glossy Accents onto his teeth and eyes, and then fussy cut him out. 

For the background, I used the “Conversation Hearts” embossing folder from Taylored Expressions to emboss the card front. Using a small circular brush, I added in some Distress Oxide ink to the hearts in Spun Sugar, Tumbled Glass, Shaded Lilac, and Squeezed Lemonade.  Finally, I popped the monster up on foam tape and placed him on the card front in the lower right corner. Just a super quick and easy card to make. Thank you for stopping by and I hope you’re having a great day! 

Copic markers used:

BV02, 04, 13, 23

RV17, 06, 04, 02

V15, B02

Heart - RV29, 25, 23

Wednesday, 17 November 2021

Namasleigh Christmas Circle Spinner Card with Center Shaker *Video*

Hello and welcome back! My card today is a circle spinner style card with a central shaker. I’ve used the fun, new Namasleigh stamp set from Gerda Steiner Designs for this one. 


The outer ring on this 5 1/2” square card will spin around to add an interactive element and of course, the card can be shaken to move the shaker bits in the middle. There are no special dies required for this card other than a few circle dies in different sizes.  I’ve made a video for you to show you how I made this card, but I have to confess, I may have switched up some of the stamps and the Reindeer and a Tree stamp set from Gerda Steiner Designs may be involved! Here's a sneak peek at what the card in the video looks like.


If you would like to see how I made this card, PLEASE CLICK HERE.
 
Thank you so much for stopping by and I do hope you're having a great day!