Thursday, 28 April 2022

Paper Rose Spring Bloom Card

Hello and welcome!  I'm really excited to be able to share with you my first card designed for the Paper Rose Studio design team.  I've loved the Paper Rose Studio products for quite a while now, so this was a dream come true.  Here's a look at my card.

Paper Rose Studio products - Spring Bloom Clear Stamp 25282, Leaf Burst Rectangle Die 20547, Celebrate Layered Die 17454, Little Foliage Die 21099

Other supplies: Cosmic Shimmer Colour Cloud ink in Lemon Meringue, Baked Peach, Scarlet Woman; Cosmic Shimmer Pixie Sparkles in Coral Crush; Nuvo Moonstone Glimmer Paste; Copic markers (RV52, RV55, V15, RV21, RV23, RV25, Y02, Y08, Y19, YR21, YR15, YR04, BG72, BG75, YG63, YG 17, YG 03, YG01, R85, R83, R81)

I coloured in the image with the copic markers listed above, and then fussy cut out the image and mounted it on double sided foam tape. For the background, I ink blended with the Colour Cloud inks and then sprinkled on the Pixie Sparkles powder.  I misted the background with about 3-4 good mists of water and allowed it to dry.  I cut the Leaf Burst background from white cardstock and used a spray glue to adhere this to the now dry background. I die cut the Celebrate die from white cardstock three times and glued these together to give some dimension.  I cut the Celebrate outline layer from vellum, and used some of the Colour Cloud ink on the back of it to darken it slightly. The stacked Celebrate die cut was then glued to the vellum outline layer. I also cut three of the Little Foliage leaves from white cardstock and covered them with the Nuvo Moonstone Glimmer Paste.  Once that was dry, I adhered the stamped image over the centre of the background, and then added the Celebrate sentiment and the leaves.

Thank you so much for stopping by and I hope you're having a fun, crafty day!


Wednesday, 20 April 2022

A Toast to You

Hello and welcome! I’ve got another pigeon card today featuring the new Pigeons stamp set from Gerda Steiner Designs. Here’s a look at my card and since it’s an interactive one, there’s a shot of before, and after, you pull the tab (this is a 5 1/2” square card).


To create the card, I started by colouring in the pigeons with Copic markers and fussy cutting them out. For the background, I used a stencil from TCW called Aspen Trees, and added some Distress Oxide shading in Evergreen Bough, Twisted Citron and Tumbled Glass. I then added a little shading to the trees with a C0 Copic marker as they looked a little stark. I cut the hilly foreground from some green cardstock, and added some Copic marker dots under the pigeons feet.  The sentiment is actually from another new stamp set by Gerda Steiner Designs called “Toast to You”, and I stamped it in black Versafine ink and then clear heat set it. The tree was made from a set of cloud dies for the leafy parts cut out of green cardstock scraps, and the trunk and branch were cut from brown cardstock using a Bigz die from Sizzix by Tim Holtz called “Branches”.  I used the “Swish ‘n Pop Pull Tab” die set from Lawn Fawn for the interactive mechanism, but I modified it to have the pigeon appear from the left hand side. I’ve done a previous video showing how to modify it, so if you’re interested, you can find it here.  The branch and pigeon with the toast are actually attached to the clear, acetate arm of the interactive mechanism, so are separate from the tree. I used foam tape in a double layer to pop up the hilly foreground and tree in order to hide the mechanism, and to allow the swing arm to move. 

Thank you so much for stopping by and I hope you’re having a great, crafty day!  


Wednesday, 6 April 2022

Pigeon Trouble

Hello and welcome back!  Today I’ve got a card featuring a new stamp set by Gerda Steiner Designs called “Pigeons”.  There are five pigeons in this set, and you just know they all have fun, expressive faces!   Here’s a look at the card I made. 


I coloured in the pigeons with Copic markers (N6, N4, N2, N1, N0).  To add the interference sparkle to their necks, I used some Cosmic Shimmer Opal Crush Polish in Golden Blackberry.  It doesn’t show up very well in the picture, but there really is a nice sparkle and hints of purple and green on their necks. 

For the background, I used some Distress Oxide Ink in Tea Dye and Mowed Lawn to create the foreground on my card front. I added in some grass and pebbles with Copic markers. I used Colour Cloud Ink in Clear Day to freestyle add a sky and some clouds.  The trees (Memory Box - Alpine Trees) were inked up with Distress Oxide Ink in Rustic Wilderness. 

I stamped and clear heat embossed the sentiments which are in the stamp set.  The pigeon on the left was glued in place. I mounted the two pigeons on the right on foam tape and positioned them on the card front. Finally, for the pigeon droppings, I added some Cosmic Shimmer Fluffy Stuff and heat set it. Once it was dry, I added a little N4 Copic marker to it. Don’t you just love the expressions on those pigeons?!

Thank you so much for stopping by and I hope you’re having a great day! 


Wednesday, 23 March 2022

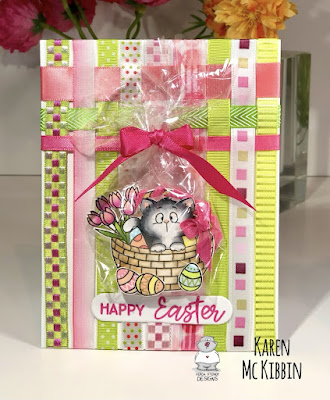
Wrapped Up Easter Kitten

Hello and welcome back!  I’ve got an Easter card today made with the sweet little Easter Kitten stamp set from Gerda Steiner Designs. This little kitten has gotten herself in a little trouble as she has been wrapped up into the Easter basket she was hiding in! Honestly, as I’m typing this up, I’m thinking “What was I thinking when I made this card!”. 


I coloured my images with Copic markers (I’m sorry, but I forgot to write down which ones I used). I fussy cut them out and used my craft knife to cut out the area just under the handle of the basket. Then I  wrapped some ribbon around the handle and made a little bow.  I popped the additional eggs up on foam tape and attached them to the front of the basket.  Here’s where it gets a little weird - I cut a piece of cello wrap and wrapped up my image and tied it off with another piece of ribbon.  It’s a bit hard to see in the photo, but in real life, it does look like the kitten is in a gift bag. 

For the background, I dug into my stash of ribbons to make a slightly woven background.  I applied some double sided tape to the back of the card front at the top and bottom of the card.  Starting at the top, I adhered strips of ribbon, trying to space them out evenly.  Then I wove three strips of ribbon through the vertical strips and adhered them to the back of the card with some more double sided tape.  Finally, I adhered the vertical strips to the bottom where I’d already placed the tape. Then I used glue to attach the card front to the card base.

I then stamped the sentiment, from the same stamp set, in Picked Raspberry Distress Oxide ink and clear heat embossed it.  I used a rounded rectangle die to cut it out and then attached it to the front with double sided tape.  Finally, I used double sided tape to adhere my gift wrapped kitten onto the ribbon background.   I just love the surprised look on that kitten’s face!  

Thank you so much for stopping by and I hope you’re having a great day! 


Wednesday, 9 March 2022

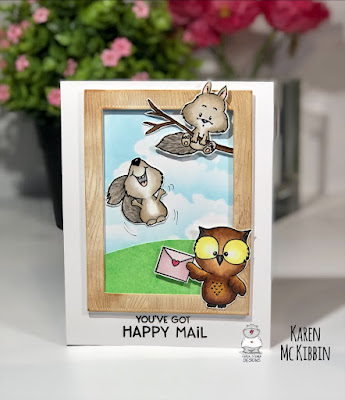
You've Got Happy Mail!

Hello and welcome back.  I've got a card today that features the Owl My Love and Happy Fall stamp sets from Gerda Steiner Designs, because who doesn't love happy mail?!  Here's a picture of my card.


I used Copic markers to colour in all the images and then fussy cut them out.  I die cut 4 of the wooden frames from a Hero Arts die called Wood Frame.  I used some Distress Ink in Vintage Photo to ink blend on the top frame, and then glued the layers together.

From the inside section of one of the frames, I inked up a grassy green colour, spritzed it with water and blotted up some of the ink with a paper towel.  Once it was dry, I freestyle cut a grassy hill.  

On the card front, I stamped and clear heat embossed the sentiment (which is from the Owl My Love set) below where the frame would sit. Next, I masked off the area outside where the frame would go, and used a cloud stencil (Cloud Edger  from Colorful Life Designs) to create the sky.  I then glued the frame around the inked area.  And finally, I adhered the images with glue and foam tape as needed.  I love that squirrel that is jumping for joy!

Thank you so much for stopping by and I hope you're having a great day.

Wednesday, 23 February 2022

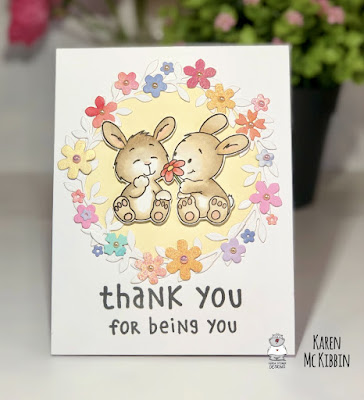
Bunny Friends Thank You Card

Hello again and welcome. We’re having a little stretch of very cold weather here at the moment, so I decided to make a springlike card to warm me up! These little bunny friends were perfect for the occasion. 


I stamped the adorable image from the “Bunny Friends” stamp set from Gerda Steiner Designs onto Neenah Solar Crest 80# cardstock, and coloured it in with Copic markers before fussy cutting it out.  I masked off my card front with some contact paper that I had die cut a circle from.  I ink blended this circle in yellow ( I used some Cosmic Shimmer Colour Cloud ink in Lemon Meringue, but any ink would work). I used a grey ink to stamp and clear heat emboss the sentiment, which is from the same stamp set.  

Next, I die cut a variety of flowers from scraps of inked up cardstock I had in my “To Be Used One Day” box (that’s the box where all those bits and pieces go when you’re just not sure what to do with them!).  I used the Spellbinders Petite Floral Potpourri die set for this, as the flowers are quite small and delicate.  Once I had everything cut out, I started with the leaves to build a wreath, and glued them in place around my inked circle.  Then I added in the little flowers around the wreath.  I mounted the bunnies on foam tape and popped them up in the middle.  Finally, I added a few pearls to the flower centres to give them that little sparkle.  Those little bunnies just steal the show with their cuteness! 

Thank you so much for joining me today and I hope you’re having a great day! 

Copic markers used: E40, E41, E42, E43, E31 and R00