Monday, 19 October 2020

Hero Arts Christmas Village Bridge Card *Video*

Hello and welcome!  I’ve made a bridge style card using the new Tri-fold Edge Village die from Hero Arts. I think this die set is such a great Christmas one because it’s very versatile and oh, so Christmassy!  


I think the easiest way to see how I made this card is to watch the video, so I haven’t done a traditional blog post today.  I do hope you’ll follow along with the video, and I hope I’ve inspired you to give this card a try. It stands up so well that it doubles as a Christmas decoration too!  To see this video, PLEASE CLICK HERE.  

Thanks for joining me! 

Wednesday, 7 October 2020

Slimline Christmas Carol Kittens Card and a Bonus Card!

Hello and welcome! I’ve got a slimline card today that features the Carol Kittens stamp set from Gerda Steiner Designs as well as one of the puppies from the Howl are You set and one of the kittens from the Christmas Kittens set. My card took a bit of a left turn along the way, and I ended up with a second bonus card for you, so you can see that card at the end of this post. 


I’ve made a video showing how I made this card, so if you would like to see the video in HD, PLEASE CLICK HERE.


I started my card by cutting a piece of Strathmore watercolour paper to be about 9 x 4”, slightly larger than my rectangular die, and I taped it down to an old cutting board. After wetting it, I dropped in some Distress Ink reinkers in Mustard Seed, Spiced Marmalade, Picked Raspberry, Wilted Violet and Dusty Concord. Once this was dry, I spattered it with some Kuretake Starry Colors paint in gold and let it dry. 


I used a Trinity Stamps die called Wonky Stitched Wilderness slimline series to cut out my background. I also embossed some of the stars that come with this die set.  I coloured all my images with Copic markers and have listed them below, and then cut them out. I applied some glossy accents to the dogs’ collar and the ornaments. I also die cut a snowbank from white cardstock using the Lawn Fawn Hillside border dies. 

When I went to assemble my card, things took a left turn.  I felt that the puppy was rather lost amongst all the kittens, but he was meant to be the singing star of the card.  So I removed the Christmas kitten in the tree (who I thought was looking very startled by the dogs’ singing), and he shows up later in the bonus card.  I die cut some trees from Sunny Studios Woodland Borders die set and covered them with Nuvo Moonstone glimmer paste.  


I embossed and heat set the words “Joy”, “The World” and the musical symbols (all from the Carol Kittens stamp set), using some Stampendous Pearlustre Moonstone embossing powder onto my snowbank border.  I also used the word stamp “To Youuuuuuuu!!!” from the Howl are You set and changed it to “Tooooooooo” by masking and rotating the stamp to only stamp and emboss the bottom of the u’s.  I then cut this out to make a speech bubble. 

To assemble my card, I foam mounted the snowbank and adhered it to the background.  I added some Nuvo shimmer pen just along the edge of the snowbank and then adhered the rest of my images. Finally, I glued the speech bubble in place to complete my card.  


And for the Bonus Card ...

So even though I had this card done, I still had that kitten in the tree image coloured and cut, so I decided to make a second card with it.  I coloured one of the other kittens in the Christmas Kittens set, as well as the tree branches.  


I die cut a panel of white cardstock with a wonky stitched rectangle die, and cut a lift the flap circle on this.  I heat embossed the “naughty or nice” sentiment around the flap in Stampendous Pearlustre Moonstone embossing powder.  I did the same for the word “Lift” on the flap.  I die cut a frame of gold foil cardstock and adhered this to my card base.  I glued the kitten in the tree in place so he would show up behind the flap, and then adhered my white rectangle panel to the card base.  I added the second kitten below the flap, and glued the tree branches over the flap itself.  I added glossy accents to all the ornaments. On the inside, I stamped the sentiment and added the broken ornament.  

Thank you so much for stopping by and I hope you’re having a great day! 

Copic Markers used:

Dog - E59, E57, E53, E51, E35, E33,  Collar - R39, R29, R35

Black cat - N6, N4, N2, N0, R20, R00,  Scarf - G99, G94, G82

Tabby cats - E34, E53, E51, YR27, R20, R00 Scarf - B66, B63

Grey cat - C3, C2, C1, C0, R20, R00, Tree/ ornaments - G67, RV13, RV04, RV02, YR16, Y38, YR21.

Hats - R39, R29, R35

Music sheets - E51, Y23


Wednesday, 23 September 2020

Theater Fold Meerkat Birthday Card with Video

Hello and welcome! Today I’ve made an interactive card featuring Meerkats on the Lookout from Gerda Steiner Designs.  I don’t usually make Halloween cards but wanted to do a fall colours card so this is what I came up with.  


I’ve made a video of how to construct this card and it’s probably the easiest way to figure it out.  If you would like to see the video in HD, PLEASE CLICK HERE.


Here’s a list of the pieces of cardstock used and a diagram of where to crease the curtains.

I started by assembling the front first.  I die cut a rectangle from two of the white 4 1/4 x 5 1/2” pieces of cardstock as well as a black piece and then glued these together.  I cut a notch out of the side edges, using a small circle die and partial cutting.  I white heat embossed the sentiment and added the three dots with a white gel pen.  I folded and creased the two sleeve pieces so they fit along the side edges and glued them in place on the back, making sure they weren’t too tight.  I trimmed the sleeves around the notches so it would be easier to grasp the curtains.

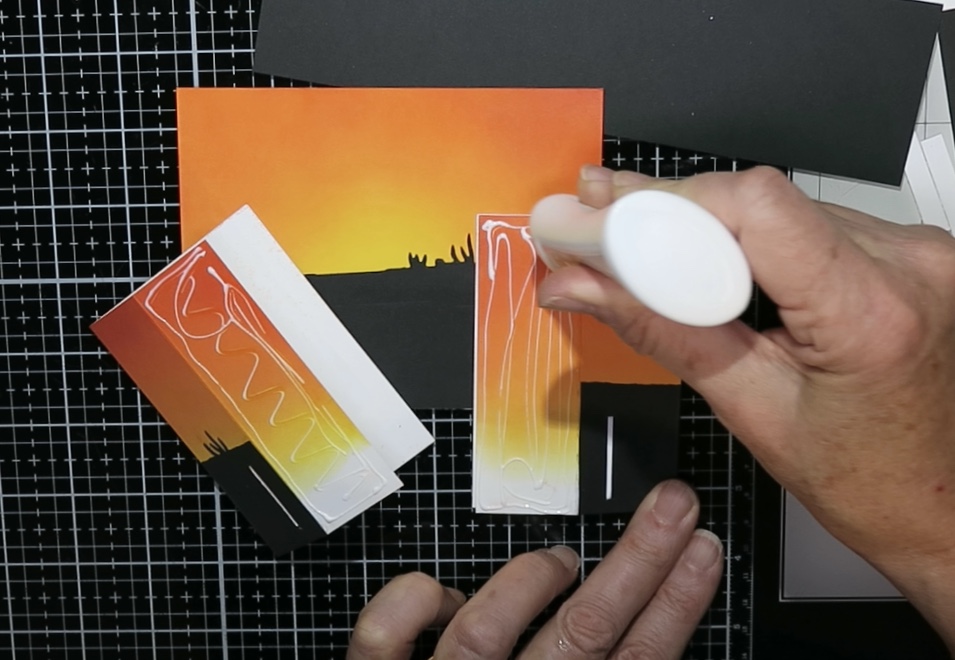
For the back and curtains, I ink blended using Distress Oxide inks in Mustard Seed, Spiced Marmalade, Ripe Persimmon, and Candied Apple.  I used a die from Find IT Media called Amy Designs Wild Animals Outback, and partially die cut this from black cardstock to fit along the lengths of all 3 pieces of cardstock.  

I trimmed the two curtains just slightly along the 5 1/2” edge so they would slide more easily through the sleeves on the front.  Then I creased and folded the curtains at 2 3/4” and 4 1/8” for the left curtain, and at 1 3/8” and 2 3/4” for the right one.  Finally, I glued the black die-cut silhouette pieces to the curtains and back and creased along the fold lines.  

I used glue to attach the curtains to the back piece, being careful to only apply glue to the first folded area on the curtains and to try to keep the center fold of the curtains together. Really, the glued area of the curtains should line up along the side edges of the back, but I found it more important for the folded curtains to match in the center. 


I cut a second platform piece from black cardstock and glued the two pieces together.  I cut slits in both curtains at the same distance, wide enough for the platform piece to pull through.  I made stoppers by using pieces of narrow scrap cardstock and gluing these to the ends of the platform so it couldn’t pull through.  Next, I stamped the inside sentiment and clear heat embossed it.

To assemble the card, slide the left curtain through the sleeve on the back of the front piece, and the right curtain through the other sleeve.  I added pull tabs to the curtains by folding a small strip of black cardstock and used the same circle die to cut them out.  Now all that’s left is to just add your images.  Oh, and to play repeatedly with opening and closing the curtains!  Thanks for stopping by and I hope you’re having a great day!


Wednesday, 16 September 2020

Z Fold Merry Wishes Christmas Card

 Hello and welcome! I’ve got a Z fold Christmas card to share with you today, that features the Merry Wishes stamp set from My Favorite Things. This is an adorable stamp set! 


K


I started by cutting my card base from navy blue cardstock (dimensions are 4 1/4” x 11” long).  I creased this at the 5 1/2” mark to make a regular A2 size card.  Then I creased the left hand side again at the halfway mark or 2 1/8”. I splattered the sky with some gold and silver paint and let it dry. 

Next, I die cut a snowbank by using Lawn Fawn border dies and doing some partial die cutting to extend the length so that the snow bank would extend fully across the scene.  The height on mine extends about a third of the way up the background.  I creased this the same way I had done the card base, and then adhered it with glue to the card base, leaving the top border free of glue to later insert my figures.   I cut a second snowbank  in the same way to use along the bottom border.  I creased this one at the 5 1/2” mark, and again at the 7 5/8” mark on the right and then creased and folded this in the opposite direction from the base.  This snowbank only extends about a quarter of the way up the background to allow the snowbank behind to be seen.  I also used a Lawn Fawn stitched heart die to add some detail to the snowbank.  

I adhered the second snowbank by glueing it to the short left hand card base and also on the short right hand side of the snowbank.  


The white trees were cut from white cardstock using the Alpine Trees from Memory Box and then inserted and glued in place just below the left hand snowbank.  The Merry Christmas die is one I had in my stash, and I cut it from a red glitter cardstock, and glued it to the snowbank on the left.

I stamped all my images with Copic friendly ink, and then coloured them in with Copic markers. After fussy cutting them out, I arranged them on my card base.  I wanted it to be a surprise when the card was opened and the whole scene was revealed, so I was careful to place most of the images in the middle of the card.  From the front, only the bird and the cabin are visible when the card is closed.  I added sparkle pen to the tree decorations and lights, as well as the star the bird is carrying.  I also added a Nuvo shimmer pen along the edges of all the snowbanks.  

I added a piece of white cardstock on the back as I felt the card needed a place to write a message.  This truly is a fun card and I hope you’ll give it a try! 


Wednesday, 9 September 2020

Embossed Christmas Card With Video

 Hello and welcome! I’ve got a very textured, embossed Christmas card to share with you today. This card was completely inspired by my recent re-organization of my embossing folders!


I’ve got a YouTube video of how I made this card, so to see it in HD please CLICK HERE


I stamped the Santa image from the “Peeking Friends” stamp set from Gerda Steiner Designs and pencilled in the rest of his beard.  I used a Copic multiliner pen to go over it and erased the pencil marks.  Then I coloured my image with Copic markers (listed below) and fussy cut it out along the lines.  I used a black marker pen from EK Tools to colour along the edges.  

Next, I diecut the word Joy from white cardstock.  If you have a nice green cardstock or glitter cardstock, that would be even easier.  I was given this die several years ago and it was second hand at the time, so I don’t have the product information to give you.  But any large Joy or Noel die would work here, even alphabet letters.  I had to do some partial die cutting on the “O” to make it wide enough for Santa to not obscure the “Y”.  I coloured the word in with a Copic marker, and went along the cut edges too.  To add some interest to the word, I heat embossed it with clear embossing powder and sprinkled some glitter on while it was still warm.  I did this 2-3 times for even more depth.  

When I reorganized my embossing folders, I die cut tags and embossed those to use as a reference for all my folders.  The tags were so pretty and full of texture, that it inspired me to make this card.  I cut out 12 -  1 1/4” squares from white cardstock and then used different embossing folders to emboss the squares.  Sometimes, I used different areas of the same embossing folder so you don’t even need that many folders. I mounted these squares on foam tape and then adhered them as evenly as possible on my card front.  I had thought I could use my T-ruler, but with the foam tape, this was not really possible.  In the end, I just spaced all 12 squares out on my card front and carefully adhered them in position.  I used glue to adhere the Santa to the word Joy and then onto the card front.  I used the “to the world” sentiment from the MFT stamp set Bitty Holiday Wishes and trimmed it down to fit over the”Y”.


Since I don’t have any bright green or red embellishments, I created my own by using different sized  circle punches to cut out circles from red and green foil cardstock and covered those with glossy accents.  


I made a second card with the reindeer image and cut the Joy out of red glitter cardstock.  These cards have just got so much fun texture in them and I hope you’ll give this a try!  

Copic markers used: E000, R00, R20, C0, C1, C2, N6, R39, R29, R35 for Santa.  G94 for the word Joy.


Wednesday, 26 August 2020

Slimline Safari Card


Hello again! I’ve got a slimline card today that could be used as either a thank you card or an encouragement card for a friend, or even a birthday card. I’ve used stamps from the Go Wild set from Gerda Steiner Designs, as well as the lion from the Party Animals set. 


 I started by stamping The Leafy Bold Print stamp from Hero Arts onto my card front with Versamark ink.  Once the ink was dry, I ink blended over it with original Distress Inks in Pine Needles, Lucky Clover and Peacock Feathers. I have to admit that I loved this card base so much that I made another card with the same background and added some flowers for a quick thank you card. 


Next, I stamped out my images by masking as needed and allowing room between my images to cut them out with a square die (I used the Selfie Square die from My Favourite Things). I used copic markers to colour them in, and also for the backgrounds.  I die cut 3 Polaroid frames from white cardstock using the Polaroid Shaker Frame die from My Favourite Things.  I wanted my images to look glossy like a photograph, so on the back of these frames, I placed double sided adhesive around the opening, and then adhered some scrap acetate (from a stamp set packaging), trimming it down to fit the opening.  Then I used a little glue to attach my coloured images to the acetate on the back of the Polaroid frames.  Just for fun, I fussy cut around the elephant’s trunk and made that come out over the front of the Polaroid frame (I had to cut a small slit in the acetate to allow it to come out). Finally, I hand wrote the hashtags messages on the front since I didn’t have any stamps for this, so you can get creative with what you write or personalize it for a special person.


I die cut the  sentiment from an older Neat and Tangled stamp and die set called “Awesome”.  The die set comes with a border die so I cut that from white cardstock, and the word from black cardstock.  I stamped the “You are so”  in black Versfine ink and clear embossed the sentiment at the top of the card, and then glued the die cut “Awesome” in place.  I placed the sentiment going down the side of the card as it allowed me to more easily fit my images without obscuring them too much.  This was a fairly quick and easy card to do and the slimline size gives you so much more room to play with.  Thanks so much for stopping by and I hope you’re having a great day!