Sunday, 22 December 2024

Embossed and Foiled Cards

Hello everyone and Merry Christmas!  I've got a couple of embossed and foiled cards to share today.  


Supplies Used: Beautiful Bouquet 3D Embossing Folder 32949, Arch Border Frames Metal Cutting Die 30420, Big Sentiments 1.0 A5 12pc Sentiment Sheets 22336 , All Occasions Sentiments A5 12pc Sentiment Sheets 22339, alcohol inks, foiled cardstock, acetate

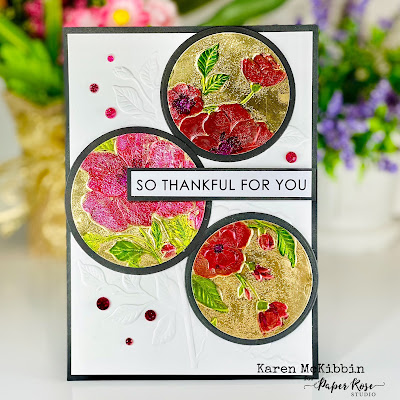
Circle Card

To create this card, I cut 3 circles of gold foiled cardstock and  embossed them in the Beautiful Bouquet embossing folder.  I also embossed the white cardstock in the same folder. I have a small paintbrush that I keep with my alcohol inks, and I used this to paint on some alcohol ink onto the flowers and leaves.  It's difficult to get these inks to blend well, so I had to just "let it be" after the inks went on.  Once the ink was dry, I swiped my VersaMark ink pad over the top of the painted pieces.  Then I added some clear embossing powder and heat set it.  The powder landed in various areas of the foiled circles, but I quite liked that and left it that way.  However, you could use a dry brush to remove the powder from the non-inked areas.  Next, I cut black circle mats to back the inked circles and attached them together.  To assemble the card, I matted the white embossed background with black cardstock, and adhered it to my card base.  I pieced the circles back onto the white background where they matched the embossing, and added the sentiment and glitter dots.

Arched Card

This card started off much like the first.  I embossed the gold foiled cardstock and then painted on the flowers and leaves with alcohol ink.  I then swiped my VersaMark inkpad over the front and added the clear embossing powder.  Once this was heat set, I repeated this process.  I had also embossed a piece of acetate, and I found that I liked the look of the acetate over the gold foil so I used a double sided adhesive to attach these together around the outside edges.  Next, I cut the arch out of the black card front, and matted this over the foiled acetate image.  Then I attached this to my card front and added the sentiment.

I hope I've been able to give you a little inspiration today as that is a beautiful embossing folder!  Thanks for stopping by!


Thursday, 12 December 2024

Gnome Tags

Hi everyone, I am always late at making tags for Christmas gifts and usually have to scramble to find something to use.  But this year, I was inspired by the new Build a Gnome die set from Paper Rose Studio, and am ahead of the game now!

Supplies Used: Build A Gnome Small Metal Cutting Die 32484 , Banner Trio Metal Cutting Die 25921, mini pompoms from the Dollar Store.

I started these by doing all my die cutting first.  I cut the tags from white cardstock and some from foiled cardstock.  After cutting out the noses, hands and beards, I laid them out on a sticky surface and coloured them all in with my Copic markers (C0, C1 for the beards, and E00, R00 and R20 for the hands and noses).  I went through my stash of used scraps and cut out the bodies, arms and hats.

Once everything was die cut, I started assembling all the gnomes, mixing and matching colours.  I punched a small hole on the upper middle of the tags and attached a ribbon or wire before attaching the gnomes to cover the holes.  Finally, I cut the pompoms in half and glued them in place.  I love how colourful and playful these tags are and they can be used for any time of the year.

Thanks for stopping by today, and I hope you're having a great day!


Monday, 2 December 2024

New Larger 5" x 7" Pop Up Box Card. *VIDEO*

Hi everyone, I'm back with another pop up box card, but I've recreated this one to fit a 5 x 7" envelope and to accommodate a lot of images.


Supplies Used: White Christmas Cut Aparts Paper Pack 32886, White Christmas Basics 6x6 Paper Collection 32934
 

So the finished size of this box card is 5" x 7" when its folded down flat.  There are 4 cross pieces where images can be attached, so any die cut images or stamped images would work well here.  It can be used for any occasion too, of course.  So check out your stash of supplies - I'm sure something in there will work!

I've made a video to show you how easy it is to make this card, so I hope you'll come watch it.  

PLEASE CLICK HERE to see the video and the PDF is located in the description box below the video. 

Thanks for stopping by today!


Tuesday, 22 October 2024

Snowglobe Shaker Card *VIDEO*

Hi everyone, I've got another video for you today.  I've made this style of snowglobe card before and have done videos on it, but I wanted to step it up a notch so I've made it into a shaker card as well!  It's so much fun!!


Paper Rose Studio supplies:  Christmas Cheer Embossed Die Cuts 32532, Large Christmas Snowflake Layered Metal Cutting Die 17727.

Now I had used the Lots & Lots of Circles die, but I think it may have been discontinued.  But any set of circle dies will work for this and just in case you want the measurements of  the circles I used, the outside diameter is 4 3/4" and the inside of the white rings is 4 1/4".  I have several more examples of cards made using the  Christmas Cheer embossed die cuts so I hope you'll come take a look.  

To watch the video, PLEASE CLICK HERE.  Thank you for stopping by and I hope you're having a great day!


Saturday, 12 October 2024

3D Pansy Embossed Cards

Hello everyone, I've got 3 cards to share today, all of them made from the new Perfect Pansies 3D embossing folder from Paper Rose Studio.


Supplies Used: Perfect Pansies 3D Embossing Folder 32946, Etched Pansy 1 Metal Cutting Die 25666, Fancy Script Layered Hello Metal Cutting Die 32478, All Occasions Sentiments A5 12pc Sentiment Sheets 22339

Isn't that a lovely embossing folder?!  For the first card, I simply embossed some white cardstock and trimmed the panel down a bit.  The finished card is a 5 x 7, and I used some blue glitter cardstock paper to mat the embossed panel. I used the Etched Pansies die to diecut 3 pansies and then coloured them with Copic markers.  I shaped the flowers a little on an old computer mouse pad, using some ball styluses.  I added a border of the blue glitter cardstock to the panel, and adhered the pansies with glue.  I mounted the sentiment on foam tape and adhered it just above the border.  

For the second card, I swiped Speckled Egg Distress Oxide ink all over the inside debossed side of the embossing folder.  This is the side where the pansies are depressed into the folder.  Then I added my white cardstock to the folder and ran it through my die cutting machine.  I then repeated this process adding two more layers of Tumbled Glass Distress Oxide ink to the debossed side of the folder.  I was careful to position my cardstock on the embossed side of the folder before closing it, because you don't want to smear the ink (although I did manage to do this a bit!).  I also found that a quick mist with water onto the inked side of the folder helped to spread the ink a bit.  But doesn't that card front remind you of Wedgewood pottery?  For the Hello sentiment, I die cut it from white cardstock 3 times and glued them together. I covered the top layer with Nuvo Crystal Glaze and then sprinkled on some white glitter.  When it had dried, I mounted this onto a vellum shadow layer that I had covered the back of with the Tumbled Glass Distress Oxide ink.  I used my heat gun to gently dry the ink, and after attaching this to the card front, I added the supporting sentiment.

For the third card, I embossed some white cardstock as usual, and then added some inks with small brushes to the pansies and leaves.  I trimmed this panel down and added the same blue glitter cardstock in behind it.  I cut the Hello sentiment 3 times from white cardstock, stacked and glued them together, and used a Copic marker to colour the top layer.  I added the Nuvo Crystal Glaze to the top layer again.  Finally, I die cut a vellum shadow layer and adhered the sentiment to this and then added it all to the card front.

Thanks for stopping by and I hope I've given you some inspiration on how to use this folder - it's a gorgeous embossing folder!!


Wednesday, 2 October 2024

Jolly Holidays 2.0 Cards - Two Takes. *VIDEO*

 Hi again, and thank you for stopping by.  I've got two cards to share today, both using essentially the same supplies.  The first card is a simple card and the second one has been stepped up a bit on the inside.


Paper Rose Studio Supplies Used: Jolly Holidays 2.0 Embossed Die Cuts 32388, Floral Holly Christmas Wreath Metal Cutting Die 32469 , Ben's Plaid 3D Embossing Folder 32157

So you can see the fronts of the cards are almost exactly the same, using very similar products.  But the inside of the second card has been stepped up a bit and has more space for adding those beautiful die cut images.  Now this style does not have to be just for Christmas of course, so remember to think of what else you may have in your supplies.  

I've made a video for you if you would like to see how these were made.  PLEASE CLICK HERE to see the video.  Thanks again for stopping by and I hope you're having a happy, creative day!

Sunday, 22 September 2024

Joyful Christms Card

 Hello again, I've got a simple Christmas card to share today.


Paper Rose Supplies Used: Floral Christmas Coverplate Metal Cutting Die 32466, Floral Holly Christmas Wreath Metal Cutting Die 32469, Fancy Script Layered Joy Metal Cutting Die 32454

This is an A2 sized card and I started by die cutting the floral coverplate die from white cardstock.  I used this as a stencil to then add a little ink onto my card front.  I used a lighter blue-green ink and then went back in with a darker shade closer to the center of the stems.  Finally, I added some Distress Grit Paste in Snowfall which gives it a nice frosty look.  

While the card front was drying, I die cut the wreath from vellum and once from white cardstock.  I added some ink to the cardstock wreath and then covered it with VersaMark ink before adding some clear sparkle embossing powder and heat setting this. I added a thin strip of foam tape to the back circle of the wreath and attached it to the vellum wreath, offsetting them slightly.  

Before assembling my card, I trimmed the front cover down and cut a piece of gold glitter cardstock behind it.  I used glue to attach the wreath and set it under an acrylic block to dry.  I cut the Joy from the same gold glitter cardstock once and twice more from white cardstock and layered these up with glue.  I used the shadow die to cut an outline from vellum and then glued the Joy word in place.  I put some foam tape under the center of the Joy word where it fit inside the wreath, and used glue on the outer edges to attach the sentiment in place. Finally, I added a few gold pearls sporadically around the card.

Thanks for stopping by everyone, and I hope you're having a great day!


Thursday, 12 September 2024

Snowflakes, Snowflakes and More Snowflakes! *VIDEO*

Hi everyone, I've got a few cards to share today as I was having lots of fun playing with Paper Rose Studio's newest Christmas Snowflake dies and sentiments.  Here's a look at the cards ...


If you want to see how these cards were created, I've made a video for you with a complete supply list if you're interested.  You can see the video if you CLICK HERE.  Thanks so much for stopping by today.


Monday, 2 September 2024

Just Treats, No Tricks

Hi everyone, I've got a Halloween card to share today.  I don't normally make these, but the Paper Rose Studio Spooky Halloween release was too cute to resist!


Paper Rose Studio Supplies: Spooky Halloween Embossed Die Cuts 32757, Spooky Halloween 6x6 Paper Collection 32754, Tree of Love Metal Cutting Die 28825, Wonky Picket Fence Metal Cutting Die 22762

This is an A2 sized card today and I started by doing some ink blending on a card front, using some Catherine Pooler inks in Crushed Violet, It's a Girl, Party Dress, Orange Peel and Ginger.  I misted with a little water after doing the ink blending and set it aside to dry.

Next, I die cut two each of the trees and fence pieces from black cardstock. I chose some of the embossed die cuts to use on my card and separated them from the cardstock. Then I positioned the trees and house in place and glued them down.  I used the Cracked Stencil to create a little path to the house by embossing it with VersaMark ink and then adding and heat setting with black embossing powder. 

I positioned the fence pieces so they were meeting in the middle and wrapped the outside edges to the back of the card front and glued those edges to the back of the card front. This creates the interactive gate element.  I added die cuts to the fence and front of the card.  The sign was created from one of the 6 x 6" papers which I trimmed down and added to a piece of black cardstock.  I created a stem for the sign and tucked it in behind the pumpkin die cut. 

Finally, I attached the card front to a card base.  Thanks for stopping by and I hope you're having a great day!


Thursday, 22 August 2024

Animal Kingdom Cards

Welcome back, and thanks for stopping by!  I've got 5 cards to share today as I was having too much fun with Paper Rose Studio's Animal Kingdom embossed die cuts and 6 x 6" papers.  I created the sentiments for all of these on my computer as I really wasn't too sure what sentiment to put with some of these!

Here's a list of the supplies: Animal Kingdom 2.0 Embossed Die Cuts 32109, Animal Kingdom 6x6 Paper Collection 32100.


This card measures 5 1/2" tall x 6" wide so it's a little unusual.  For this card, I used the Layered Pinwheel Lace Border Metal Cutting Die 20973 outline die to cut the left and right borders of the 6 x 6" paper.  I also cut it from black cardstock and offset this slightly behind the patterned paper.  I adhered a small strip of gold foiled cardstock behind the central piece of patterned paper.  I then trimmed down the left and right edges so the finished card would measure 6" across after allowing for some of the gold to show through.  The gold doesn't show up well in my first picture, but in real life it's quite noticeable. I added foam tape behind the left and right borders and then mounted everything onto the card base.  After printing off the sentiment, I mounted it on gold foil cardstock and then popped the center up on foam tape.  I also mounted the tiger on foam tape before adhering everything onto the card front. 

This is an A2 sized card and was very quick to make.  I did a little ink blending in the center of my card base with some yellow and yellow-green inks.  I then used the Flowy Leaves 6x6" Stencil 18870 over top and applied some Liquitex Gloss Heavy Gel through the stencil, just over the ink blended areas.  When that was dry, I added the strips of patterned paper which are from the same Animal Kingdom 6 x 6" papers.  I foam mounted the elephant and added him to the center of the card and then adhered the sentiment strips.  

This card measures 5 1/2 x 5 1/2".  After trimming the 6 x 6" paper down to be a 5 1/2" square, I trimmed off 1/4" from the right hand edge of the patterned paper.  After deciding where the chameleons would go, I used a craft knife to cut a small slit along the tree so the branches of the die cuts could be inserted.  I placed foam tape on the back of the chameleons and attached them to the patterned paper.  Next, I adhered a strip of black paper on the right hand edge of the card base, and then glued the main piece of patterned paper and the small strip down, so there would be an even border of black along both edges. I used Copic markers to colour in the word "Colour" on the sentiment and then went over it with a black pen to mark where the colours had changed.  I was trying to keep the mosaic look going.  I mounted this sentiment on gold foiled cardstock and adhered it to the front of the card. 


Both of these cards are A2 sized and were again, very quick and easy to make.  I used the Forest Trip 12x12 Paper Collection 26629 for the backgrounds on both cards.  I glued the animals directly down to the card front.  I used one of the information paper strips for the sentiment on the bear card, and glued my sentiment on top.  For the owl card, I used a scrap of the Forest Trip papers and foam mounted it before adhering to the card front. 

These really are beautiful embossed die cuts and papers, and I'm so happy that many of these can be used for more masculine cards.  Thank you again for stopping by and I hope you are having a lovely, creative day!


Monday, 12 August 2024

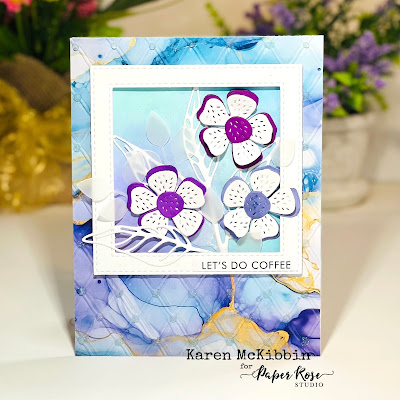
Embossed 2 For 1 Cards

Hello and welcome back!  I've got a set of  2 for 1 cards today which always makes me happy.  I like to be able to immediately use the extra pieces as I have a tendency to put them away and forget about them.  Here's a look at the two cards I was able to make ...

Paper Rose Studio Supplies:  Tufted Elegance 3D Embossing Folder 32154, Inky Colour 6x6 Paper Collection 31896 , Elodie Flower Builder Metal Cutting Die 28477 , Hand Lettered Thanks Metal Cutting Die 25606, Leaf Outline Die Metal Cutting Die 29620 , Little Foliage 1 Metal Cutting Die 21099, So Extra White 1.0 Supporting Sentiments 20165, Stitched Square Frames Metal Cutting Die 16685.

For these cards I started with the top card first.  I chose one of the pieces of Inky Colour papers and trimmed it down to make an A2 sized card front.  From this, I die cut a square in the upper third portion of the card.  I pieced the square back into the card front and used low tack tape on the back to keep it in position.  I misted it and then put it into the embossing folder and ran it through my machine.  Then I applied some Nuvo Jewel Drops in Sea Breeze over all the tufted areas, and before the drops dried, I sprinkled on a clear white glitter and then set this aside to dry.  

While it was drying, I die cut out all the floral elements, leaves, frame and sentiments. For the top card, I used Copic markers to colour in the base layer of the flowers and the centers.  On the bottom card, I used some Catherine Pooler inks to add a touch of colour to the outside of the petals and leaves, and to the centers.  The "Thanks" die was cut three times from white cardstock and then glued together.  I applied ink to the top layer to turn it a blue-purple colour and then covered it with Nuvo Crystal Glaze.  I cut a few of the leaves from vellum on the top card.

To assemble the top card, I marked on my card base where the square opening would be and then did some ink blending over the opening with Distress Oxide inks.  I glued the "Leaf Outline" leaf down over this, and then adhered the embossed card front to the card base.  I mounted the square frame onto foam tape and popped it in place over the front opening.  Then I arranged my flowers and leaves and glued them in place.  Finally, I added the sentiment to the bottom of the square frame.

For the second card, I cut the remaining embossed square on the diagonal from corner to corner, creating two triangles.  I cut a rectangular opening from a white A2 card front and then embossed the outline using the Tufted Elegance embossing folder.  I used three layers of scrap white strips to add some dimension to this frame.   I then glued the embossed frame to a card base, and then glued each of the triangular pieces into place inside the frame.  Finally, I glued the sentiment along the center and arranged the flowers and leaves and glued them in place. Using the Inky Colour papers really made these quick and simple cards.

Thank you for stopping by today!


Friday, 2 August 2024

Embellishing Your Dies *VIDEO*

Welcome back and I hope you're having a great day!  Today I've got some ideas for how to step up your dies to add a little more interest to your cards.  I've got 4 cards for you today and a video, so here's a look at the cards ...


Supplies used:  Alora Stained Glass Background Metal Cutting Die 31614Inky Colour 6x6 Paper Collection 31896,  So Extra White 1.0 Supporting Sentiments 20165, Cracked 6x6" Stencil 19298, Distress Spritz Uncharted Mariner, Distress Texture Paste Crackle - Translucent, Cosmic Shimmer - Gilding Flakes - Golden Jewels

Supplies used: Christmas Poinsettia Border Metal Cutting Die 30159, Merry Christmas Chunky Metal Die Set 19511, Nature Stroll Festive 12x12 Paper Collection 27433, Cosmic Shimmer - Gilding Flakes - Golden Jewels, Therm O Web - Fancy Foils - 6 x 8 - Red Velvet

Supplies used: Bee Happy 12x12 Paper Collection 27706, Sunflower Border Metal Cutting Die 26362, So Extra White 1.0 Supporting Sentiments 20165, Cosmic Shimmer - Gilding Flakes - Mulled Wine


Supplies used: Inky Colour 6x6 Paper Collection 31896, Wave Borders Metal Die Set 19562, Fish Family Metal Cutting Die 22477, Spotty Line Square Metal Cutting Die 18545, Birthday Layered Metal Cutting Die 18297, Ranger Ink - Glossy Accents

For all of these cards I've embellished the die cut images with either gilding flakes, glitter, foil or even glossy accents.  I hope you will come join me to watch the video and see how these were done. To watch the video PLEASE CLICK HERE.

Thanks for stopping by and I hope you're having a happy, creative day!


Monday, 22 July 2024

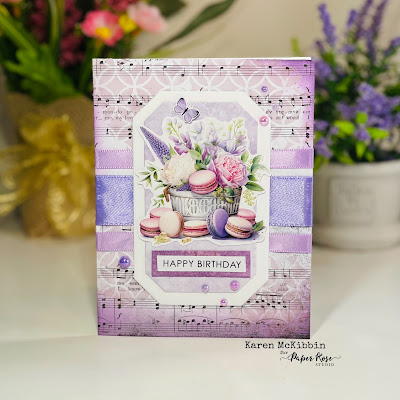
Lavender Collection of Cards

Welcome back everyone!  Today is a rather purple and violet day as you can see!


Paper Rose Supplies Used; Vintage Backgrounds 1.0 6x6 Paper Collection 32382, Lavender & Roses Ephemera Embossed Die Cuts 32193, Tufted Elegance 3D Embossing Folder 32154, Vintage Label 2 Metal Cutting Die 32064 , Vintage Label 1 Metal Cutting Die 32061, Leafy Circle Lattice 6x6" Stencil 21546 , All Occasions Sentiments A5 12pc Sentiment Sheets 22339, Dear Isabella Patterns 12x12 Paper Collection 29778, Hello Border Word Metal Cutting Die 31959.

Now, I was going for a bit more of a mixed media look, but that is not my forte!  I started all of these by inking the edges with a little Catherine Pooler ink in Royal Treatment.  I did a little stencilling over the first and last card in random areas, using a Distress texture paste.

All the cards have a little ribbon on them, and the second and third cards have some tuille on them also.  I've used one of the Dear Isabella papers on the first and second cards on the label sections.  I also cut out a few of the butterflies from that collection and used them on the first two cards.  The embossed die cuts and the background paper really are the star of the show here.  The die cuts are gorgeous and just go so well with the background papers.  The second card has an embossed center which doesn't show up very well in my photo, but its got lovely dimension. 

As always, I hope that's given you a little inspiration!  These were really quick and easy to make!
 

Friday, 12 July 2024

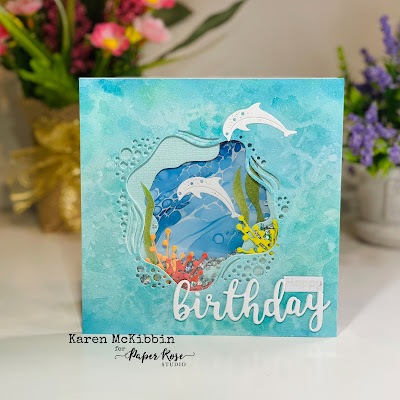
Oceans of Birthday Wishes

Hello again, and welcome.  I've got two birthday cards today that are the result of using the positive and negative images from some die cuts.  I love getting a 2 for 1!  Here's a look at the two cards:


 CARD 1

The first card is a shaker card.  I started by adding some Catherine Pooler inks to my card front in Aquatini, Stone Blue and Seafoam.  I added in some water drops and then reinked over those once they were dry.  I repeated this several times until there was some depth and interest to the cardstock.  Then I used the Cracked stencil over top and spread some Nuvo Jewel Drops in Sea Breeze over the card front. 

When this was dry, I used the Dolphin Dance dies to cut out the center.  I also cut the dolphins from white cardstock and set them aside.  I had originally thought I was going to create more layers for this card (which is why the second card has so many layers), but changed my mind and only cut one lighter green-blue piece of cardstock, using the Splat Nesting die for this.  I used one of the pieces of Inky Colour papers to place at the back of the opening. 

I covered the back of the card front with a piece of acetate.  I put a second piece of acetate behind the lighter green-blue layer as well.  I placed double side foam tape around the back of the opening on the card front to create a well for my shaker. 

I had to get a little creative with the coral and seaweed as I did not have any dies for this.  So the "coral" is acutally one of the branches from the Little Foliage 2 set that I coloured, cut apart and then glued back together to look a little like coral. The "seaweed" is made from the wavy border die in the Wave borders die set.  I cut it from some inked up green card, and then cut it out to make seaweed by following the die cut lines.  I glued these element onto the back of the card front before adding the shaker bits and attaching the second die cut layer.   

I positioned the Inky Colour paper onto the card base and added the one dolphin so he could be seen through the opening.  I then attached the shaker layers to the card front.  Finally, I added the second dolphin and the sentiment. 

CARD 2

I started this card by cutting through the card base with the bubbly border die from the Wave borders die set.  I cut through both the front and back and had to run it through my die cutting machine several times. I then added a lighter blending of the same inks used in the first card.   Then I used the Cracked stencil over top and applied some Liquitex Gloss Heavy Gel that was mixed with some of the Aquatini ink. 

Once the card front was dry, I started layering up my die cut pieces.  I had used the Splat Nesting dies to cut all of them except for the top layer.  The very top layer was applied with foam tape to give some added dimension. I added in my seaweed and coral in a few places.  

I die cut the fish from white cardstock and then backed them with some scraps of the Inky Colour papers.  I added these to the card front and then added the sentiment.  I created the sentiment on my computer as I didn't have anything fishy enough in my stash! 

Thank you for stopping by today and I hope I may have given you some inspiration.


Tuesday, 2 July 2024

Using Scrap Strips to Make Cards *VIDEO*

Hello again everyone.  I've got a video for you today as I was having lots of fun using the patterned information strips that come on all the 12 x 12" papers by Paper Rose Studio.  I've wanted to do a video like one for a long time and finally got around to doing it.  Here's a look at the cards I made with these strips:


Supplies Used: Paper Rose Studio 12 x 12" papers; Large floral image - Rainbow Twirl 2.0 31046; Celebrate Layered die 17454, Hand Lettered Thanks Metal Cutting Die 25606, Bryony Floral Wreath 31941, Alora Butterfly Border 31620, Little Etched Butterflies 25609, Mother's Day Gnomes Embossed Die Cuts 31872, 12 x 12 Collection Pack - Dear Isabella 29802

So as you can see, all these card fronts are made from those patterned paper strips which are just over 1/2" wide.  I love these strips as the colours coordinate with the collections, but there is a different pattern on each paper collection, so they look really fun when mixed together.  But keep in mind, these could just as easily have been strips of the actual patterned papers, or solid cardstock.  They could also be scrap strips of paper of all different sizes and widths.  They could even be white scraps that you colour up and then use to make cards like these. So many possibilities!

I hope you will come join me to watch the video of how these were made.  PLEASE CLICK HERE to watch the video.  Thanks everyone, and I hope you're having a great day!


Saturday, 22 June 2024

Easy Scene Cards *VIDEO*

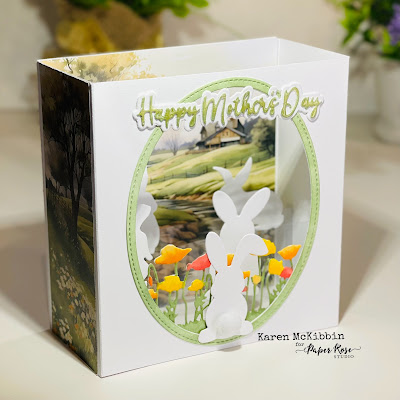
Hi everyone,  I've been playing with the Farmhouse Friends Background papers from Paper Rose Studio, and wow do they ever make for some easy scene cards!  My two cards are very dimensional so it was quite hard to photograph, but here's what they look like ...


Paper Rose Studio Supplies Used: Farmhouse Friends Backgrounds 6x6 Paper Collection 32022, Bunny Trio Large Metal Cutting Die 31935, Bunnies Small Metal Cutting Die 18718, Happy Mother's Day Layered Word Metal Cutting Die 31965, So Extra White 1.0 Supporting Sentiments 20165, Poppy Field Border Metal Cutting Die 18640, Wonky Picket Fence Metal Cutting Die 22762

The first card is a full size box card and while I made it just before Mother's Day here in Canada, it could easily be an Easter card, Father's Day card, birthday card or even a thank you card. And I've used bunnies to fill in the box, but it could be butterflies, die cut animals or gnomes, whatever you have in your stash that would fill in the front layers.  The second card is a Bay Window fold, so it's a bit like an easel card, only going sideways, and is super easy to make.  So I hope you will come join me to watch the video and see how these two cards were made.  PLEASE CLICK HERE  to see the video.

Thanks for stopping by everyone, and I hope you're having a great day!


Wednesday, 12 June 2024

Botanical Blooms Birthday Cards

Welcome back and I'm glad you've stopped by.  I have two cards to share today, both made from the beautiful Botanical Blooms 6 x 6" patterned paper from Paper Rose Studio.  These papers are so beautiful that I really didn't think they needed much more added to them.  Here's a look at my cards ... 


Paper Rose Studio Supplies Used:  Botanical Blooms 6x6 Paper Collection 32052, Happy Birthday A5 10pc Sentiment Sheets 30720 - Foil, Little Foliage 2 Metal Cutting Die 21102, Happy Peek-a-Boo Metal Cutting Die 16832.

For the first card which I'm going to call the blue card, I started by cutting a 5 1/2" x 5 1/2" square of the patterned paper.  I used the Peek-A-Boo Happy die to cut out the bottom third or so from the paper.  This die leaves the letters attached at the top and bottom, so the patterned paper stayed intact.  On another piece of white scrap cardstock, I did a little ink blending with different shades of blue using some Catherine Pooler inks (I'm sorry but I forgot to write down which inks I used).  I then die cut the Peek-A-Boo Happy from this now coloured cardstock.  I applied some VersaMark ink to the letters and then covered them with Ultra Thick Embossing powder and heat set them.  I repeated this two more times until the letters were smooth and glossy.  Then I trimmed the top and bottom off the letters so that they were now individual letters. I glued the botanical paper down to a 5 1/2" square card base, and then glued the embossed letters on top of the botanical paper layer.  I used some blueish ink again on some scrap cardstock and then die cut the Little Foliage 2 leaves out and tucked them in beside the Happy part of the sentiment. I had a little butterfly that was from the Rainbow Butterflies and Insects cut aparts that I glued to one of the leaves. And finally, I cut the birthday from one of the silver foiled sentiment strips, mounted it onto double sided foam tape and adhered it below the Happy sentiment. 

For the second card, I started with an A2 card base that is side folding.  I trimmed a piece of the botanical paper to cover the front and glued it in place.  Then I positioned the Peek-A-Boo Happy die at the top of my card and die cut out the letters from both the front and back of the card base.  There was a very thin strip of card left at the top of the letters, and I trimmed that off with my paper trimmer.  On a separate piece of scrap white cardstock, I did some ink blending to get a mix of pinks  and peachy tones.  I die cut the Peek-A-Boo Happy die from this also, and again, used my VersaMark ink and Ultra Thick Embossing powder to get a thick, glossy effect. I then trimmed the top and bottom off this to just get the letters separately.  I glued the letters onto the front of the card and added the gold foiled birthday sentiment just below.  Since the letters were die cut out of both the front and back of the card, when you open the card, there is a separate happy at the top of the inside of the card which is quite fun. 

Thank you for stopping by and I hope I've given you a little inspiration today!