Wednesday, 27 January 2021

Hedgehog Valentines Card

Hello everyone, I’ve got a fun little Valentines Day card to share with you today. I’ve used the sweet “Hedgehog with Gifts” stamp set from Gerda Steiner Designs to create this card. 


The background was made from ink blending on my card front with Distress Oxide inks in Worn Lipstick and Tattered Rose and then I splattered it with some gold and silver Starry Colours paints from Tsukineko. I die cut the border with one of the “Hearstrings” border dies from Sunny Studios. I mounted this on my card base and then stamped and clear embossed the sentiment below it on the card base.  The sentiment is from the “Valentine Penguins” stamp set from Gerda Steiner Designs. 

I copic coloured the hedgehogs and added a few eyelashes and a hair bow to the hedgehog I chose to be a girl. I also added a few hearts to the gift to add to the valentines theme. I used a craft knife to cut around the the hand that holds the gift on the male hedgehog, so I could put the ribbon behind his hand. I found the flowers as a small extra stamp in in one of my stamp sets and added that to his other hand. I mounted both the hedgehogs on foam tape and attached them to the background. Finally, I die cut some hearts from foiled cardstock and added them around the hedgehogs. 

I hope you’re having a great day and thanks for joining me today. 

Copic markers used: Body - C1, C2, E40, R00  Back - W7, W5, W2, N4, E53

Wednesday, 13 January 2021

Masculine Valentines Day Card with Video

Hello, and welcome back. I’ve got a Valentines Day card today that I think is a masculine one.  Every year I get excited about making some pretty pink and red Valentines cards with hearts and flowers, but come Valentines Day, none of these seem appropriate for my husband! So I tried hard not to get out the pink and reds for this one, except for a wee pop of pink on the inside. 


If you would like to see a video of how I made this card, PLEASE CLICK HERE.

I used the cutest frogs I could find, which were the “Frogs” stamp set from Gerda Steiner Designs and used copic markers to colour them in (YG11, YG03, YG17 and G20. For the spots, G94, YG67).  I had a background already made on my gel press so I used that for the background. I just ran it through a geometric 3D embossing folder from We R Memory Keepers after I had stamped on the sentiment which is from the Frogs stamp set. There is actually much more dimension on this card than the above image shows. The white frame is the Wood Frame from Hero Arts and once I had that attached, I adhered the card front to the base. 

For the heart, I dabbed the wet edges in some Distress Oxide ink in Tumbled Glass, Old Paper and Evergreen Bough. On the back, I spritzed the center with water and then carefully tore a hole in the heart. From the front, I kept pulling back the edges until I had a big enough hole for the frog to come out of. I was hoping to make it look like the frog was bursting out of the heart. After attaching the frog and his hands, I mounted the heart on foam adhesive and attached it to the front. Finally, I added some alcohol ink acetate hearts to make it look like the hearts were falling out of the bigger heart. 

On the inside, I used some packaging acetate to cut a 1/2 - 3/4” wide strip for the frog to be mounted on, and used another small piece to attach some hearts above the fogs’ head. I attached all of the acetate with double sided tape and then glued a second diecut behind the frog to sandwich in the acetate. 

For the border, I used two pieces of cardstock, each with a scoreline I made at 1/4” from the bottom, and die cut a cattails border. The back piece needs to be a reverse image, so I diecut this with the wrong side of the cardstock facing up. This border can be anything you want - I think grass, hills or even a heart border would be fun. When I had the border cut, I turned the flaps to the back and creased them with a bone folder. I placed 1/8” double sided tape along the flap. Next, I adhered the leaping frog to the back border piece, glueing it where it touched the grass, and using double sided tape at the bottom. Then I glued the front border to the back border by only glueing together the top third to half of the borders. You need to leave the bottom unattached so it will form the pop up. I stamped my inside sentiment next. Finally, I opened the flaps of both borders so they were straight, removed the backing from the adhesive on the back border, and lined it up so the edge ran along the inside crease on the top half of the card. After pressing it down, I removed the backing on the adhesive on the front border, closed the card and pressed down to make sure it was adhered. 

These inside pop up cards are really easy to do and they add so much fun to the inside of a card. I love that extra little surprise the recipient gets when they open the card. Thanks for joining me for this card and I hope you’re having a great day!


Wednesday, 6 January 2021

Bee Happy Birthday Card

Hello and happy New Year to all of you!  Hopefully, 2021 will be a much more positive, happy year for all of us.  

I’ve got a birthday card today that I actually made for my mom who has just moved into a new retirement home at the beginning of December. With two weeks of quarantining and not being allowed to visit family over Christmas, it’s been a tough start for her. So I wanted a cheerful, happy card for her and I hope you’ll think this one fits the bill.


I made the background by using alcohol inks in a laminating folder (I originally had intended to do something else), but the alcohol ink on either acetate or Yupo paper would also work.  I used Ranger inks in Teakwood, Pearl Alchemy, and Butterscotch.  Once it was dry, I ran it through my laminator and cut it down to fit my frame size.  I used a hexagon die from Papertrey Ink for the background and diecut it from gold cardstock. I trimmed out just a few of the hexagons to use on my panel.  The frame was cut from a Double Stitch Rectangle Frame die from Poppy Stamps and I also cut it from the same gold cardstock.

The bee and flower images are all from a Gerda Steiner Design stamp set called Happy Bee Day, and I just stamped multiple flower images and chose the “Bee Happy” sentiment to put in the message area on the bee. I also stamped the bee’s hands and message a second time, fussy cut it out, and then mounted the message on foam tape to give it some dimension.  Isn’t that just the happiest bee?!  I added some dark blue beads to the flower centers and a sparkle pen on the bee’s wings.  

To assemble everything, I added some foam tape to the frame and then glued everything else in place.  Thanks so much for joining me today, and I hope you’re having a great day.


Wednesday, 30 December 2020

Hedgehog Thank You Card

Hello and thanks for stopping by. I hope everyone had a very happy Christmas, however it was celebrated this year. I’m finding myself very much in need of some thank you cards at the moment, and luckily the Hedgehog with Gifts stamp set from Gerda Steiner Designs has come to my rescue. There are so many great sentiments in this set, and I just couldn’t decide which ones to use, so I used them all! *Big grin*


I started my card by making two rows of sentiments in my stamp positioner and then stamped with Versamark ink onto my card front that I had used an anti-static powder bag on. I started at the top of my card, and then just shifted my card front up in my stamp positioner to stamp the next two lines. Once the whole card front was stamped, I added white embossing powder and heat set it. Then I ink blended the background with Distress Oxide inks in Rustic Wilderness, Evergreen Bough, Twisted Citron, and a little Speckled Egg. From white cardstock, I die cut a semi-circle and a strip of cardstock for my sentiment. I ink blended these with Speckled Egg and a little Rustic Wilderness around the edges.  I again, stamped and white heat embossed the sentiment on the strip of cardstock. 

I chose two of the three hedgehogs in this adorable stamp set and one of the gifts. When I googled hedgehogs, they have slightly darker markings around their noses, so I tried to be brave and added in some darker lines.  I have to confess, I’m a little undecided whether I like it better or not, but I wanted to give it a try.  I’ve listed the copic markers I used down below if you’re interested. I cut around the paw on the hedgehog holding the gift and then mounted the hedgehogs and sentiment on foam tape. Finally, I centered the semi-circle on the card front and attached the sentiment and hedgehogs. This was a quick and simple card to make, but those hedgehogs just steal the show!

Copic Markers used:

Hedgehogs: BODY - C1, E40, R00, N0.  BACK - W7, W5, W2, N4, E53.  FACE - W1, W3, N2

Gift - Y08, Y38, YR27 and a gold DecoColor pen for the ribbon.


Wednesday, 16 December 2020

Fun with Penguins!

Hello and thanks for stopping by! I’ve been having a little too much fun with a new stamp set from Gerda Steiner Designs called Happy Holiday Penguin.  I’ve made three cards with it, and because we’re so close to Christmas, I’ve decided to share them all with you today.  So I hope you have your coffee at hand, as this is a rather long post!


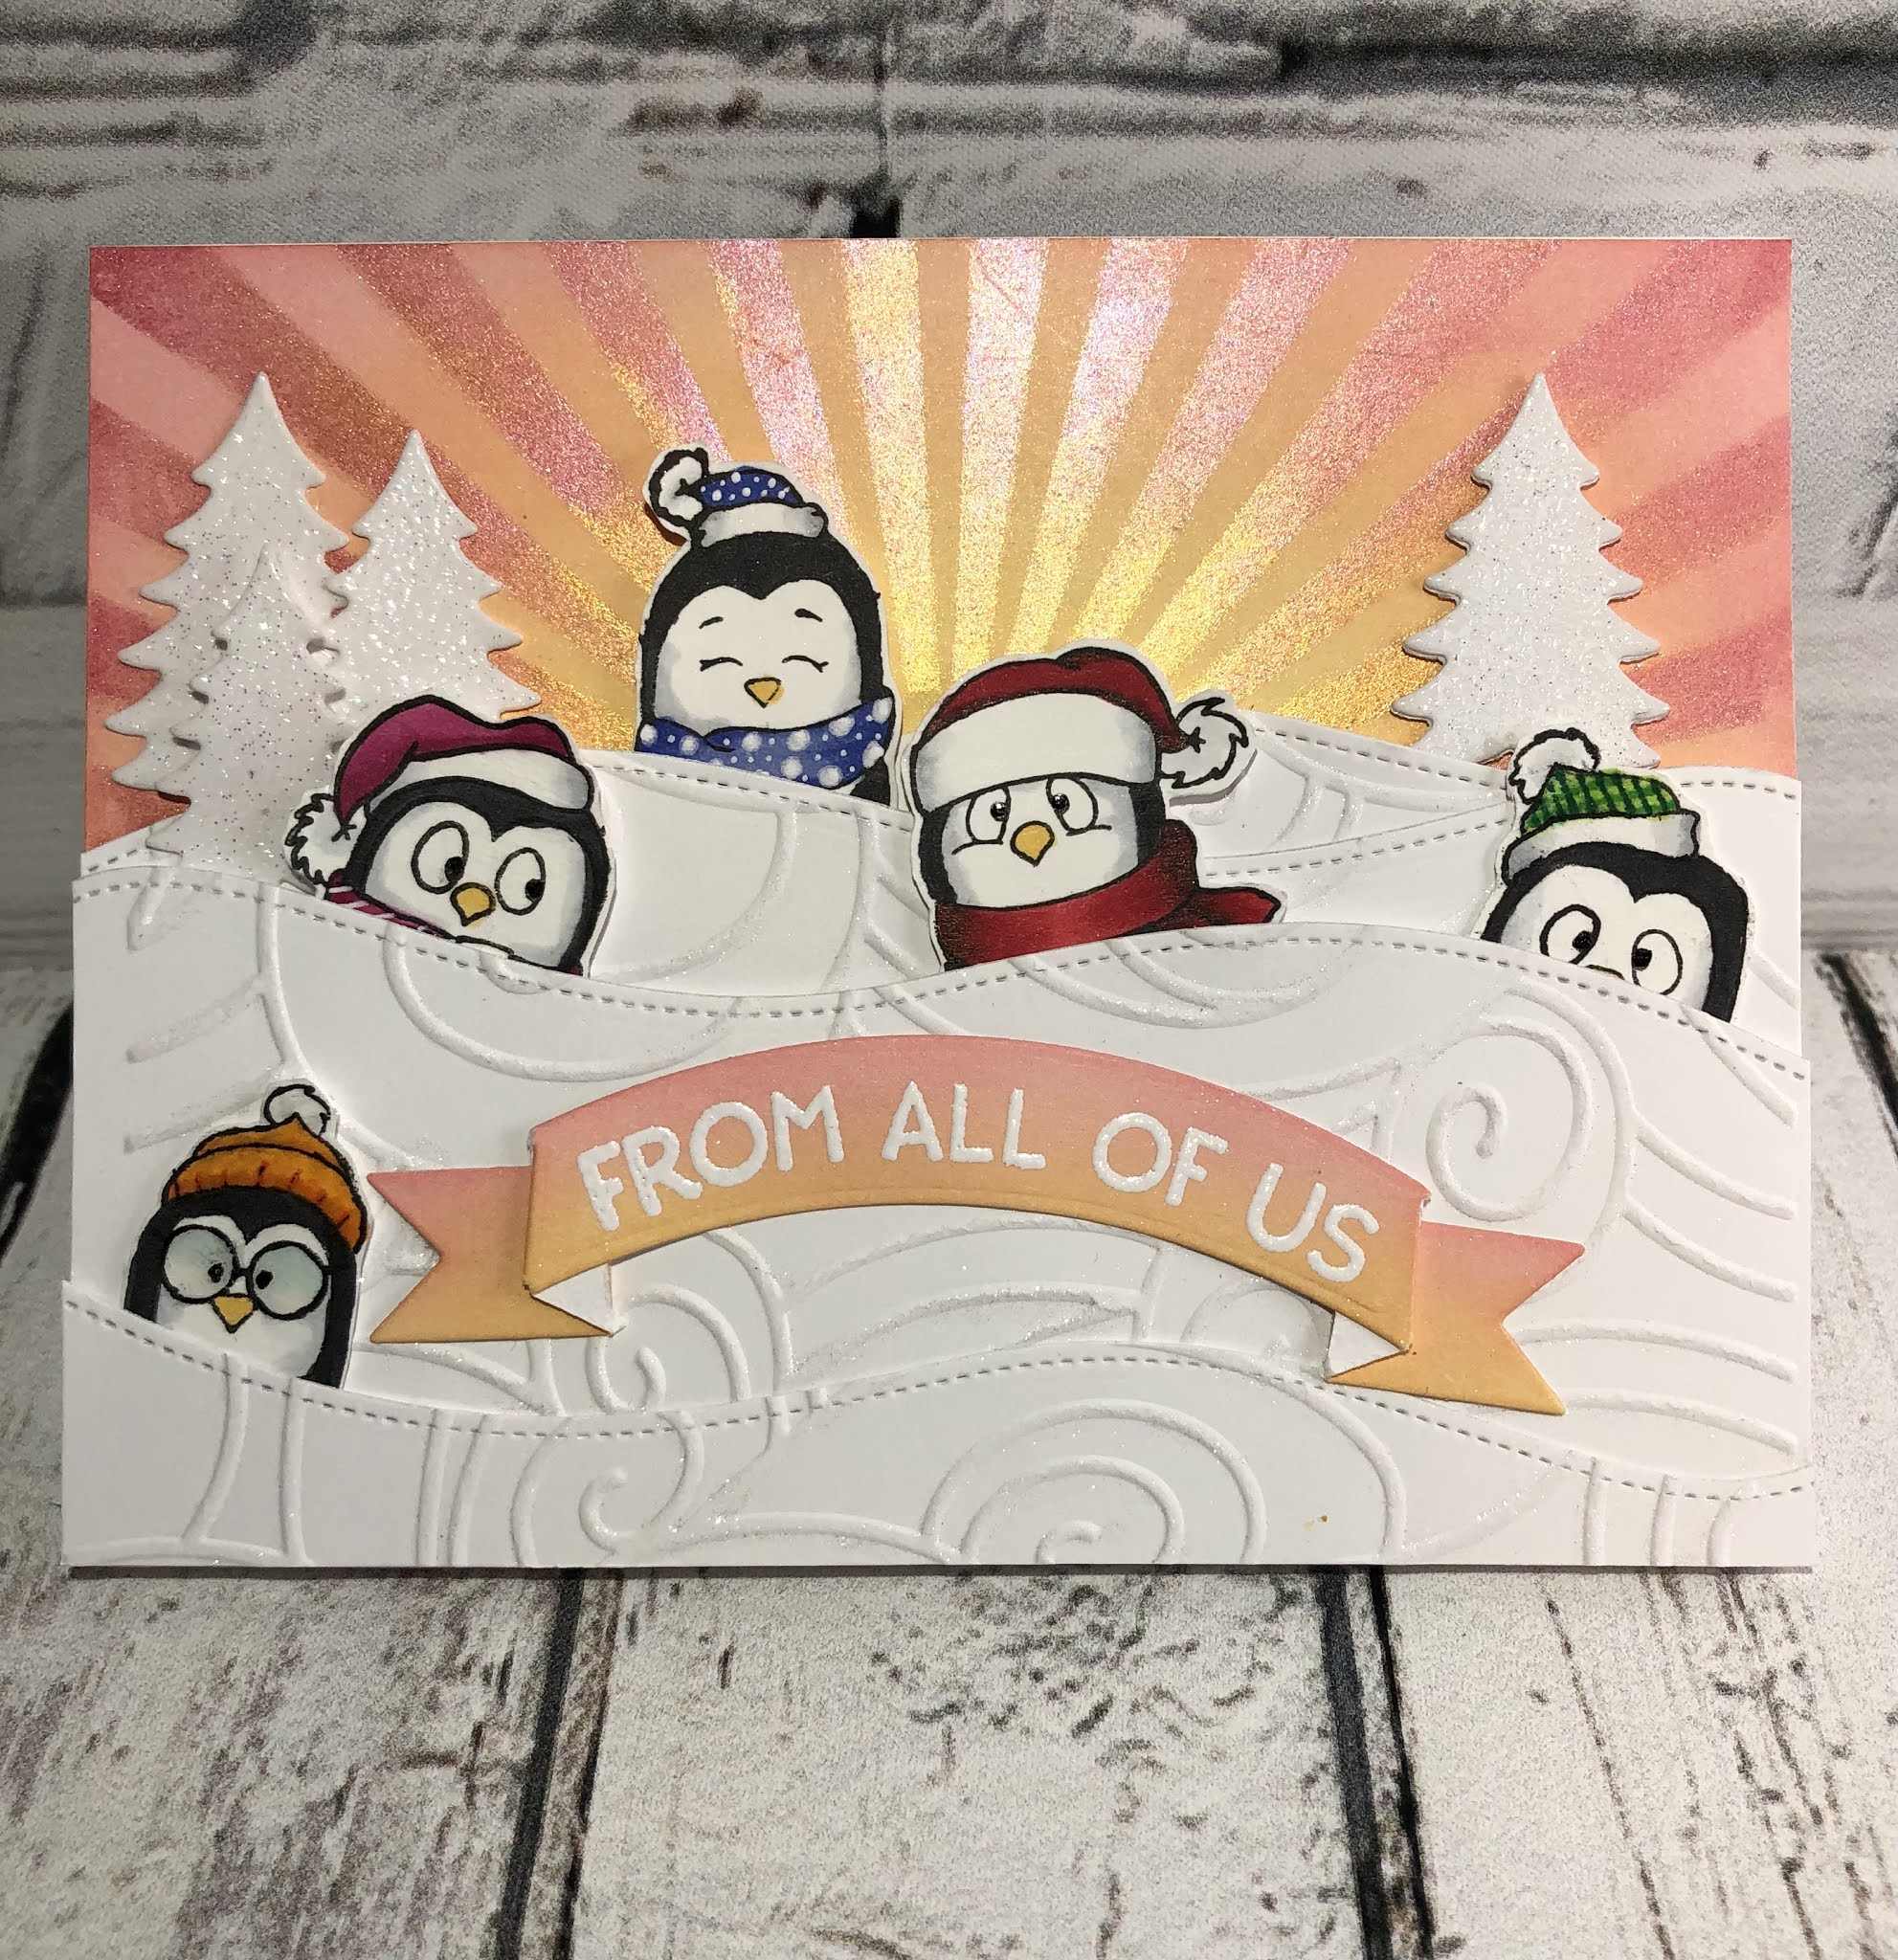
I created the front of this card by ink blending in Distress Oxide ink in Squeezed Lemonade, Dried Marigold, and Worn Lipstick.  I placed a sunray stencil over top (mine was MFT Stamps Radiating Rays), dabbed on some Versamark ink and then brushed on some PearlEx powder which gave it a lot of shine and more colour.  Next, I die cut some snowbanks and dry embossed them (my folder was from Lifestyle Crafts but had no name on it).  I used a Nuvo shimmer pen over the raised edges of the embossing.  To get the individual penguin images, I masked off alternating penguins and filled in with a copic multiliner pen as needed. I only coloured in the top of the images as they would be hidden behind the snow. For the banner, I ink blended a scrap of cardstock in Dried Marigold and Worn Lipstick before white heat embossing the sentiment which is from the stamp set.  I added a few trees from Sunny Studios Woodland Borders die set that I had heat embossed with some Hero Arts Sparkle embossing powder.  On the inside, I stamped the “birthday” sentiment from the “Meerkats on the Lookout “ set from GSD Stamps before gluing my image above it.  I coloured in the “happy” with a gold DecoFoil pen so it has a lot of shine to it.  This card would be so easy to adapt to whatever holiday was being celebrated by just changing the inside sentiment.


In my second card, I’ve also got the adorable little Tangled Penguin with the other penguins.  I somehow had the idea that these penguins were floating by each other on icebergs, wishing each other a merry Christmas.  Weird, I know!

This is a Double Z fold card so the inside image is hidden from the front of the card when it’s closed.  I’ve made a video previously on how to make this style of card, so if you want more detailed instructions, here is the link to the video.

I ink blended the background sky using the Cloud Edger stencil from A Colorful Life Designs, using Distress Oxide inks in Warm Honey, Worn Lipstick, Shaded Lilac, and Stormy Sky. I die cut a wave border from some blue cardstock I had in my stash and glued that to my card base.  I made the second wave border out of some Brusho crystals and Nuvo shimmer powders and then die cut another wave border.  I needed help with drawing the icebergs, so I pulled out my “Make a Splash” stamp set from Craft Consortium and copied the one there. After copic colouring all my images, I glued them to my card base, being careful to keep the inside iceberg and penguins hidden inside.  The sentiment on the front of the card is from MFT Stamps Bitty Holiday Wishes and I stamped it in Stormy Sky Distress Oxide ink.  Finally, I added some sparkle pen to the icebergs and glossy accents to the Christmas lights.


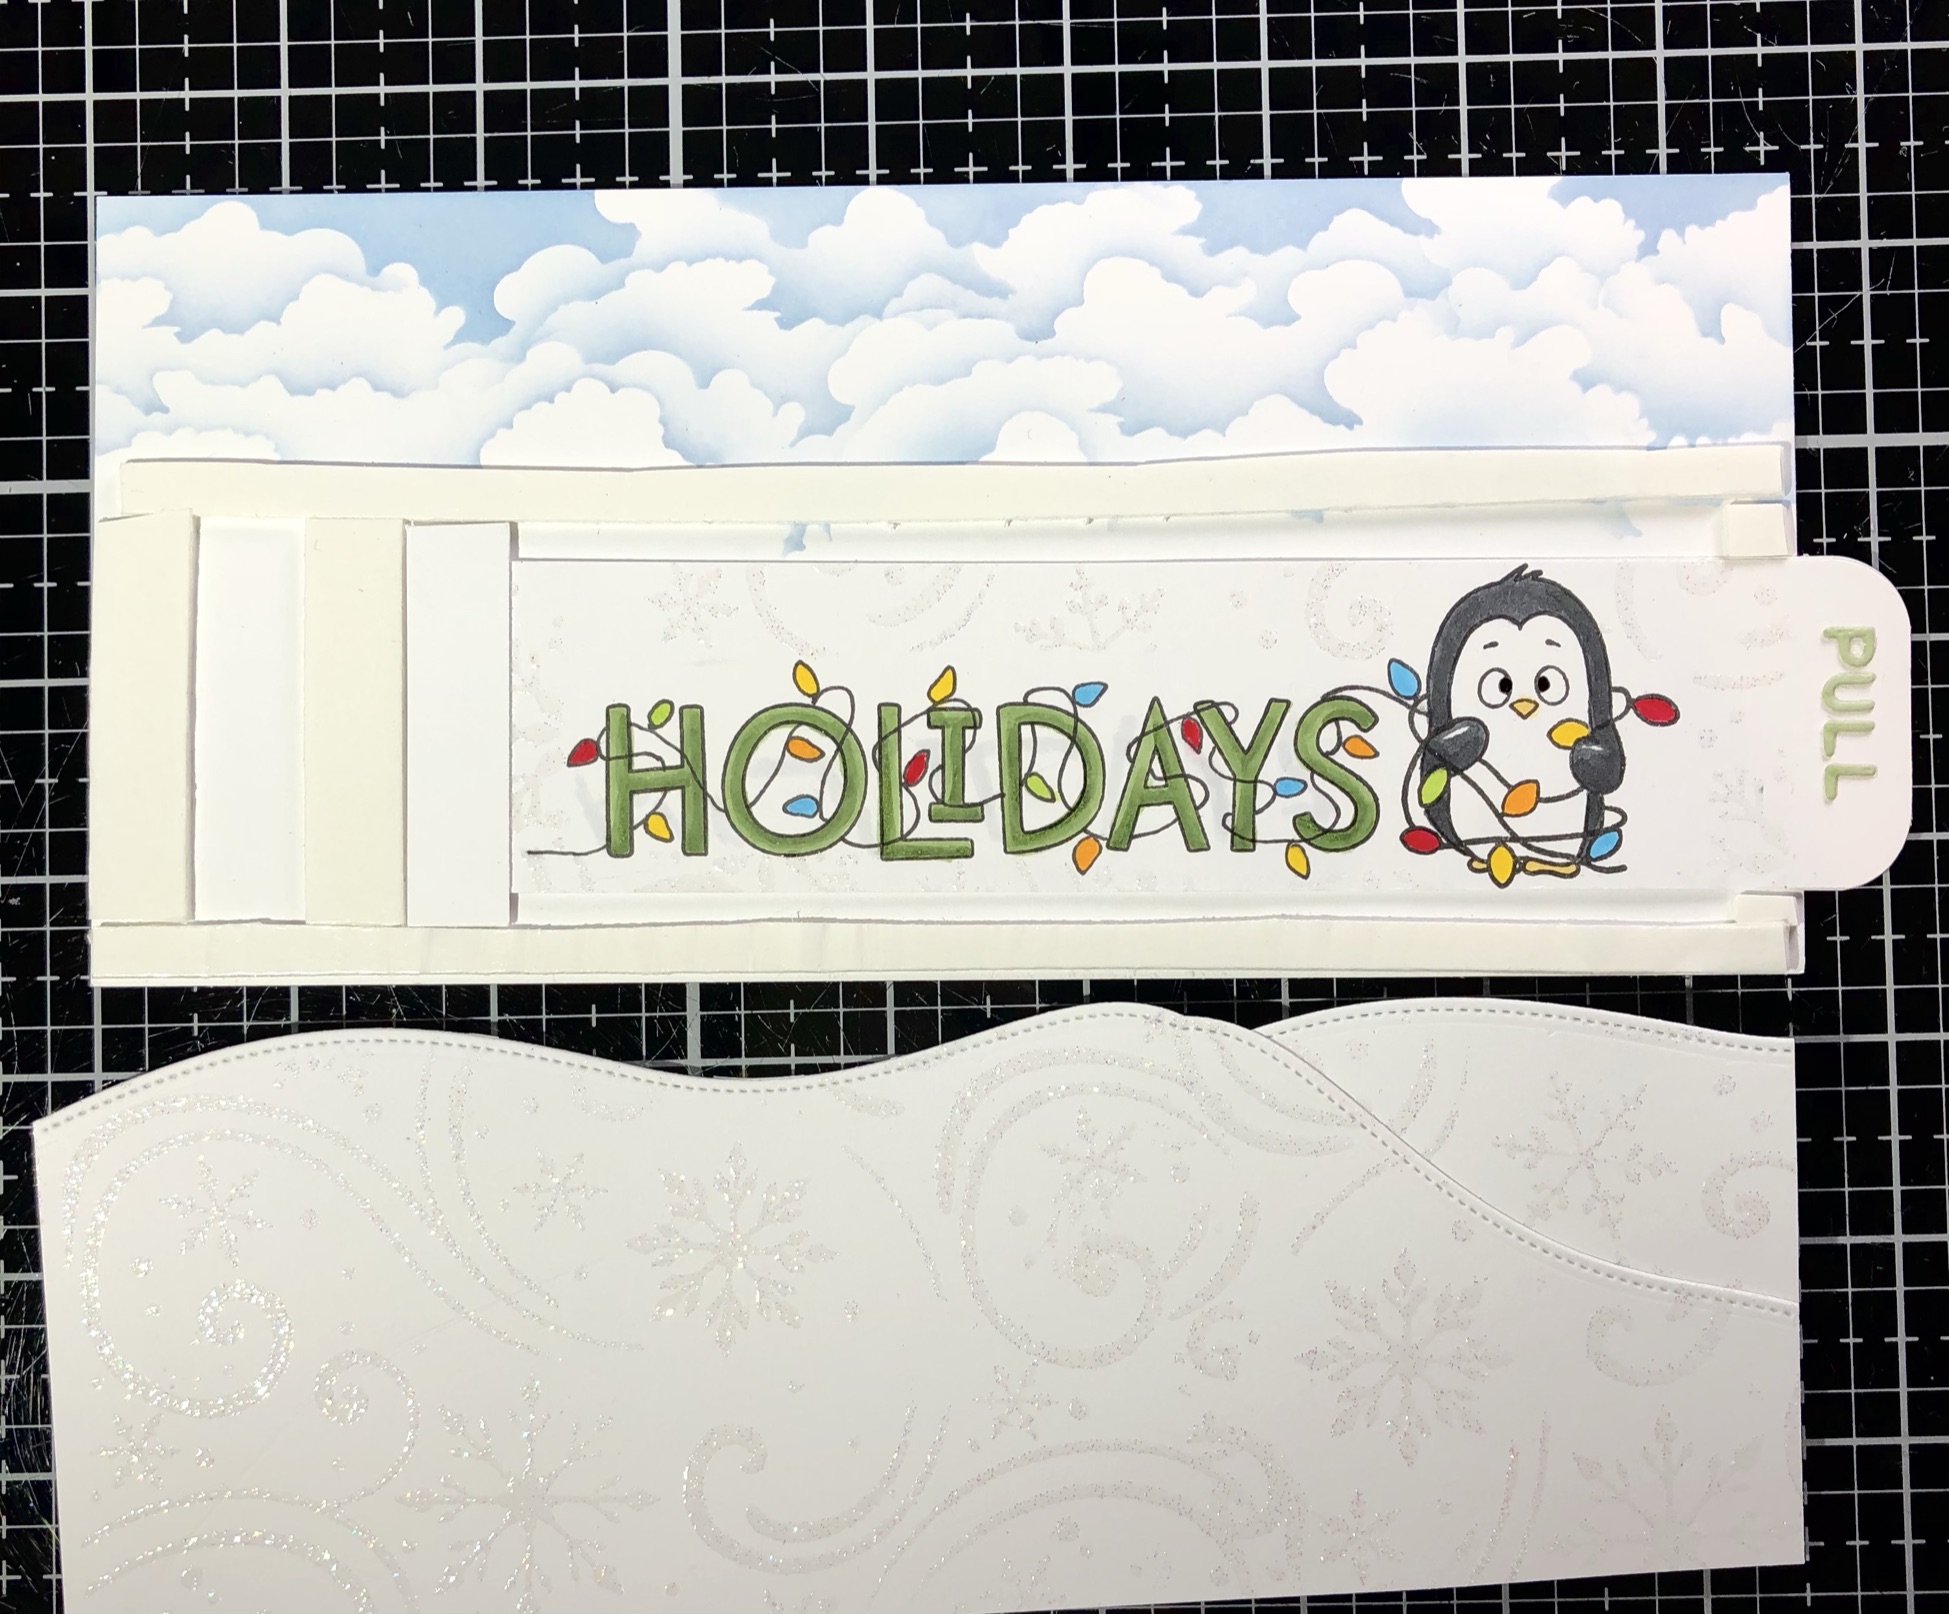
My final card is an 8 x 4” slimline pullout card and again has the Tangled Penguin with the other penguins, only he’s having a little more trouble now! I had intended to make a video for this card but just ran out of time, so I’m hoping the photos will be enough of an explanation.  

I used the Cloud Edger stencil and Stormy Sky Distress Oxide ink for the sky.  After die cutting the snowbanks, I used a snowflake stencil (mine is Snowflake Swirls from Echo Park) with Versamark ink, before heat embossing it with sparkle embossing powder. The trees are also embossed with the sparkle embossing powder and are again, from the Sunny Studios Woodland Borders die set. 

To create the pull tab, I stamped the “Holidays” sentiment next to the tangled Penguin and then drew some lights through the word in a very tangled pattern with a copic multiliner pen.  I also used the same stencil and embossing powder to add the snowflake swirls to the pull tab.  Next, I added two strips of scrap cardstock at the left hand edge to create a stopper.  Finally, I added the word “pull” on the right edge and corner rounded those edges.


I created a channel for the pull tab by applying foam tape along the bottom edge of the card, and above the upper edge of the stopper on the pull tab.  I also placed foam tape to the left of where the pull tab would stop (so it wouldn’t disappear into the card), and two small pieces of foam tape at the opening edge to prevent the tab from pulling all the way out.  


Next, I placed the tab inside the channel, removed the backing paper from the foam tape, and adhered the snowbanks over top to cover all the tape.  


I finished decorating the front of the card by adding the holiday penguins, the embossed trees and a little string of lights leading to the pull tab (this was my son’s idea and I loved it!).   

If you have managed to stay with me up to this point, huge kudos to you! I’m sorry for this being such a looooong post, but I wanted to share these ideas with you.  Thanks again for stopping by and I hope everyone has a wonderful Christmas!!


Friday, 4 December 2020

A Dog and a Bone Christmas

Hello again, I hope you’re having a great day.  I love these images from Anita Jerem of the Colorado Craft Company (Christmas Presents stamp set) and couldn’t wait to start playing with them. 


I copic coloured the image and fussy cut it out.  I also diecut the Merry from MFTStamps about 4 times and stacked them up.  I really like the look of tone on tone white, but I felt that something was still missing. So I used a CZ Designs stencil from Simon Says Stamp and added some Distress crackle paste in white. When it dries, it gives so much texture and interest to the background. The frame is from Poppy Stamps Double Stitched Rectangle Frames, and I die cut 3 of them.  I also cut an inner frame from foiled cardstock.  The ornaments are from a Gerda Steiner Designs stamp set called Reindeer and a Tree. 

This was such a fun, quick card to make and I absolutely love that image! I know there is no way at our house, that the bone shaped gift would remain under the tree to be admired!! *grin*